Ana içeriğe geç

Bu sürüm, hatalı düzenlemeler içerebilir. En son doğrulanmış bellek kopyası dönün.

Neye ihtiyacın var

  1. , Ön Panel Düzeneği: adım 1, 1 resimden 1.
    • İşleme başlamadan önce, iPhone'unuzun pil gücünü %25'in altına düşürün. Şarj edilmiş lityum-iyon piller, yanlışlıkla delinmesi halinde alev alabilir ya da patlayabilir.

    • Sökme işlemine başlamadan önce iPhone'unuzu kapatın.

    • Tercümeyi buraya girin

  2. : adım 2, 3 resimden 1. : adım 2, 3 resimden 2. : adım 2, 3 resimden 3.
    • Eğer ekran camınız çatlamış ise, cama hafifçe vurarak, daha fazla kırılmayı kontrollü bir şekilde yapın ve tamir esnasında gövdenin de zarar görmesini engelleyin.

    • Temiz koli bandı şeritlerini üstüste gelecek şekilde yapıştırarak, iPhone'un ekranını tamamen kaplayın.

    • Bu işlem, cam kırıklarını zapteder, ekranı oynatırken ve kaldırırken de yapısal bütünlüğü sağlar.

    • Tamir esnasında ortaya saçılan cam kırıklarından gözlerinize zarar gelmemesi için koruyucu gözlük kullanın.

  3. Bu adım çevrilmemiş. Çevrilmesine yardım edin

    : adım 3, 3 resimden 1. : adım 3, 3 resimden 2. : adım 3, 3 resimden 3.
    • In the following steps you will be pulling the display up out of the phone body. The display is composed of a glass screen and a plastic bezel with metal clips.

    • Regardless of the tool you use, you need to be sure you pull up the entire display.

    • If the glass begins to separate from the plastic, as shown in the first image, slide a plastic opening tool between the plastic frame and the metal phone body to pry the metal clips out of the case.

    • If you are reassembling a phone with a separated display bezel, you may want to place a thin strip of adhesive between the plastic bezel and the glass to keep the phone closed.

  4. Bu adım çevrilmemiş. Çevrilmesine yardım edin

    : adım 4, 3 resimden 1. : adım 4, 3 resimden 2. : adım 4, 3 resimden 3.
    Bu adımda kullanılan alet:
    Anti-Clamp
    $24.95
    Satın Al
    • The next two steps demonstrate the Anti-Clamp, a tool we designed to make the opening procedure easier. If you aren't using the Anti-Clamp, skip down two steps for an alternate method.

    • For complete instructions on how to use the Anti-Clamp, check out this guide.

    • Pull the blue handle backwards to unlock the Anti-Clamp's arms.

    • Slide the arms over either the left or right edge of your iPhone.

    • Position the suction cups near the bottom edge of the iPhone just above the home button—one on the front, and one on the back.

    • Squeeze the cups together to apply suction to the desired area.

    • If the surface of your iPhone is too slippery for the Anti-Clamp to hold onto, you can use the included tape pad to create a grippier surface.

  5. Bu adım çevrilmemiş. Çevrilmesine yardım edin

    : adım 5, 3 resimden 1. : adım 5, 3 resimden 2. : adım 5, 3 resimden 3.
    • Pull the blue handle forwards to lock the arms.

    • Turn the handle clockwise 360 degrees or until the cups start to stretch.

    • Make sure the suction cups remain aligned with each other. If they begin to slip out of alignment, loosen the suction cups slightly and realign the arms.

    • Insert an opening pick under the screen when the Anti-Clamp creates a large enough gap.

    • If the Anti-Clamp doesn't create a sufficient gap, rotate the handle a quarter turn.

    • Don't crank more than a quarter turn at a time and wait a few seconds between turns. Let the Anti-Clamp and time do the work for you.

    • Skip the next two steps.

  6. Bu adım çevrilmemiş. Çevrilmesine yardım edin

    : adım 6, 1 resimden 1.
    • If you don't have an Anti-Clamp, use a single suction cup to lift the front panel:

    • Press a suction cup onto the screen, just above the home button.

    • Be sure the cup is completely on the screen to get a tight seal.

  7. Bu adım çevrilmemiş. Çevrilmesine yardım edin

    : adım 7, 1 resimden 1.
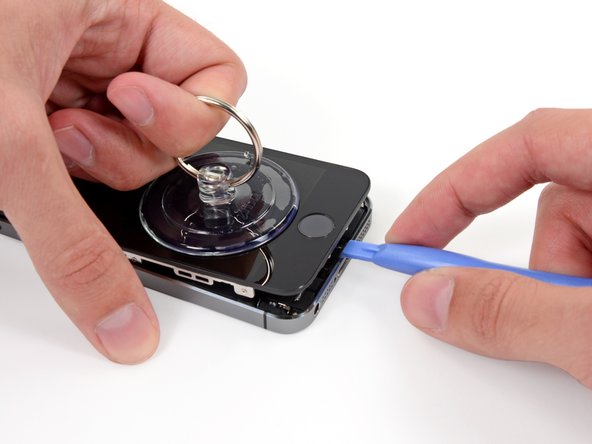
    • The front panel is attached with clips, and there are several ribbon cables connecting it to the rest of the phone. Your goal here is to release the clips and open the phone only enough to disconnect the cables. Go slowly and carefully to avoid damage.

    • Make sure the suction cup is firmly attached to the front panel assembly near the home button.

    • While holding the iPhone down with one hand, pull up on the suction cup to slightly separate the home button end of the front panel from the rear case.

    • With a plastic opening tool, gently pry the edges of the rear case down, away from the front panel assembly, while you pull up with the suction cup.

    • Take your time and apply firm, constant force. The front panel assembly is a much tighter fit than on most other devices.

  8. Bu adım çevrilmemiş. Çevrilmesine yardım edin

    : adım 8, 2 resimden 1. : adım 8, 2 resimden 2.
    • Do not try to completely remove the front panel assembly from the rear case, as there are several delicate ribbon cables connecting them.

    • Pull the plastic nub to release the vacuum seal on the suction cup.

    • Remove the suction cup from the screen.

  9. Bu adım çevrilmemiş. Çevrilmesine yardım edin

    : adım 9, 3 resimden 1. : adım 9, 3 resimden 2. : adım 9, 3 resimden 3.
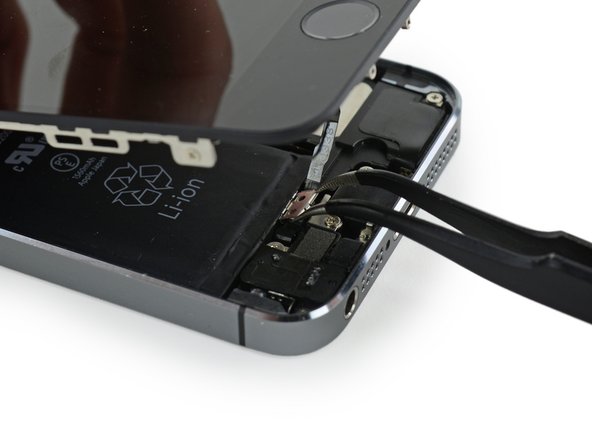
    • Open the phone just enough to reveal the metal bracket covering the home button cable.

    • Do not open the phone too far or you risk damaging the home button cable, or the socket it plugs into. Keep the cable loose—if it is stretched taut, that's too far.

    • Only the phone's original home button assembly will be capable of using the Touch ID functionality. If you rip the cable, installing a new home button will only restore ordinary home button functions, not the Touch ID features.

    • Use the tip of a spudger to push the bracket free and remove it with tweezers.

    • The next two steps apply to reassembly. Skip them and continue to Step 12 until reassembly.

  10. Bu adım çevrilmemiş. Çevrilmesine yardım edin

    : adım 10, 2 resimden 1. : adım 10, 2 resimden 2.
    • During reassembly, you will need to reinstall the Touch ID cable bracket. The top of the bracket needs to slide between the battery and Touch ID cable connector, in front of the metal tab. The bottom must latch down over the connector.

    • Slide the top of the bracket over the Touch ID cable connector from left to right.

  11. Bu adım çevrilmemiş. Çevrilmesine yardım edin

    : adım 11, 2 resimden 1. : adım 11, 2 resimden 2.
    • During reassembly, use the flat end of a spudger to snap the front portion of the Touch ID cable bracket down over the cable connector.

    • If the bracket does not snap down flush, you may need to remove the bracket and slide it over the cable connector again for a better fit.

  12. Bu adım çevrilmemiş. Çevrilmesine yardım edin

    : adım 12, 2 resimden 1. : adım 12, 2 resimden 2.
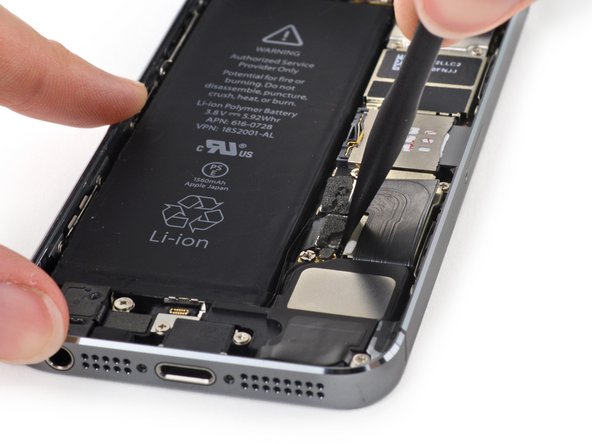
    • Use the tip of a spudger to pry the home button cable connector up out of its socket.

    • Be sure you're separating the cable connector from its socket, and not prying the entire socket up. The socket is on its own glued-down cable that can be pried up if you aren't careful.

  13. Bu adım çevrilmemiş. Çevrilmesine yardım edin

    : adım 13, 3 resimden 1. : adım 13, 3 resimden 2. : adım 13, 3 resimden 3.
    • Once the connector has been released, pull the home button end of the assembly away from the rear case, using the top of the phone as a hinge.

    • Open the display to about a 90º angle, and lean it against something to keep it propped up while you're working on the phone.

    • Add a rubber band to keep the display securely in place while you work. This prevents undue strain on the display cables.

    • In a pinch, you can use an unopened canned beverage to hold the display.

  14. Bu adım çevrilmemiş. Çevrilmesine yardım edin

    : adım 14, 1 resimden 1.
    • Remove the two 1.6 mm Phillips #000 screws securing the metal battery connector bracket to the logic board.

  15. Bu adım çevrilmemiş. Çevrilmesine yardım edin

    : adım 15, 1 resimden 1.
    • Remove the metal battery connector bracket from the iPhone.

  16. Bu adım çevrilmemiş. Çevrilmesine yardım edin

    : adım 16, 2 resimden 1. : adım 16, 2 resimden 2.
    • Use the flat end of a spudger to gently pry the battery connector up from its socket on the logic board.

    • Be very careful to only pry up on the battery connector itself and not the socket on the logic board. If you pry up on the logic board socket or the board itself, you may destroy the socket or damage nearby components on the board.

  17. Bu adım çevrilmemiş. Çevrilmesine yardım edin

    : adım 17, 1 resimden 1.
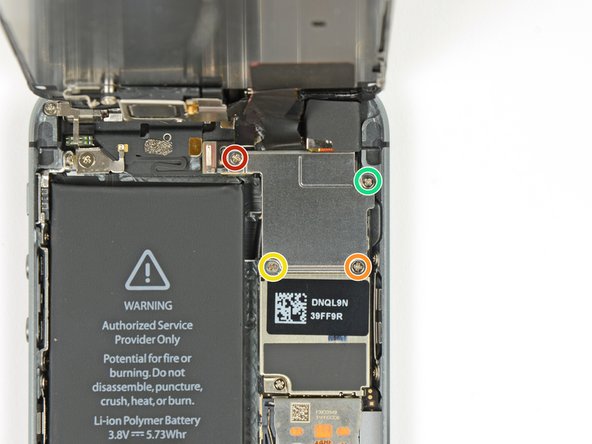
    • Remove the following screws securing the front panel assembly cable bracket to the logic board:

    • One 1.7 mm Phillips #000 screw

    • One 1.2 mm Phillips #000 screw

    • One 1.3 mm Phillips #000 screw

    • One more 1.7 mm Phillips #000 screw

    • This 1.7 mm screw tends to not be attracted to a magnetized screwdriver. Take care not to lose it when removing.

    • It is especially important to keep track of your screws in this step for reassembly. Accidentally using the 1.3 mm screw or one of the 1.7 mm screws in the bottom right hole will result in significant damage to the logic board causing the phone to no longer boot properly.

    • Be careful not to over-tighten the screws, and don't force them. If they don't fit easily when you are securing them, they may be the wrong size.

  18. Bu adım çevrilmemiş. Çevrilmesine yardım edin

    : adım 18, 1 resimden 1.
    • Remove the front panel assembly cable bracket from the logic board.

  19. Bu adım çevrilmemiş. Çevrilmesine yardım edin

    : adım 19, 2 resimden 1. : adım 19, 2 resimden 2.
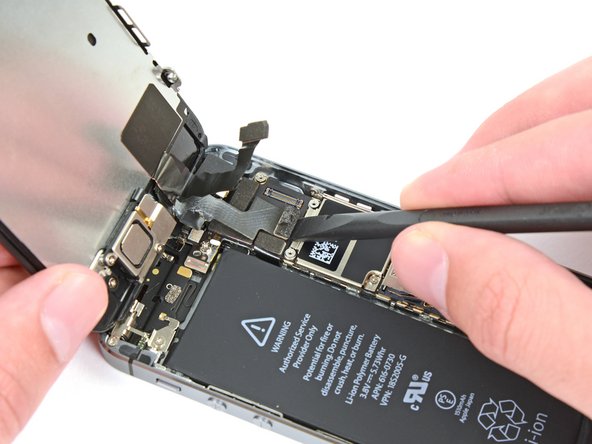
    • Use a spudger or a fingernail to disconnect the front-facing camera and sensor cable.

  20. Bu adım çevrilmemiş. Çevrilmesine yardım edin

    : adım 20, 2 resimden 1. : adım 20, 2 resimden 2.
    • Make sure the battery is disconnected before you disconnect or reconnect the cable in this step.

    • Disconnect the LCD cable connector.

    • When reassembling your phone, the LCD cable may pop off the connector. This can result in white lines or a blank screen when powering your phone back on. If that happens, simply reconnect the cable and power cycle your phone. The best way to power cycle your phone is to disconnect and reconnect the battery.

  21. Bu adım çevrilmemiş. Çevrilmesine yardım edin

    : adım 21, 2 resimden 1. : adım 21, 2 resimden 2.
    • Finally, disconnect the digitizer cable connector.

  22. Bu adım çevrilmemiş. Çevrilmesine yardım edin

    : adım 22, 1 resimden 1.
    • Remove the front panel assembly from the rear case.

  23. Bu adım çevrilmemiş. Çevrilmesine yardım edin

    : adım 23, 2 resimden 1. : adım 23, 2 resimden 2.
    • Insert a SIM card eject tool or a paperclip into the small hole in the SIM card tray.

    • Press to eject the tray. This may require a significant amount of force.

  24. Bu adım çevrilmemiş. Çevrilmesine yardım edin

    : adım 24, 1 resimden 1.
    • Remove the SIM Card tray assembly from the iPhone.

    • When reinserting the SIM card, ensure that it is in the proper orientation relative to the tray.

  25. Bu adım çevrilmemiş. Çevrilmesine yardım edin

    : adım 25, 2 resimden 1. : adım 25, 2 resimden 2.
    • Use a spudger to gently pry the button assembly cable up from its socket on the logic board.

    • Be very careful to only pry up on the connector and not the socket on the logic board. If you pry up on the logic board socket, you may break the connector entirely.

  26. Bu adım çevrilmemiş. Çevrilmesine yardım edin

    : adım 26, 3 resimden 1. : adım 26, 3 resimden 2. : adım 26, 3 resimden 3.
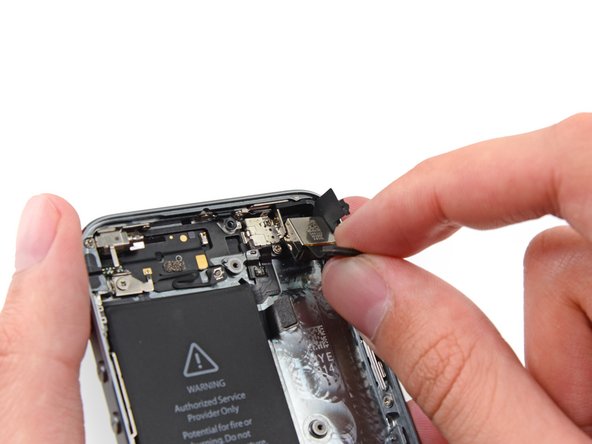
    • Use a spudger to pry the Lightning connector cable up from its socket on the logic board.

    • Fold the Lightning connector cable out of the way of the logic board.

  27. Bu adım çevrilmemiş. Çevrilmesine yardım edin

    : adım 27, 2 resimden 1. : adım 27, 2 resimden 2.
    • Use the tip of a spudger to pry the antenna cable up from its socket on the logic board.

  28. Bu adım çevrilmemiş. Çevrilmesine yardım edin

    : adım 28, 2 resimden 1. : adım 28, 2 resimden 2.
    • Use the flat end of a spudger to disconnect the rear-facing camera cable from its socket on the logic board.

  29. Bu adım çevrilmemiş. Çevrilmesine yardım edin

    : adım 29, 1 resimden 1.
    • Remove any tape covering the camera flash bracket.

  30. Bu adım çevrilmemiş. Çevrilmesine yardım edin

    : adım 30, 1 resimden 1.
    Bu adımda kullanılan alet:
    Standoff Screwdriver for iPhones
    $5.49
    Satın Al
    • Remove the following screws from the logic board:

    • One 2.4 mm Phillips #000 screw

    • This screw also holds a small metal contact beneath the logic board. It's held in place underneath a plastic bracket, but if you see it slipping out, refer to this step to remove it.

    • Two 2.3 mm Phillips #000 screws

    • Four 2.8 mm standoff screws

    • Standoff screws are best removed using a standoff screwdriver or bit.

    • In a pinch, a small flathead screwdriver will do the job—but use extra caution to ensure it doesn't slip and damage surrounding components.

  31. Bu adım çevrilmemiş. Çevrilmesine yardım edin

    : adım 31, 2 resimden 1. : adım 31, 2 resimden 2.
    • Use a plastic opening tool to lift the logic board up enough to grab with your fingers.

  32. Bu adım çevrilmemiş. Çevrilmesine yardım edin

    : adım 32, 3 resimden 1. : adım 32, 3 resimden 2. : adım 32, 3 resimden 3.
    • Pull the logic board slightly away from the rear facing camera.

    • Do not try to remove the logic board just yet, as it is still connected by an antenna cable on the back.

    • Flip the logic board toward the battery, as if you are turning the page in a book.

  33. Bu adım çevrilmemiş. Çevrilmesine yardım edin

    : adım 33, 2 resimden 1. : adım 33, 2 resimden 2.
    • Use the flat end of a spudger to disconnect the antenna cable on the back of the logic board.

    • Remove the logic board from the iPhone.

  34. Bu adım çevrilmemiş. Çevrilmesine yardım edin

    : adım 34, 3 resimden 1. : adım 34, 3 resimden 2. : adım 34, 3 resimden 3.
    • At this point, a small metal plate near the rear facing camera is loose and may come free from its recess.

    • Because it is very small and easy to lose, it's best to remove this plate and set it aside while you continue to work on your phone.

    • Use tweezers to remove the plate from beneath the bracket to the left of the rear-facing camera.

    • When reassembling, orient the plate with the small tab to the right and the longest flat edge against the top of the phone.

  35. Bu adım çevrilmemiş. Çevrilmesine yardım edin

    : adım 35, 3 resimden 1. : adım 35, 3 resimden 2. : adım 35, 3 resimden 3.
    • Using a pair of tweezers, flip the rubber camera cover out of its clip and toward the outside of the rear case.

    • Do not attempt to fully remove this cover. It is attached to the rear case and only needs to be flipped open, not removed.

  36. Bu adım çevrilmemiş. Çevrilmesine yardım edin

    : adım 36, 3 resimden 1. : adım 36, 3 resimden 2. : adım 36, 3 resimden 3.
    • Remove the rear-facing camera from the rear case.

    • During reassembly, the camera cable should bend in a 'U' shape to slot in behind the logic board.

    • If the rubber camera bumper has shifted, be sure to replace it before reassembling your iPhone.

  37. Bu adım çevrilmemiş. Çevrilmesine yardım edin

    : adım 37, 1 resimden 1.
    • Remove the two 1.6 mm Phillips #000 screws securing the rear-facing camera bracket.

  38. Bu adım çevrilmemiş. Çevrilmesine yardım edin

    : adım 38, 1 resimden 1.
    • Remove the rear-facing camera bracket from the rear case.

  39. Bu adım çevrilmemiş. Çevrilmesine yardım edin

    : adım 39, 1 resimden 1.
    • Remove the rubber camera bumper from the case.

  40. Bu adım çevrilmemiş. Çevrilmesine yardım edin

    : adım 40, 3 resimden 1. : adım 40, 3 resimden 2. : adım 40, 3 resimden 3.
    • Insert the tip of a spudger into the hole in the battery adhesive tab near the headphone jack.

    • Lift the tab up slightly and use the spudger to unfold the tab from its recess.

  41. Bu adım çevrilmemiş. Çevrilmesine yardım edin

    : adım 41, 3 resimden 1. : adım 41, 3 resimden 2. : adım 41, 3 resimden 3.
    • Pull the battery adhesive tab straight up from the phone.

    • Cut the black battery adhesive tab between the two white adhesive strips, separating them.

  42. Bu adım çevrilmemiş. Çevrilmesine yardım edin

    : adım 42, 2 resimden 1. : adım 42, 2 resimden 2.
    • Try to keep the strips flat and unwrinkled during this procedure; wrinkled strips will stick together and break instead of pulling out cleanly.

    • Slowly pull one of the battery adhesive strips away from the battery, toward the bottom of the iPhone.

    • Pull steadily, maintaining constant tension on the strip as it slips out from between the battery and the rear case. For best results, pull the strip at a 60º angle or less.

  43. Bu adım çevrilmemiş. Çevrilmesine yardım edin

    : adım 43, 3 resimden 1. : adım 43, 3 resimden 2. : adım 43, 3 resimden 3.
    • Guide the strip carefully around the corner and up the side of the battery.

    • Be careful not to snag it on the corner of the battery or on any of the other internal iPhone components.

    • The strip will stretch to many times its original length. Continue pulling, re-grabbing the strip near the battery if necessary, until the entire strip comes free.

  44. Bu adım çevrilmemiş. Çevrilmesine yardım edin

    : adım 44, 3 resimden 1. : adım 44, 3 resimden 2. : adım 44, 3 resimden 3.
    • Repeat to remove the second adhesive strip.

    • If you removed both strips successfully, skip the next two steps.

    • If either of the adhesive strips break underneath the battery and cannot be retrieved, try to remove the remaining strip, and then proceed to the next step.

  45. Bu adım çevrilmemiş. Çevrilmesine yardım edin

    : adım 45, 1 resimden 1.
    • If any of the adhesive strips broke off and the battery remains stuck to the rear case, prepare an iOpener or use a hair dryer to heat the rear case directly behind the battery.

  46. Bu adım çevrilmemiş. Çevrilmesine yardım edin

    : adım 46, 1 resimden 1.
    Bu adımda kullanılan alet:
    Plastic Cards
    $2.99
    Satın Al
    • Flip the iPhone back over and insert a plastic card between the case side of the battery and the rear case.

    • Be careful to keep the card as flat as possible to avoid bending the battery, which may damage it and cause it to release dangerous chemicals.

    • Press the card in farther to break up the adhesive behind the battery.

  47. Bu adım çevrilmemiş. Çevrilmesine yardım edin

    : adım 47, 2 resimden 1. : adım 47, 2 resimden 2.
    • Remove the battery from the rear case.

    • When installing the battery, refer to this guide to replace your battery's adhesive strips.

  48. Bu adım çevrilmemiş. Çevrilmesine yardım edin

    : adım 48, 1 resimden 1.
    • Remove the following Phillips #000 screws from the vibrator bracket:

    • One 1.7 mm screw

    • One 2.5 mm screw

  49. Bu adım çevrilmemiş. Çevrilmesine yardım edin

    : adım 49, 1 resimden 1.
    • With a set of tweezers, remove the vibrator bracket.

  50. Bu adım çevrilmemiş. Çevrilmesine yardım edin

    : adım 50, 1 resimden 1.
    • Remove the 1.7 mm Phillips #000 screw securing the vibrator to the rear case.

  51. Bu adım çevrilmemiş. Çevrilmesine yardım edin

    : adım 51, 1 resimden 1.
    • Use a set of tweezers to remove the vibrator from the rear case.

  52. Bu adım çevrilmemiş. Çevrilmesine yardım edin

    : adım 52, 1 resimden 1.
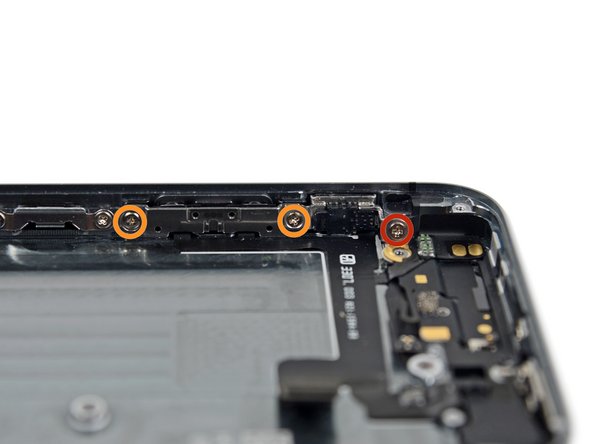
    • Remove the following screws securing the volume button and ringer switch brackets to the side of the rear case:

    • One 1.9 mm Phillips screw

    • Two 1.6 mm Phillips screws

  53. Bu adım çevrilmemiş. Çevrilmesine yardım edin

    : adım 53, 3 resimden 1. : adım 53, 3 resimden 2. : adım 53, 3 resimden 3.
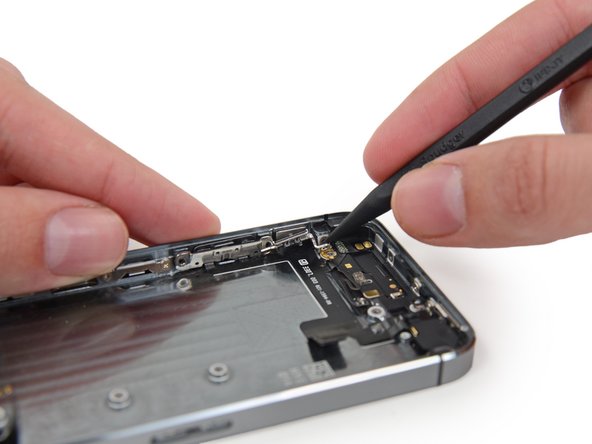
    • Use the tip of a spudger to pry the ringer switch bracket from the side of the rear case.

    • Remove the ringer switch.

    • Note the orientation for reassembly: The red line should be at the top of the button. The notch in the back of the ringer switch button should be in the same position as, and mate with, the mechanical switch on the cable.

  54. Bu adım çevrilmemiş. Çevrilmesine yardım edin

    : adım 54, 3 resimden 1. : adım 54, 3 resimden 2. : adım 54, 3 resimden 3.
    • Use a spudger to pry the volume button bracket from the side of the rear case.

    • Remove the volume buttons.

    • During reassembly, make sure the '+' (volume up) button is in the hole closest to the ringer switch.

  55. Bu adım çevrilmemiş. Çevrilmesine yardım edin

    : adım 55, 2 resimden 1. : adım 55, 2 resimden 2.
    • Use tweezers to pull the rubber rear-facing camera cover out of its slot in the rear case.

  56. Bu adım çevrilmemiş. Çevrilmesine yardım edin

    : adım 56, 1 resimden 1.
    • Remove the 1.3 mm Phillips #000 screw securing the logic board antenna bracket to the rear case.

  57. Bu adım çevrilmemiş. Çevrilmesine yardım edin

    : adım 57, 1 resimden 1.
    • Remove the logic board antenna bracket.

  58. Bu adım çevrilmemiş. Çevrilmesine yardım edin

    : adım 58, 1 resimden 1.
    • Remove the 2.1 mm Phillips #000 screw securing the contact clip and power/sleep button bracket.

  59. Bu adım çevrilmemiş. Çevrilmesine yardım edin

    : adım 59, 2 resimden 1. : adım 59, 2 resimden 2.
    • Remove the contact clip from the iPhone.

    • During reassembly, be sure the bracket is properly seated between the rear-facing camera flash and the top edge of the case.

  60. Bu adım çevrilmemiş. Çevrilmesine yardım edin

    : adım 60, 3 resimden 1. : adım 60, 3 resimden 2. : adım 60, 3 resimden 3.
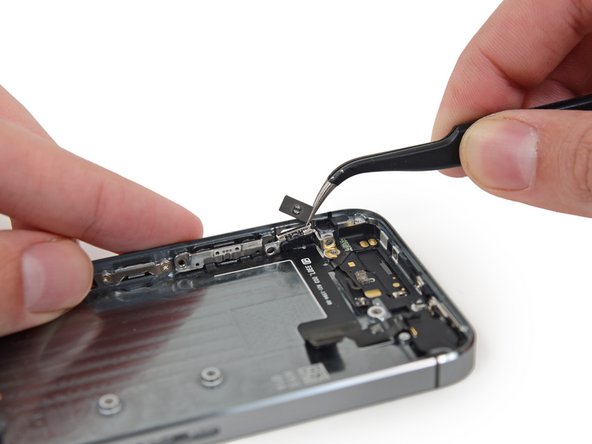
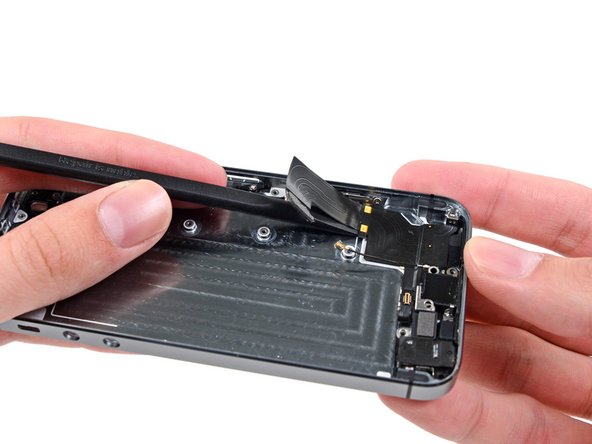
    • Slide the flat end of a spudger under the upper component assembly cable to free it from the rear case.

  61. Bu adım çevrilmemiş. Çevrilmesine yardım edin

    : adım 61, 3 resimden 1. : adım 61, 3 resimden 2. : adım 61, 3 resimden 3.
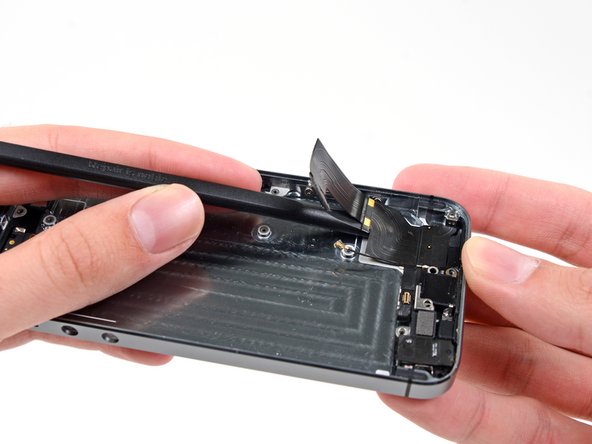
    • Run the flat end of the spudger under the portion of the cable near the volume control buttons.

  62. Bu adım çevrilmemiş. Çevrilmesine yardım edin

    : adım 62, 3 resimden 1. : adım 62, 3 resimden 2. : adım 62, 3 resimden 3.
    • Use the tip of a spudger to free the adhesive securing the vibrator contact portion of the upper assembly cable from the rear case.

    • If the flash assembly has not already popped out of its hole in the rear case, use the tip of a spudger to push it free.

  63. Bu adım çevrilmemiş. Çevrilmesine yardım edin

    : adım 63, 3 resimden 1. : adım 63, 3 resimden 2. : adım 63, 3 resimden 3.
    • Use the tip of a spudger to free the microphone portion of the assembly from the case.

  64. Bu adım çevrilmemiş. Çevrilmesine yardım edin

    : adım 64, 2 resimden 1. : adım 64, 2 resimden 2.
    • Use a set of tweezers to swing the power/sleep button bracket away from the case.

  65. Bu adım çevrilmemiş. Çevrilmesine yardım edin

    : adım 65, 3 resimden 1. : adım 65, 3 resimden 2. : adım 65, 3 resimden 3.
    • Use the tip of a spudger to push the power/sleep button into the phone slightly.

    • Use a set of tweezers to remove the button.

    • Double check the orientation of the button for reassembly. The two "L" shapes should be upside down, and the metal bar should be folded onto the top of the button.

  66. Bu adım çevrilmemiş. Çevrilmesine yardım edin

    : adım 66, 2 resimden 1. : adım 66, 2 resimden 2.
    • Unclip the power/sleep button bracket hinge from the post holding it in the iPhone.

  67. Bu adım çevrilmemiş. Çevrilmesine yardım edin

    : adım 67, 1 resimden 1.
    • Remove the upper component assembly from the iPhone.

    • This cable has many delicate ends and can tear very easily. If you encounter any resistance when you lift the cable, stop immediately. Run a spudger under the entire cable and try lifting again.

  68. Bu adım çevrilmemiş. Çevrilmesine yardım edin

    : adım 68, 1 resimden 1.
    • Remove the following Phillips #000 screws:

    • Two 2.9 mm

    • Two 1.5 mm

    • One 3.1 mm

    • One 3.6 mm

    • One 3.4 mm

  69. Bu adım çevrilmemiş. Çevrilmesine yardım edin

    : adım 69, 3 resimden 1. : adım 69, 3 resimden 2. : adım 69, 3 resimden 3.
    • Remove the speaker by lifting it up and out of the rear case.

  70. Bu adım çevrilmemiş. Çevrilmesine yardım edin

    : adım 70, 3 resimden 1. : adım 70, 3 resimden 2. : adım 70, 3 resimden 3.
    • Slide the flat end of a spudger under the right-hand side of the lightning connector cable assembly to free it from the rear case.

  71. Bu adım çevrilmemiş. Çevrilmesine yardım edin

    : adım 71, 2 resimden 1. : adım 71, 2 resimden 2.
    • Continue to detach the lightning cable assembly by sliding the spudger under the port components.

  72. Bu adım çevrilmemiş. Çevrilmesine yardım edin

    : adım 72, 1 resimden 1.
    • Remove the lightning cable assembly from the rear case.

  73. Bu adım çevrilmemiş. Çevrilmesine yardım edin

    : adım 73, 2 resimden 1. : adım 73, 2 resimden 2.
    • There are two small metal pieces—a bracket and washer that may come loose and fall out of the phone with the Lightning connector assembly removed.

    • Take these pieces out and set them aside for safe keeping.

Bitiş Çizgisi

206 farklı kişi bu kılavuzu tamamladı.

Sam Goldheart

Üyelik tarihi: 10/18/12

465.762 İtibar

538 adet Kılavuz yazıldı

Ekip

iFixit iFixit üyesi

Staff

135 Üyeler

16.817 adet Kılavuz yazıldı

24 Yorum

There appears to be steps missing from this guide. I am finished but the antenna is still attached to the inside of the case. I see it in the image of step 60, but not after. I also have 2 clips remaining on one side of the case.

scott56 - Yanıt

I quote scott56 except the last pic I see the piece is #61 and I have two clips per side plus the spring of the SIM card.

stenjidiver - Yanıt

The guide is excellent, but few things are missing. You will need double stick adhesive to reattach the battery otherwise it will rattle inside the case. Also the lightening cable need double stick tape to stick to case. Its highly recommended that you have a roll of 3M thin double stick tape before you start. The guide also left out that you need to remove and reinstall SIM card lever and three mounting clips. Plus you need to pull off various rubber components all around the old case including those that secure lightening, speaker, audio jack etc to the case and reinstall them in the new case.

Paul Pryor - Yanıt

I don't get service please help ?

Ahmed Raza - Yanıt

Are you in the restaurant and waiting to be served? Wrong place and definitely not good question - why are you not asking what is wrong because the phone is not working? Come on!!

Bojan Bilbija -

Yorum Ekle

İstatistikleri Görüntüle:

Son 24 Saat: 2

Son 7 gün: 39

Son 30 gün: 145

Her zaman: 238,835