Ana içeriğe geç

Bu sürüm, hatalı düzenlemeler içerebilir. En son doğrulanmış bellek kopyası dönün.

Neye ihtiyacın var

  1. , Pentalobe Vida: adım 1, 1 resimden 1.
    • Söküme başlamadan önce iPhone'unuzu kapatın.

    • Lightning konnektörün yanındaki iki adet 3.6 mm'lik Pentalobe vidayı çıkartın.

  2. , iSclack Açma Prosedürü: adım 2, 3 resimden 1. , iSclack Açma Prosedürü: adım 2, 3 resimden 2. , iSclack Açma Prosedürü: adım 2, 3 resimden 3.
    • Takip eden üç adım, iSclack kullanımını gösterir. iSclack, iPhone 6'yı güvenli bir şekilde açmak için kullanılan harika bir alettir ve birden fazla tamir yapacak herkese tavsiye ederiz. iSclack kullanmıyorsanız Adım 5'e atlayın.

    • Eğer iSclack'in üzerindeki plastik derinlik ölçer, iSclack'in merkezine bitişik ise, çıkarın—iPhone 6 gibi büyük telefonlarda kullanılmasına gerek yoktur.

    • Vakumlu ağızları aralamak için iSclack'in sapını kapatın.

  3. : adım 3, 3 resimden 1. : adım 3, 3 resimden 2. : adım 3, 3 resimden 3.
    • iPhone'unuzun altını vakumlu ağızların arasına yerleştirin.

    • iSclack'in üstteki vakumlu ağzını, ana sayfa düğmesini kapatmayacak ancak ana sayfa düğmesinin hemen yukarsına yerleşecek şekilde ekranın üzerine getirin.

    • iSclack'in ağzını kapatmak için sapı açın. Vakumlu ağızları ortalayarak yerleştirip, telefonun ön ve arkasına doğru sıkıca bastırın.

  4. , Ön Panel Düzeneği: adım 4, 1 resimden 1.
    • iSclack'iniz yoksa, ön paneli kaldırmak için bir adet vakumlu ağız kullanın:

    • Vakumlu ağzı, ana sayfa düğmesinin hemen üstünden ekranın üzerine doğru bastırın.

    • Ağzın ekrana sıkıca yapışması için, ağzı güvenli bir şekilde bastırdığınızdan emin olun.

  5. : adım 5, 1 resimden 1.
    • Bir elinizle iPhone'u aşağıda tutarken, vakumlu ağzı havaya doğru kaldırarak ön panel düzeneğini arka kasadan hafifçe ayırın.

    • Acele etmeden, sağlam ve sürekli bir kuvvet uygulayın. Bu ekran düzeneği diğer cihazlara oranla daha sıkı olacak şekilde tasarlanmıştır.

    • Vakumlu ağızla ekran düzeneğini yukarı doğru çekerken, plastik bir açma aletiyle arka kasayı ekran düzeneğinden nazikçe ayırın.

    • Ön panel düzeneğini arka kasaya bağlayan çeşitli kelepçeler vardır. Bu sebeple, ön panel düzeneğini ayırmak için hem vakumlu ağzı hem de plastik açma aletini beraber kullanmanız gerekebilir.

  6. : adım 6, 2 resimden 1. : adım 6, 2 resimden 2.
    • Plastik yumruyu çekerek, vakumlu ağızda kilitli havayı serbest bırakın.

    • Vakumlu ağzı ekran düzeneğinden ayırın.

  7. : adım 7, 3 resimden 1. : adım 7, 3 resimden 2. : adım 7, 3 resimden 3.
    • iPhone'u, cihazın ön panelini ana sayfa düğmesinin bulunduğu kısmından tutarak ve telefonun üst tarafını da destek olarak kullanarak, arka kasadan ayırın.

    • Ön panelin üst tarafındaki bazı kelepçeler kısmi destek oluştururlar.

    • Tekrar montaj için kelepçeleri, arka kasanın üst köşesinin hemen altında bir araya getirin. Ardından paneli, üst köşeleri arka kasanın köşeleriyle hizaya gelinceye kadar kaydırın.

  8. : adım 8, 3 resimden 1. : adım 8, 3 resimden 2. : adım 8, 3 resimden 3.
    • Ön paneli, arka kasaya 90 derecelik bir açı çizecek şekilde yavaşça kaldırarak, üzerinde çalışırken durması için bir şeye yaslayın.

    • Bir şey bulamazsanız, bu işlem için açılmamış teneke kutu içecek gayet kullanışlıdır.

    • Çalışırken ekranın sağlam bir şekilde yerinde durması için, lastik bir bant kullanın. Bu bant aynı zamanda ekran kablolarına uygulanabilecek lüzumsuz gerginliği de önleyecektir.

  9. : adım 9, 1 resimden 1.
    • Pil konnektör kolundan aşağıdaki Phillips vidaları ayırın:

    • Bir adet 2.2 mm vida

    • Bir adet 3.2 mm vida

  10. : adım 10, 1 resimden 1.
    • Metal pil konnektör kolunu iPhone'dan ayırın.

  11. : adım 11, 1 resimden 1.
    • Pil konnektörünü, anakart üstündeki soketinden ayırıp kaldırmak için plastik bir açma aleti kullanın.

    • Sadece pil konnektörünü kaldırmaya ve kesinlikle anakart üzerindeki soketi zorlamamaya özen gösterin. Eğer anakarttaki soketi zorlarsanız, konnektörü tamamen bozabilirsiniz.

  12. : adım 12, 1 resimden 1.
    • Ön panel düzeneği kablo kolunu tutturan aşağıdaki Phillips vidaları sökün:

    • Üç adet 1.2 mm vida

    • Bir adet 1.7 mm vida

    • Bir adet 3.1 mm vida

    • Tekrar montaj esnasında bu vidaların yanlış yerlere monte edilmesi, iPhone'unuzun anakartına kalıcı zarar verir.

  13. : adım 13, 1 resimden 1.
    • Ön panel düzeneği kablo kolunu anakarttan ayırın.

  14. : adım 14, 2 resimden 1. : adım 14, 2 resimden 2.
    • Sadece kablo konnektörlerini kaldırmaya ve kesinlikle konnektörlerin anakart üzerindeki soketlerini zorlamamaya özen gösterin.

    • Ön kamera ve sensör kablo konnektörünü ayırmak için plastik kanırtma aparatının düz ucunu kullanın.

  15. : adım 15, 2 resimden 1. : adım 15, 2 resimden 2.
    • Ana sayfa düğmesi kablo konnektörünü ayırmak için plastik kanırtma aparatının düz ucunu kullanın.

  16. : adım 16, 2 resimden 1. : adım 16, 2 resimden 2.
    • Ekran data kablo konnektörünü ayırmak için plastik kanırtma aparatının düz ucunu kullanın.

    • Telefonunuzu tekrar birleştirirken, ekran data kablosu konnektörden çıkabilir. Bu, telefonunuzu tekrar açarken beyaz çizgilerin oluşmasına ya da hiçbir şey gözükmemesine sebep olabilir. Böyle bir durumda, kabloyu tekrar bağlayıp telefonunuzu baştan başlatın. Telefonunuzu baştan başlatmanın en iyi yolu pil konnektörünü söküp yeniden takmaktır.

  17. : adım 17, 2 resimden 1. : adım 17, 2 resimden 2.
    • Sayısallaştırıcı kablo konnektörünü ayırmak için plastik kanırtma aletinin düz ucunu kullanın.

    • Sayısallaştırıcının kablosunu tekrar monte ederken, konnektörün ortasına kesinlikle bastırmayın. Önce konnektörün bir ucuna bastırın, daha sonra diğer ucuna. Konnektörün ortasına bastırmak parçayı eğip sayısallaştırıcının zarar görmesine sebep olur.

  18. : adım 18, 1 resimden 1.
    • Ön panel düzeneğini arka kasadan ayırın.

  19. Bu adım çevrilmemiş. Çevrilmesine yardım edin

    : adım 19, 2 resimden 1. : adım 19, 2 resimden 2.
    • Insert a SIM card eject tool or a paperclip into the small hole in the SIM card tray.

    • Press to eject the tray.

    • This may require a significant amount of force.

  20. Bu adım çevrilmemiş. Çevrilmesine yardım edin

    : adım 20, 1 resimden 1.
    • Remove the SIM card tray assembly from the iPhone.

    • When reinserting the SIM card, ensure that it is in the proper orientation relative to the tray.

  21. Bu adım çevrilmemiş. Çevrilmesine yardım edin

    : adım 21, 2 resimden 1. : adım 21, 2 resimden 2.
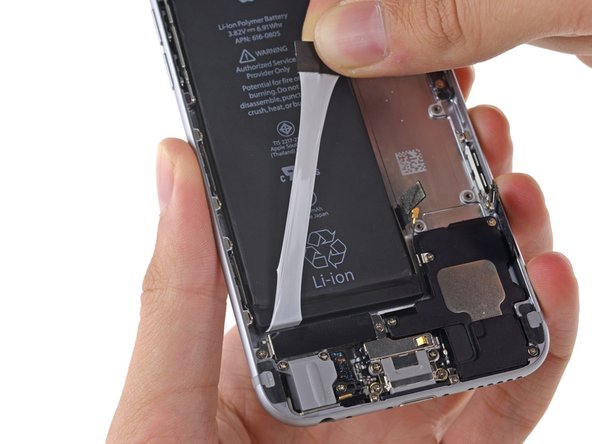
    • Use the flat end of a spudger to disconnect the Lightning connector assembly cable and fold it out of the way of the speaker.

  22. Bu adım çevrilmemiş. Çevrilmesine yardım edin

    : adım 22, 2 resimden 1. : adım 22, 2 resimden 2.
    • Use the point of a spudger to lift the antenna cable connector up off of its socket on the logic board.

  23. Bu adım çevrilmemiş. Çevrilmesine yardım edin

    : adım 23, 1 resimden 1.
    • Remove the following Phillips screws from the upper cable bracket:

    • One 2.9 mm screw

    • One 2.2 mm screw

  24. Bu adım çevrilmemiş. Çevrilmesine yardım edin

    : adım 24, 2 resimden 1. : adım 24, 2 resimden 2.
    • Remove the upper cable bracket from the iPhone.

  25. Bu adım çevrilmemiş. Çevrilmesine yardım edin

    : adım 25, 3 resimden 1. : adım 25, 3 resimden 2. : adım 25, 3 resimden 3.
    • When disconnecting the following connectors, only pry up on the connector, not the socket on the logic board or you risk permanent damage.

    • Use the flat end of a spudger to lift the power button and flash assembly cable connector up off of its socket.

    • Lift the volume control cable connector up out of its socket on the logic board.

  26. Bu adım çevrilmemiş. Çevrilmesine yardım edin

    : adım 26, 1 resimden 1.
    • Remove the following four Phillips screws from the Wi-Fi antenna:

    • One 1.5 mm screw

    • One 1.4 mm screw

    • Two 2.1 mm screws

  27. Bu adım çevrilmemiş. Çevrilmesine yardım edin

    : adım 27, 2 resimden 1. : adım 27, 2 resimden 2.
    • Remove the Wi-Fi antenna from the iPhone.

    • Be careful not to touch any metal to metal contact points with your bare fingers—use tweezers or gloves. Finger oils may disrupt conductivity. If you do touch any of these components, clean them with a degreaser like windex or isopropyl alcohol before reassembly.

  28. Bu adım çevrilmemiş. Çevrilmesine yardım edin

    : adım 28, 1 resimden 1.
    • Remove the two 1.6 mm Phillips screws from the grounding bracket.

  29. Bu adım çevrilmemiş. Çevrilmesine yardım edin

    : adım 29, 2 resimden 1. : adım 29, 2 resimden 2.
    • Remove the grounding bracket from the iPhone.

  30. Bu adım çevrilmemiş. Çevrilmesine yardım edin

    : adım 30, 2 resimden 1. : adım 30, 2 resimden 2.
    • Remove the following Phillips screws securing the angled logic board bracket.

    • One 2.6 mm screw

    • One 1.3 mm screw, located horizontally in the upper sidewall of the iPhone.

  31. Bu adım çevrilmemiş. Çevrilmesine yardım edin

    : adım 31, 2 resimden 1. : adım 31, 2 resimden 2.
    • Remove the angled logic board bracket.

  32. Bu adım çevrilmemiş. Çevrilmesine yardım edin

    : adım 32, 1 resimden 1.
    • Remove the single 1.2 mm Phillips screw securing the antenna interconnect cable to the logic board.

  33. Bu adım çevrilmemiş. Çevrilmesine yardım edin

    : adım 33, 2 resimden 1. : adım 33, 2 resimden 2.
    • Use the point of a spudger to fold the antenna interconnect cable up out of the way of the logic board.

  34. Bu adım çevrilmemiş. Çevrilmesine yardım edin

    : adım 34, 3 resimden 1. : adım 34, 3 resimden 2. : adım 34, 3 resimden 3.
    • Use the flat end of a spudger to lift the camera cable connector straight up out of its socket on the logic board.

    • Be sure to only pry on the connector not the socket itself or you can cause permanent damage to the logic board.

    • Fold the camera cable up out of the way of the logic board.

  35. Bu adım çevrilmemiş. Çevrilmesine yardım edin

    : adım 35, 1 resimden 1.
    Bu adımda kullanılan alet:
    Standoff Screwdriver for iPhones
    $5.49
    Satın Al
    • Remove the following screws securing the logic board to the rear case:

    • Two 1.9 mm Phillips screws

    • One 2.3 mm standoff screw

    • Standoff screws are best removed using a standoff screwdriver or bit.

    • In a pinch, a small flathead screwdriver will do the job—but use extra caution to ensure it doesn't slip and damage surrounding components.

  36. Bu adım çevrilmemiş. Çevrilmesine yardım edin

    : adım 36, 2 resimden 1. : adım 36, 2 resimden 2.
    • Use the flat end of a spudger to lift the battery connector end of the logic board up slightly, just enough to grab with your fingers.

    • Insert the spudger near the metal shields below the SIM card tray to avoid damaging any chips or sockets.

  37. Bu adım çevrilmemiş. Çevrilmesine yardım edin

    : adım 37, 3 resimden 1. : adım 37, 3 resimden 2. : adım 37, 3 resimden 3.
    • Lift the battery connector end of the logic board and pull it up and out of the rear case.

    • Be careful not to snag the logic board on any cables.

  38. Bu adım çevrilmemiş. Çevrilmesine yardım edin

    : adım 38, 1 resimden 1.
    • Peel back the first battery adhesive tab from the bottom right edge of the battery.

    • Use your fingers or blunt tweezers, and be extra careful when working near the battery—puncturing a lithium-ion battery can release dangerous chemicals and cause a fire.

  39. Bu adım çevrilmemiş. Çevrilmesine yardım edin

    : adım 39, 3 resimden 1. : adım 39, 3 resimden 2. : adım 39, 3 resimden 3.
    • Gently pull the battery adhesive tab away from the battery, toward the bottom of the iPhone.

    • Try not to pull against the battery or the lower components, or you may rip the adhesive strip.

    • Continue pulling, allowing the strip to slowly slip out from between the battery and the rear case. When you feel increased resistance from the strip, stop pulling and continue with the next step.

    • If the battery adhesive tabs break off at any point during the removal process, use your fingers or blunt tweezers to retrieve the remaining length of adhesive, and continue pulling.

    • If one of the adhesive strips breaks under the battery during this procedure, and cannot be retrieved, remove the remaining strip, and then proceed to Step 44.

  40. Bu adım çevrilmemiş. Çevrilmesine yardım edin

    : adım 40, 3 resimden 1. : adım 40, 3 resimden 2. : adım 40, 3 resimden 3.
    • When you feel increased resistance from the adhesive strip, pull it gently around the lower right corner of the battery.

    • Continue pulling the adhesive tab upward and away from the right edge of the battery, allowing it to slowly slide out from between the battery and the rear case, until the strip comes free from the iPhone.

    • Don't allow the adhesive strip to snag on the battery connector, or it may tear or break off.

  41. Bu adım çevrilmemiş. Çevrilmesine yardım edin

    : adım 41, 2 resimden 1. : adım 41, 2 resimden 2.
    • Peel back the second battery adhesive tab from the bottom left edge of the battery.

    • Again, gently pull the battery adhesive tab upward and away from the battery, allowing the adhesive strip to slowly slide out from between the battery and the rear case.

    • Continue pulling the adhesive tab until you feel increased resistance, and then stop.

  42. Bu adım çevrilmemiş. Çevrilmesine yardım edin

    : adım 42, 1 resimden 1.
    • When you feel increased resistance from the adhesive strip, pull it gently around the lower left corner of the battery.

    • Don't allow the adhesive strip to snag on the corner of the battery, or it may tear or break off.

    • Continue pulling the adhesive tab upward and away from the left edge of the battery, allowing it to slowly slide out from between the battery and the rear case, until the strip comes free from the iPhone.

    • If you removed both adhesive strips successfully, skip the next two steps and continue on Step 46.

    • If either of the adhesive strips broke off underneath the battery and could not be retrieved, continue with the next step below.

  43. Bu adım çevrilmemiş. Çevrilmesine yardım edin

    : adım 43, 1 resimden 1.
    • If any of the adhesive strips broke off and the battery remains stuck to the rear case, prepare an iOpener or use a hair dryer to heat the rear case directly behind the battery.

  44. Bu adım çevrilmemiş. Çevrilmesine yardım edin

    : adım 44, 1 resimden 1.
    Bu adımda kullanılan alet:
    Plastic Cards
    $2.99
    Satın Al
    • Insert a plastic card under the logic board edge of the battery.

    • Be careful to keep the card as flat as possible to avoid bending the battery, which may damage it and cause it to release dangerous chemicals.

    • Press the card in at several points if necessary to break up the adhesive behind the battery.

  45. Bu adım çevrilmemiş. Çevrilmesine yardım edin

    : adım 45, 1 resimden 1.
    • After peeling or prying out all adhesive, remove the battery from the iPhone.

    • When reinstalling the battery, refer to this guide to replace your battery's adhesive strips.

  46. Bu adım çevrilmemiş. Çevrilmesine yardım edin

    : adım 46, 2 resimden 1. : adım 46, 2 resimden 2.
    • Remove any tape covering the upper left rear-facing camera screw.

  47. Bu adım çevrilmemiş. Çevrilmesine yardım edin

    : adım 47, 1 resimden 1.
    • Remove the following Phillips #00 screws from the rear-facing camera bracket:

    • One 1.5 mm screw

    • One 2.1 mm screw

  48. Bu adım çevrilmemiş. Çevrilmesine yardım edin

    : adım 48, 2 resimden 1. : adım 48, 2 resimden 2.
    • Remove the rear-facing camera bracket.

  49. Bu adım çevrilmemiş. Çevrilmesine yardım edin

    : adım 49, 2 resimden 1. : adım 49, 2 resimden 2.
    • Carefully remove the antenna interconnect cable from the rear case.

  50. Bu adım çevrilmemiş. Çevrilmesine yardım edin

    : adım 50, 2 resimden 1. : adım 50, 2 resimden 2.
    • Remove the rear-facing camera from the iPhone.

  51. Bu adım çevrilmemiş. Çevrilmesine yardım edin

    : adım 51, 1 resimden 1.
    • Remove the single 1.2 mm Phillips #00 screw securing the flash bracket.

  52. Bu adım çevrilmemiş. Çevrilmesine yardım edin

    : adım 52, 2 resimden 1. : adım 52, 2 resimden 2.
    • Remove the flash bracket from the rear case.

  53. Bu adım çevrilmemiş. Çevrilmesine yardım edin

    : adım 53, 1 resimden 1.
    • Remove the two 2.2 mm Phillips #00 screws from the power button bracket.

  54. Bu adım çevrilmemiş. Çevrilmesine yardım edin

    : adım 54, 3 resimden 1. : adım 54, 3 resimden 2. : adım 54, 3 resimden 3.
    • Use the point of a spudger to gently push the flash and microphone modules up out of their respective holes in the rear case.

    • If you encounter significant adhesive, use tweezers to peel the components up from the rear case.

  55. Bu adım çevrilmemiş. Çevrilmesine yardım edin

    : adım 55, 3 resimden 1. : adım 55, 3 resimden 2. : adım 55, 3 resimden 3.
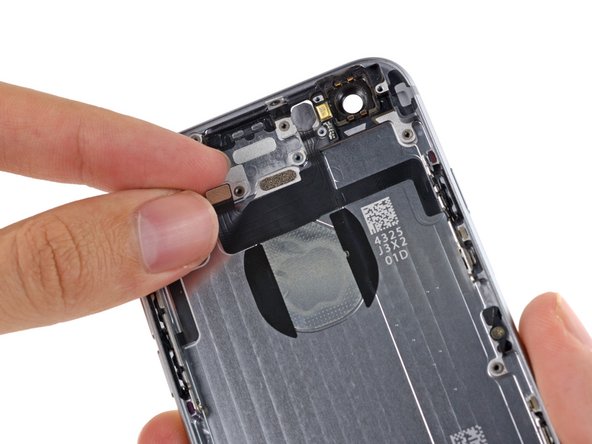
    • Begin to peel the flash/microphone/power button assembly cable up from the rear case starting from the connector end.

    • Continue to peel the cable up, being particularly careful of the narrow component ends of the cable.

    • Remove the flash/microphone/power button assembly cable from the phone.

  56. Bu adım çevrilmemiş. Çevrilmesine yardım edin

    : adım 56, 2 resimden 1. : adım 56, 2 resimden 2.
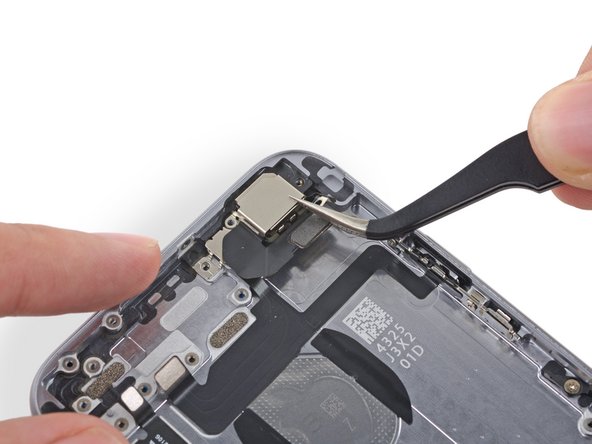
    • Grip the power button by the metal bar to pull it free from the rear case.

    • The power button is held to the case with an adhesive gasket, pull carefully to prevent ripping the membrane.

Bitiş Çizgisi

90 farklı kişi bu kılavuzu tamamladı.

Sam Goldheart

Üyelik tarihi: 10/18/12

465.647 İtibar

538 adet Kılavuz yazıldı

Ekip

iFixit iFixit üyesi

Staff

135 Üyeler

16.732 adet Kılavuz yazıldı

13 Yorum

Ive recently done a full housing change on my iphone 6 plus to a black one since doing it the power button doesnt work its rock solid i used original power button (space gray) and original flex cable once istalled it just wont press

The only way it works is if i leave the power button screws slightly loose which is a pain becasue the button loosens itself anyone had anything similar or is it the way its been installed ?? All other buttons work correctly mute switch and volume buttons

marcusdean2009 - Yanıt

Hello marcusdean2009 this problem occurs because the new carcass have the power button screw hole a little bit long than the original one. And yes, you will have to let the power button screws slightly loose to make the power button work

Ricardo Gomes -

My power button is a little bit loose. There's still clicking sound but not same as the other normal button,the button also seems 'into' or 'concave ' compare to normal button.while the power button with long shape also seems just have a clicking sound when I press the middle part of button but not the upper and lower part of button.when I press the upper and lower part,it is soft and without clicking sound and springing feel. I used to replace the flex cable, but it still loose,is it the matter of the quality for the flex cable or the improperly attach of rubber gasket or the scuffed of little metal tip of the power button? Please reply me.

cyg - Yanıt

Hi, after e I've assembled the iPhone power button is ok .... the flash does not work and the rear camera does not take more photos...i can see word the rear camera and i can record a video but no photo. How can i fix it?

Michele - Yanıt

Great job on this guide. What could have been a pain in the butt has been an easy fix/replacement thanks to this guide. Thank you for taking the time to do this. Just plain awesome.

Jesus Juarez - Yanıt

Yorum Ekle

İstatistikleri Görüntüle:

Son 24 Saat: 7

Son 7 gün: 33

Son 30 gün: 106

Her zaman: 165,426