Bu sürüm, hatalı düzenlemeler içerebilir. En son doğrulanmış bellek kopyası dönün.
Neye ihtiyacın var
-
-
Lightning konnektörün yanındaki iki adet 3.6 mm'lik Pentalobe vidayı çıkartın.
-
-
-
Eğer iSclack'in üzerindeki plastik derinlik ölçer, iSclack'in merkezine bitişik ise, çıkarın—iPhone 6 gibi büyük telefonlarda kullanılmasına gerek yoktur.
-
Vakumlu ağızları aralamak için iSclack'in sapını kapatın.
-
-
-
iPhone'unuzun altını vakumlu ağızların arasına yerleştirin.
-
iSclack'in üstteki vakumlu ağzını, ana sayfa düğmesini kapatmayacak ancak ana sayfa düğmesinin hemen yukarsına yerleşecek şekilde ekranın üzerine getirin.
-
iSclack'in ağzını kapatmak için sapı açın. Vakumlu ağızları ortalayarak yerleştirip, telefonun ön ve arkasına doğru sıkıca bastırın.
-
-
-
iSclack'iniz yoksa, ön paneli kaldırmak için bir adet vakumlu ağız kullanın:
-
Vakumlu ağzı, ana sayfa düğmesinin hemen üstünden ekranın üzerine doğru bastırın.
-
-
-
Ön paneli, arka kasaya 90 derecelik bir açı çizecek şekilde yavaşça kaldırarak, üzerinde çalışırken durması için bir şeye yaslayın.
-
Çalışırken ekranın sağlam bir şekilde yerinde durması için, lastik bir bant kullanın. Bu bant aynı zamanda ekran kablolarına uygulanabilecek lüzumsuz gerginliği de önleyecektir.
-
-
-
-
Pilin yapışkan şeridini, iPhone'un altına ve pilden uzağa doğru nazik bir şekilde çekin.
-
Pile ya da aşağıdaki parçalara doğru çekmemeye çalışın; aksi takdirde yapışkan şerit kopabilir.
-
Şerit, pil ve arka kasanın arasından sıyrılana kadar şeridi çekmeyi sürdürün. Şiddetli bir direnç hissederseniz çekmeyi bırakın ve bir sonraki adımdan devam edin.
-
-
-
iPhone'u ters çevirip, kasa tarafından olmak üzere pilin ve arka kasanın arasına plastik bir kart yerleştirin.
-
Kartı iyice ileri doğru iterek, pilin arkasındaki yapışkanı kopartın.
-
Pilin üst köşelerinden diş ipini ya da teli geçirip, uçları yanyana getirin, sonrasında bunları katlanmış bir kumaş parçasının etrafına sararak eşit bir şekilde çekin.
-
-
Bu adım çevrilmemiş. Çevrilmesine yardım edin
-
Remove the following Phillips #00 screws from the upper cable bracket:
-
One 2.9 mm screw
-
One 2.2 mm screw
-
-
Bu adım çevrilmemiş. Çevrilmesine yardım edin
-
Remove the following four Phillips #00 screws from the contact bracket:
-
One 1.5 mm screw
-
One 1.4 mm screw
-
Two 2.1 mm screws
-
-
Bu adım çevrilmemiş. Çevrilmesine yardım edin
-
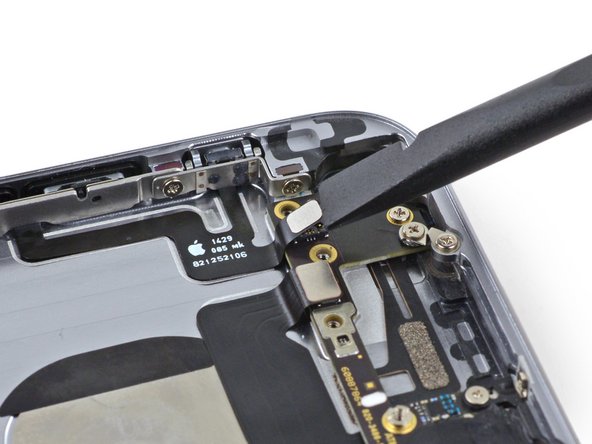
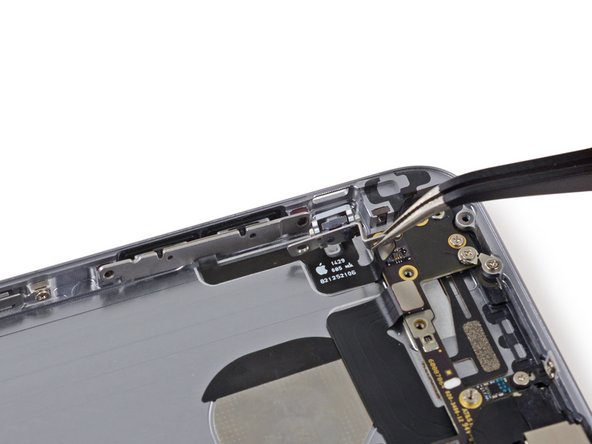
Use the flat end of a spudger to lift the volume control cable connector up off of its socket.
-
-
Bu adım çevrilmemiş. Çevrilmesine yardım edin
-
Remove the following Phillips #00 screws from the volume control cable brackets:
-
Two 2.3 mm screws
-
One 1.8 mm scew
-
-
Bu adım çevrilmemiş. Çevrilmesine yardım edin
-
Pull the hold switch and volume control button brackets away from the rear case to allow access to the button covers.
-
-
Bu adım çevrilmemiş. Çevrilmesine yardım edin
-
Begin to peel the volume control button cable up from the rear case starting from the connector end.
-
Be gentle when peeling the thin portions of the cable up from the case.
-
Remove the volume control button cable from the rear case.
-
-
Bu adım çevrilmemiş. Çevrilmesine yardım edin
-
Pull the volume control buttons by the metal bar to remove them from the rear case.
-
The buttons are held to the case with an adhesive gasket, pull carefully to prevent ripping the membrane.
-


İptal et: Bu kılavuzu tamamlamadım.
79 farklı kişi bu kılavuzu tamamladı.


6 Yorum
hello guys, i have a problem with installing the frets to put in silent, I noticed that there are small springs to adhere well to the external key to the internal mechanism, only to replace it I loosened a bit, and now the clips and some smollato ... you as you have done? have you also found this problem? I hope you can help me.
Best regards
No doubt you probably have sorted it by now lol but I was struggling re-mounting the mute switch too! You’ll notice there’s small grooves/notches that the little pins off the bottom of the physical metal switch sit in. You just have to put the switch in the off position (top side when mounted) and then get it seated over the plastic switch first, and then move the little pins back under the springs either side and into the little grooves/notches on the mount. Once it’s seated in those notches just push the springs down a little so the metal switch won’t easily fall off when moving around and positioning back into the chassis ;)
Und wie klebt man die Klebedichtung wieder an?
Hab echt ein Problem….und wo bekäme man diese als ersatzteile?
Danke , freundlich grüsst
Michael
From (https://translate.google.com.au/?hl=en&t...):
“And how do you glue the adhesive seal back on?
Have a real problem .... And where would you get these as spare parts?
Thank you, friendly greetings”
—————————————————————————————————————
I was lucky enough just to get them to stick back into their spots with the existing adhesive on them. They’d be near impossible to clean anyhow, so just do your best ;)
Hello! If one of the buttons is bent, then I only need to replace the button not the whole cable right? :)