Ana içeriğe geç

Bu sürüm, hatalı düzenlemeler içerebilir. En son doğrulanmış bellek kopyası dönün.

Neye ihtiyacın var

  1. Bu adım çevrilmemiş. Çevrilmesine yardım edin

    : adım 1, 1 resimden 1.
    • Before disassembling your iPhone, discharge the battery below 25%. A charged lithium-ion battery can catch fire and/or explode if accidentally punctured.

    • Power off your iPhone before beginning disassembly.

    • Remove the two 3.4 mm Pentalobe screws on either side of the Lightning port.

  2. , iSclack Açma Prosedürü: adım 2, 3 resimden 1. , iSclack Açma Prosedürü: adım 2, 3 resimden 2. , iSclack Açma Prosedürü: adım 2, 3 resimden 3.
    • Takip eden üç adım, iSclack kullanımını gösterir. iSclack, iPhone 6'yı güvenli bir şekilde açmak için kullanılan harika bir alettir ve birden fazla tamir yapacak herkese tavsiye ederiz. iSclack kullanmıyorsanız Adım 5'e atlayın.

    • Eğer iSclack'in üzerindeki plastik derinlik ölçer, iSclack'in merkezine bitişik ise, çıkarın—iPhone 6 gibi büyük telefonlarda kullanılmasına gerek yoktur.

    • Vakumlu ağızları aralamak için iSclack'in sapını kapatın.

  3. : adım 3, 3 resimden 1. : adım 3, 3 resimden 2. : adım 3, 3 resimden 3.
    • iPhone'unuzun altını vakumlu ağızların arasına yerleştirin.

    • iSclack'in üstteki vakumlu ağzını, ana sayfa düğmesini kapatmayacak ancak ana sayfa düğmesinin hemen yukarsına yerleşecek şekilde ekranın üzerine getirin.

    • iSclack'in ağzını kapatmak için sapı açın. Vakumlu ağızları ortalayarak yerleştirip, telefonun ön ve arkasına doğru sıkıca bastırın.

  4. Bu adım çevrilmemiş. Çevrilmesine yardım edin

    : adım 4, 1 resimden 1.
    Bu adımda kullanılan alet:
    Anti-Clamp
    $24.95
    Satın Al
    • If you don't have an Anti-Clamp, follow the next three steps to use a suction handle.

    • Apply mild heat to the lower edge of the iPhone using an iOpener or hair dryer for about a minute.

    • Heat softens the adhesive securing the display, making it easier to open.

  5. Bu adım çevrilmemiş. Çevrilmesine yardım edin

    : adım 5, 1 resimden 1.
    • Opening the display on the 6s Plus separates a thin strip of adhesive around the perimeter of the display. If you prefer to replace the adhesive, have a set of new adhesive strips ready before you continue. It's possible to complete the repair without replacing the adhesive, and you probably won't notice any difference in functionality.

    • Apply a suction cup to the lower left corner of the display assembly.

    • If your display is badly cracked, covering it with a layer of clear packing tape may allow the suction cup to adhere. Alternatively, very strong tape may be used instead of the suction cup. If all else fails, you can superglue the suction cup to the broken screen.

  6. Bu adım çevrilmemiş. Çevrilmesine yardım edin

    : adım 6, 2 resimden 1. : adım 6, 2 resimden 2.
    • Pull up on the suction cup with firm, constant pressure to create a slight gap between the front panel and rear case.

    • Pulling too hard may damage the display assembly. Apply just enough pressure to create a small gap between the display assembly and the rear case.

  7. Bu adım çevrilmemiş. Çevrilmesine yardım edin

    : adım 7, 3 resimden 1. : adım 7, 3 resimden 2. : adım 7, 3 resimden 3.
    • The safest place to pry from is the notch in the front panel above the headphone jack.

    • While still maintaining pressure on the suction cup, insert the flat tip of a spudger into the gap, directly above the headphone jack.

  8. Bu adım çevrilmemiş. Çevrilmesine yardım edin

    : adım 8, 2 resimden 1. : adım 8, 2 resimden 2.
    • Twist the spudger to widen the gap between the front panel and the rear case.

  9. Bu adım çevrilmemiş. Çevrilmesine yardım edin

    : adım 9, 3 resimden 1. : adım 9, 3 resimden 2. : adım 9, 3 resimden 3.
    • While firmly pulling up on the suction cup, slide the edge of the spudger under the bottom left corner of the display.

  10. Bu adım çevrilmemiş. Çevrilmesine yardım edin

    : adım 10, 2 resimden 1. : adım 10, 2 resimden 2.
    • Slide the tip of the spudger up the left side of the phone, between the front panel and the rear case.

  11. Bu adım çevrilmemiş. Çevrilmesine yardım edin

    : adım 11, 2 resimden 1. : adım 11, 2 resimden 2.
    • Insert the flat tip of the spudger under the right edge of the display.

    • Slide the spudger up the right side.

  12. Bu adım çevrilmemiş. Çevrilmesine yardım edin

    : adım 12, 2 resimden 1. : adım 12, 2 resimden 2.
    • Use a plastic opening tool to hold down the rear case while pulling up the suction cup to open the phone.

    • Do not remove the display completely, or you will damage the data cables connecting the display near the top edge of the iPhone.

  13. Bu adım çevrilmemiş. Çevrilmesine yardım edin

    : adım 13, 2 resimden 1. : adım 13, 2 resimden 2.
    • Pull up on the small nub on the suction cup to remove it from the display.

  14. Bu adım çevrilmemiş. Çevrilmesine yardım edin

    : adım 14, 3 resimden 1. : adım 14, 3 resimden 2. : adım 14, 3 resimden 3.
    • Gently grasp the display assembly and lift it up to open the phone, using the clips at the top of the front panel as a hinge.

    • Open the display to about a 90º angle, and lean it against something to keep it propped up while you're working on the phone.

    • Don't open the display more than 90º—it is still connected to the top of the phone by the display, digitizer, and front camera cables which can tear easily.

    • Add a rubber band to keep the display securely in place while you work. This prevents undue strain on the display cables.

    • In a pinch, you can use an unopened canned beverage to support the display.

  15. Bu adım çevrilmemiş. Çevrilmesine yardım edin

    : adım 15, 1 resimden 1.
    Bu adımda kullanılan alet:
    Magnetic Project Mat
    $19.95
    Satın Al
    • Remove two Phillips screws securing the battery connector bracket to the logic board, of the following lengths:

    • One 2.9 mm screw

    • One 2.3 mm screw

    • Throughout this guide, keep careful track of your screws so that each one goes back where it came from during reassembly. Installing a screw in the wrong place can cause permanent damage.

  16. Bu adım çevrilmemiş. Çevrilmesine yardım edin

    : adım 16, 2 resimden 1. : adım 16, 2 resimden 2.
    • Remove the battery connector bracket.

  17. Bu adım çevrilmemiş. Çevrilmesine yardım edin

    : adım 17, 3 resimden 1. : adım 17, 3 resimden 2. : adım 17, 3 resimden 3.
    • Use a spudger or a clean fingernail to disconnect the battery connector by prying it straight up off the logic board.

  18. Bu adım çevrilmemiş. Çevrilmesine yardım edin

    : adım 18, 3 resimden 1. : adım 18, 3 resimden 2. : adım 18, 3 resimden 3.
    • Bend the connector back to ensure it doesn't make contact and power the iPhone on while you're working on it.

  19. , Ekran Düzeneği: adım 19, 1 resimden 1.
    • Aşağıda sıralanan Phillips vidaları çıkartın:

    • Üç adet 1.3 mm'lik vida

    • Bir adet 1.6 mm'lik vida

    • Bir adet 3.0 mm'lik vida

    • Cihazınızı tekrar birleştirirken, 3.0 mm'lik vidayı kolun sağ üst köşesine yerleştirmek kritik önem taşıyor. Vidayı herhangi başka bir yere yerleştirmeye çalışmak anakarta zarar verebilir.

  20. : adım 20, 2 resimden 1. : adım 20, 2 resimden 2.
    • Ekran kablo kolunu ayırın.

  21. : adım 21, 2 resimden 1. : adım 21, 2 resimden 2.
    • Kaldırırken yalnızca konnektörle temas ettiğinizden emin olun; özellikle anakart üzerindeki sokete değmemeye çalışın.

    • Ön kamera ve sensör kablo konnektörünün bağlantısını kesmek için plastik bir açma aleti kullanın.

  22. : adım 22, 2 resimden 1. : adım 22, 2 resimden 2.
    • Sayısallaştırıcı kabloyu, anakartın üzerindeki soketinden havaya doğru kaldırarak bağlantısını kesmek için plastik bir açma aleti kullanın.

    • Sayısallaştırıcı kabloyu tekrar bağlarken, konnektörün ortasına bastırmayın. Önce konnektörün bir ucuna, daha sonra diğer ucunda bastırın. Konnektörün ortasına basmak bileşeni eğip, sayısallaştırıcıya zarar verebilir.

  23. Bu adım çevrilmemiş. Çevrilmesine yardım edin

    : adım 23, 2 resimden 1. : adım 23, 2 resimden 2.
    • Make sure the battery is disconnected before you disconnect or reconnect the cable in this step.

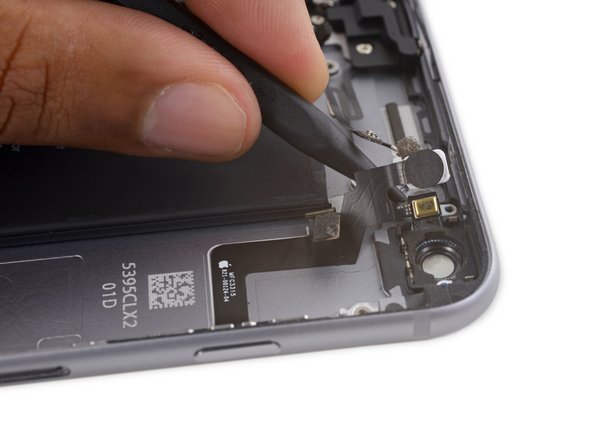
    • Disconnect the home button/fingerprint sensor cable by prying it straight up from its socket on the logic board.

  24. Bu adım çevrilmemiş. Çevrilmesine yardım edin

    : adım 24, 2 resimden 1. : adım 24, 2 resimden 2.
  25. Bu adım çevrilmemiş. Çevrilmesine yardım edin

    : adım 25, 3 resimden 1. : adım 25, 3 resimden 2. : adım 25, 3 resimden 3.
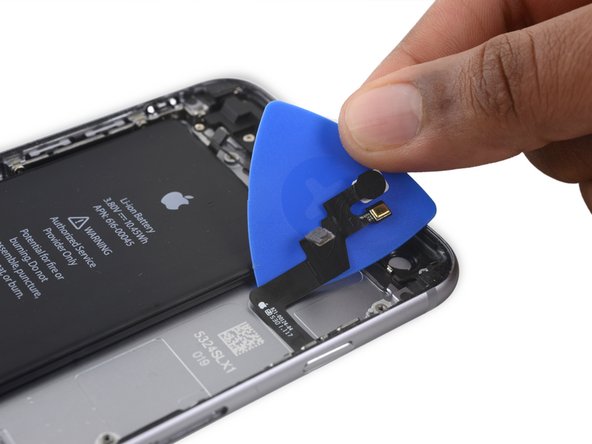
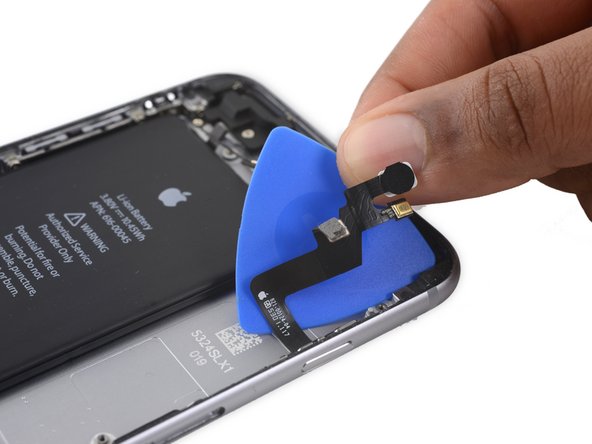
    • Peel up any tape covering the iSight camera bracket screws.

  26. Bu adım çevrilmemiş. Çevrilmesine yardım edin

    : adım 26, 1 resimden 1.
    • Remove the following Phillips screws over the camera bracket:

    • One 1.9 mm screw

    • One 2.4 mm screw

  27. Bu adım çevrilmemiş. Çevrilmesine yardım edin

    : adım 27, 2 resimden 1. : adım 27, 2 resimden 2.
    • Remove the iSight camera bracket.

  28. Bu adım çevrilmemiş. Çevrilmesine yardım edin

    : adım 28, 2 resimden 1. : adım 28, 2 resimden 2.
    • Disconnect the iSight camera connector from its socket on the logic board.

    • Be sure to pry up only the connector and not the socket on the logic board.

  29. Bu adım çevrilmemiş. Çevrilmesine yardım edin

    : adım 29, 2 resimden 1. : adım 29, 2 resimden 2.
    • Insert the flat end of the spudger between the iSight camera and rear casing.

    • Gently pry the camera out from its housing.

  30. Bu adım çevrilmemiş. Çevrilmesine yardım edin

    : adım 30, 2 resimden 1. : adım 30, 2 resimden 2.
    • Remove the iSight camera.

  31. Bu adım çevrilmemiş. Çevrilmesine yardım edin

    : adım 31, 2 resimden 1. : adım 31, 2 resimden 2.
    • Insert a SIM eject tool into the hole in the SIM tray.

    • Press to eject the SIM tray.

  32. Bu adım çevrilmemiş. Çevrilmesine yardım edin

    : adım 32, 1 resimden 1.
    • Remove the SIM tray.

    • When reinserting the SIM tray, be sure to orient the tray such that the SIM eject hole is on the bottom.

  33. Bu adım çevrilmemiş. Çevrilmesine yardım edin

    : adım 33, 1 resimden 1.
    • Remove the single 1.4 mm Phillips screw holding the NFC bracket in place.

  34. Bu adım çevrilmemiş. Çevrilmesine yardım edin

    : adım 34, 2 resimden 1. : adım 34, 2 resimden 2.
    • Remove the NFC bracket.

  35. Bu adım çevrilmemiş. Çevrilmesine yardım edin

    : adım 35, 1 resimden 1.
    • Remove the two 2.7 mm Phillips screws securing the audio control cable bracket to the logic board.

  36. Bu adım çevrilmemiş. Çevrilmesine yardım edin

    : adım 36, 2 resimden 1. : adım 36, 2 resimden 2.
    • Remove the audio control cable bracket.

  37. Bu adım çevrilmemiş. Çevrilmesine yardım edin

    : adım 37, 2 resimden 1. : adım 37, 2 resimden 2.
    • Disconnect the audio control cable by prying its connector straight up from its socket on the logic board.

  38. Bu adım çevrilmemiş. Çevrilmesine yardım edin

    : adım 38, 2 resimden 1. : adım 38, 2 resimden 2.
    • Disconnect the cellular antenna cable by prying its connector straight up from its respective socket on the logic board.

  39. Bu adım çevrilmemiş. Çevrilmesine yardım edin

    : adım 39, 2 resimden 1. : adım 39, 2 resimden 2.
    • Disconnect the Wi-Fi diversity antenna cable by prying its connector up from the logic board.

  40. Bu adım çevrilmemiş. Çevrilmesine yardım edin

    : adım 40, 2 resimden 1. : adım 40, 2 resimden 2.
    • Disconnect the power button flex cable from its socket on the logic board.

  41. Bu adım çevrilmemiş. Çevrilmesine yardım edin

    : adım 41, 2 resimden 1. : adım 41, 2 resimden 2.
    • Disconnect the antenna cable by prying it up from the logic board.

  42. Bu adım çevrilmemiş. Çevrilmesine yardım edin

    : adım 42, 2 resimden 1. : adım 42, 2 resimden 2.
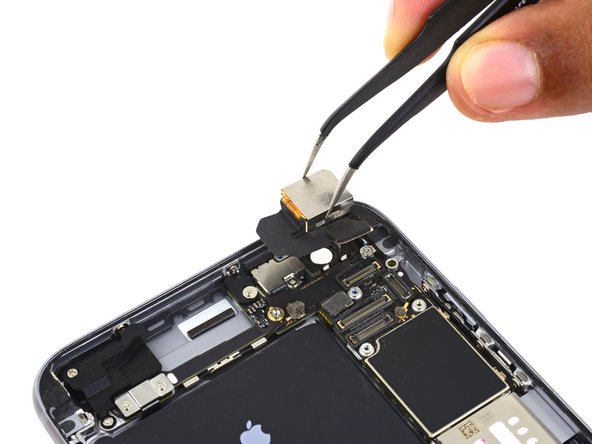
    • Use the flat end of a spudger to disconnect the Lightning connector flex cable from the logic board.

  43. Bu adım çevrilmemiş. Çevrilmesine yardım edin

    : adım 43, 3 resimden 1. : adım 43, 3 resimden 2. : adım 43, 3 resimden 3.
    • Deroute the antenna cable from the two clips on the right edge of the logic board.

  44. Bu adım çevrilmemiş. Çevrilmesine yardım edin

    : adım 44, 2 resimden 1. : adım 44, 2 resimden 2.
    Bu adımda kullanılan alet:
    Standoff Screwdriver for iPhones
    $5.49
    Satın Al
    • Remove the following screws:

    • One 1.3 mm Phillips screw

    • One 2.6 mm Phillips screw

    • One 2.2 mm standoff screw

    • Standoff screws are best removed using a standoff screwdriver or bit.

    • In a pinch, a small flathead screwdriver will do the job—but use extra caution to ensure it doesn't slip and damage surrounding components.

  45. Bu adım çevrilmemiş. Çevrilmesine yardım edin

    : adım 45, 2 resimden 1. : adım 45, 2 resimden 2.
    • Remove the bracket.

  46. Bu adım çevrilmemiş. Çevrilmesine yardım edin

    : adım 46, 2 resimden 1. : adım 46, 2 resimden 2.
    • Deroute the upper left cellular antenna cable from the first logic board clip by nudging it out from under the clip, towards the battery.

  47. Bu adım çevrilmemiş. Çevrilmesine yardım edin

    : adım 47, 3 resimden 1. : adım 47, 3 resimden 2. : adım 47, 3 resimden 3.
    • Continue derouting the cellular antenna cable from the second and third logic board clips.

    • Use the pointed tip of a spudger to gently pry the cellular antenna cable from the middle logic board clip.

    • Don't try to remove it by pulling on the cable, as it will tear easily.

    • In order for the cable to reach its socket on the logic board, you must route it above the logic board and underneath the audio control flex cable, as shown in the first photo.

  48. Bu adım çevrilmemiş. Çevrilmesine yardım edin

    : adım 48, 1 resimden 1.
    • Remove the final 2.0 mm Phillips screw directly below the SIM card reader.

  49. Bu adım çevrilmemiş. Çevrilmesine yardım edin

    : adım 49, 3 resimden 1. : adım 49, 3 resimden 2. : adım 49, 3 resimden 3.
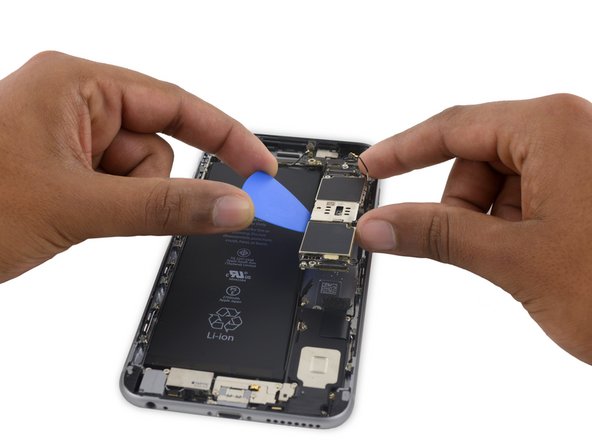
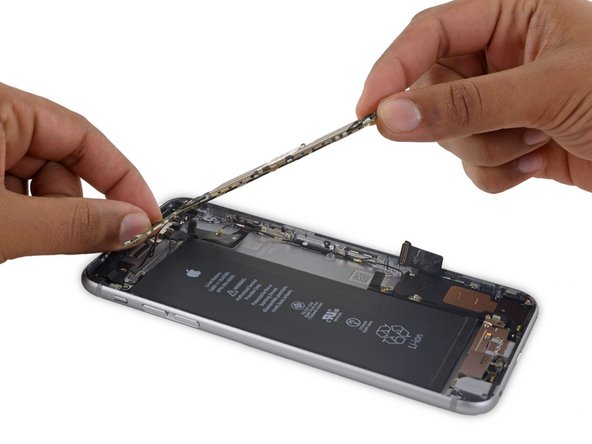
    • Carefully raise—but do not remove—the logic board, lifting it from the bottom edge nearest the Lightning connector.

  50. Bu adım çevrilmemiş. Çevrilmesine yardım edin

    : adım 50, 3 resimden 1. : adım 50, 3 resimden 2. : adım 50, 3 resimden 3.
    • Tip the logic board up to a vertical position to expose the single antenna connector on the underside, near the top edge of the board.

    • Do not attempt to fully remove the logic board yet, as the Wi-Fi/Bluetooth antenna is still connected to the underside of the board.

  51. Bu adım çevrilmemiş. Çevrilmesine yardım edin

    : adım 51, 2 resimden 1. : adım 51, 2 resimden 2.
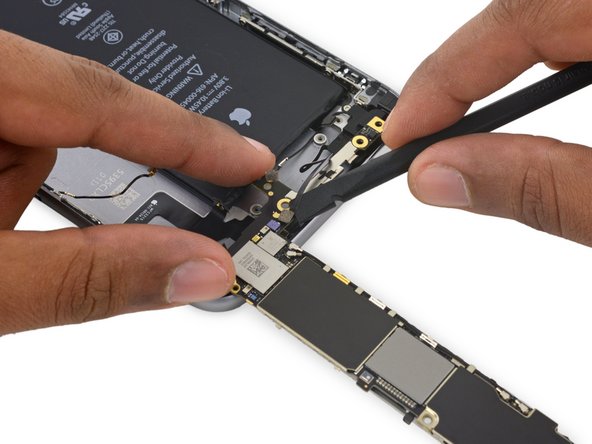
    • Gently lay the logic board upside-down, with the top portion resting against the rear case of the iPhone.

    • Use the flat end of the spudger to disconnect the Wi-Fi/Bluetooth antenna cable from its socket on the back of the logic board.

  52. Bu adım çevrilmemiş. Çevrilmesine yardım edin

    : adım 52, 1 resimden 1.
    • Remove the logic board.

  53. Bu adım çevrilmemiş. Çevrilmesine yardım edin

    : adım 53, 2 resimden 1. : adım 53, 2 resimden 2.
    • Remove the following four Phillips screws:

    • Three 2.0 mm screws holding the power button bracket in place

    • One 1.3 mm Phillips screw over the flash and microphone bracket

  54. Bu adım çevrilmemiş. Çevrilmesine yardım edin

    : adım 54, 2 resimden 1. : adım 54, 2 resimden 2.
    • Remove the flash/microphone bracket.

  55. Bu adım çevrilmemiş. Çevrilmesine yardım edin

    : adım 55, 2 resimden 1. : adım 55, 2 resimden 2.
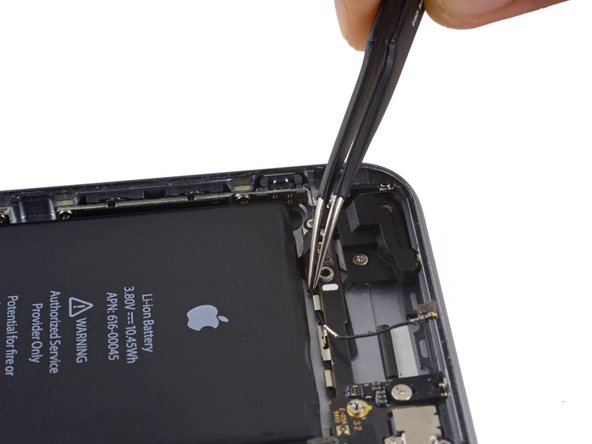
    • Use the pointed end of a spudger to lift the flash out of its housing in the rear case.

  56. Bu adım çevrilmemiş. Çevrilmesine yardım edin

    : adım 56, 2 resimden 1. : adım 56, 2 resimden 2.
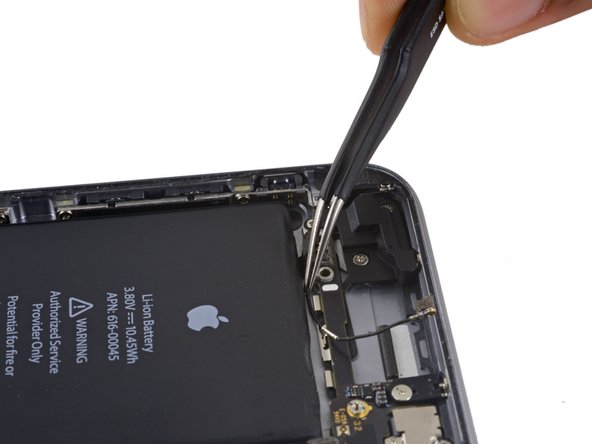
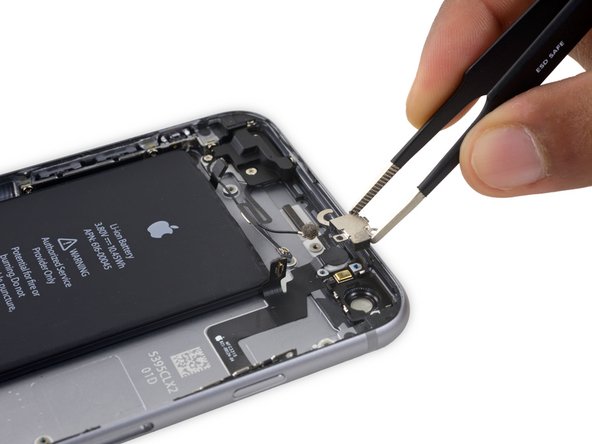
    • Use the flat end of a spudger to peel the power button flex cable off the rear case.

  57. Bu adım çevrilmemiş. Çevrilmesine yardım edin

    : adım 57, 3 resimden 1. : adım 57, 3 resimden 2. : adım 57, 3 resimden 3.
    • Insert the tip of a spudger underneath the microphone portion of the flex cable and gently pry it off of the rear case.

  58. Bu adım çevrilmemiş. Çevrilmesine yardım edin

    : adım 58, 3 resimden 1. : adım 58, 3 resimden 2. : adım 58, 3 resimden 3.
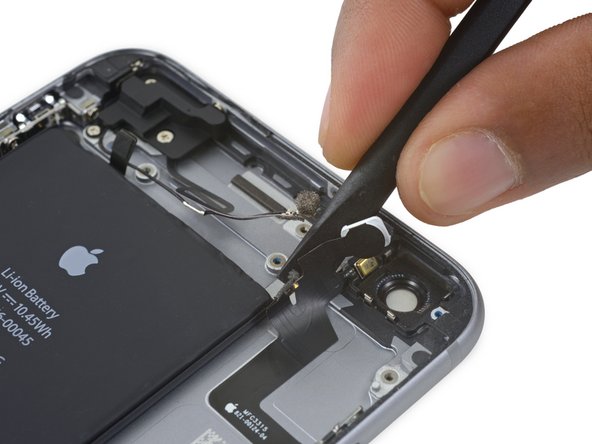
    • Slide an opening pick underneath the power button flex cable to pry the cable off the rear case.

  59. Bu adım çevrilmemiş. Çevrilmesine yardım edin

    : adım 59, 2 resimden 1. : adım 59, 2 resimden 2.
    • Remove the power button flex cable.

  60. Bu adım çevrilmemiş. Çevrilmesine yardım edin

    : adım 60, 2 resimden 1. : adım 60, 2 resimden 2.
    • Gently nudge the power button cover out of its slot in the rear case.

  61. Bu adım çevrilmemiş. Çevrilmesine yardım edin

    : adım 61, 2 resimden 1. : adım 61, 2 resimden 2.
    • Remove the button cover.

Bitiş Çizgisi

9 farklı kişi bu kılavuzu tamamladı.

Dante Mazzanti

Üyelik tarihi: 07/13/15

36.177 İtibar

26 adet Kılavuz yazıldı

Bir Yorum

Hi,

I have done all the process, I have replaced the power button, but this does not fix the “no clicking” button issue.

Should I replace the power flat cable too? Or could it be related about how power button is inserted in the hole?

My power button flat is “clicking” if I try it with my nail, but I don’t know if this is enought clicking or it has got too much use..

Fabio - Yanıt

Yorum Ekle

İstatistikleri Görüntüle:

Son 24 Saat: 0

Son 7 gün: 12

Son 30 gün: 32

Her zaman: 7,125