Bu sürüm, hatalı düzenlemeler içerebilir. En son doğrulanmış bellek kopyası dönün.
Neye ihtiyacın var
-
Bu adım çevrilmemiş. Çevrilmesine yardım edin
-
Power off your iPhone before beginning disassembly.
-
Remove the two 3.4 mm Pentalobe screws on either side of the Lightning port.
-
-
-
Eğer iSclack'in üzerindeki plastik derinlik ölçer, iSclack'in merkezine bitişik ise, çıkarın—iPhone 6 gibi büyük telefonlarda kullanılmasına gerek yoktur.
-
Vakumlu ağızları aralamak için iSclack'in sapını kapatın.
-
-
-
iPhone'unuzun altını vakumlu ağızların arasına yerleştirin.
-
iSclack'in üstteki vakumlu ağzını, ana sayfa düğmesini kapatmayacak ancak ana sayfa düğmesinin hemen yukarsına yerleşecek şekilde ekranın üzerine getirin.
-
iSclack'in ağzını kapatmak için sapı açın. Vakumlu ağızları ortalayarak yerleştirip, telefonun ön ve arkasına doğru sıkıca bastırın.
-
-
Bu adım çevrilmemiş. Çevrilmesine yardım edin
-
If you don't have an Anti-Clamp, follow the next three steps to use a suction handle.
-
Apply mild heat to the lower edge of the iPhone using an iOpener or hair dryer for about a minute.
-
-
Bu adım çevrilmemiş. Çevrilmesine yardım edin
-
Apply a suction cup to the lower left corner of the display assembly.
-
-
Bu adım çevrilmemiş. Çevrilmesine yardım edin
-
Pull up on the suction cup with firm, constant pressure to create a slight gap between the front panel and rear case.
-
-
Bu adım çevrilmemiş. Çevrilmesine yardım edin
-
The safest place to pry from is the notch in the front panel above the headphone jack.
-
While still maintaining pressure on the suction cup, insert the flat tip of a spudger into the gap, directly above the headphone jack.
-
-
Bu adım çevrilmemiş. Çevrilmesine yardım edin
-
Twist the spudger to widen the gap between the front panel and the rear case.
-
-
Bu adım çevrilmemiş. Çevrilmesine yardım edin
-
While firmly pulling up on the suction cup, slide the edge of the spudger under the bottom left corner of the display.
-
-
Bu adım çevrilmemiş. Çevrilmesine yardım edin
-
Slide the tip of the spudger up the left side of the phone, between the front panel and the rear case.
-
-
Bu adım çevrilmemiş. Çevrilmesine yardım edin
-
Insert the flat tip of the spudger under the right edge of the display.
-
Slide the spudger up the right side.
-
-
Bu adım çevrilmemiş. Çevrilmesine yardım edin
-
Use a plastic opening tool to hold down the rear case while pulling up the suction cup to open the phone.
-
-
Bu adım çevrilmemiş. Çevrilmesine yardım edin
-
Pull up on the small nub on the suction cup to remove it from the display.
-
-
Bu adım çevrilmemiş. Çevrilmesine yardım edin
-
Gently grasp the display assembly and lift it up to open the phone, using the clips at the top of the front panel as a hinge.
-
Open the display to about a 90º angle, and lean it against something to keep it propped up while you're working on the phone.
-
Add a rubber band to keep the display securely in place while you work. This prevents undue strain on the display cables.
-
-
Bu adım çevrilmemiş. Çevrilmesine yardım edin
-
Remove two Phillips screws securing the battery connector bracket to the logic board, of the following lengths:
-
One 2.9 mm screw
-
One 2.3 mm screw
-
-
Bu adım çevrilmemiş. Çevrilmesine yardım edin
-
Use a spudger or a clean fingernail to disconnect the battery connector by prying it straight up off the logic board.
-
-
Bu adım çevrilmemiş. Çevrilmesine yardım edin
-
Bend the connector back to ensure it doesn't make contact and power the iPhone on while you're working on it.
-
-
-
Aşağıda sıralanan Phillips vidaları çıkartın:
-
Üç adet 1.3 mm'lik vida
-
Bir adet 1.6 mm'lik vida
-
Bir adet 3.0 mm'lik vida
-
-
-
Bu adım çevrilmemiş. Çevrilmesine yardım edin
-
Disconnect the home button/fingerprint sensor cable by prying it straight up from its socket on the logic board.
-
-
Bu adım çevrilmemiş. Çevrilmesine yardım edin
-
Peel up any tape covering the iSight camera bracket screws.
-
-
Bu adım çevrilmemiş. Çevrilmesine yardım edin
-
Remove the following Phillips screws over the camera bracket:
-
One 1.9 mm screw
-
One 2.4 mm screw
-
-
Bu adım çevrilmemiş. Çevrilmesine yardım edin
-
Disconnect the iSight camera connector from its socket on the logic board.
-
-
Bu adım çevrilmemiş. Çevrilmesine yardım edin
-
Insert the flat end of the spudger between the iSight camera and rear casing.
-
Gently pry the camera out from its housing.
-
-
Bu adım çevrilmemiş. Çevrilmesine yardım edin
-
Insert a SIM eject tool into the hole in the SIM tray.
-
Press to eject the SIM tray.
-
-
Bu adım çevrilmemiş. Çevrilmesine yardım edin
-
Remove the single 1.4 mm Phillips screw holding the NFC bracket in place.
-
-
Bu adım çevrilmemiş. Çevrilmesine yardım edin
-
Remove the two 2.7 mm Phillips screws securing the audio control cable bracket to the logic board.
-
-
Bu adım çevrilmemiş. Çevrilmesine yardım edin
-
Disconnect the audio control cable by prying its connector straight up from its socket on the logic board.
-
-
Bu adım çevrilmemiş. Çevrilmesine yardım edin
-
Disconnect the cellular antenna cable by prying its connector straight up from its respective socket on the logic board.
-
-
Bu adım çevrilmemiş. Çevrilmesine yardım edin
-
Disconnect the Wi-Fi diversity antenna cable by prying its connector up from the logic board.
-
-
Bu adım çevrilmemiş. Çevrilmesine yardım edin
-
Disconnect the power button flex cable from its socket on the logic board.
-
-
Bu adım çevrilmemiş. Çevrilmesine yardım edin
-
Disconnect the antenna cable by prying it up from the logic board.
-
-
Bu adım çevrilmemiş. Çevrilmesine yardım edin
-
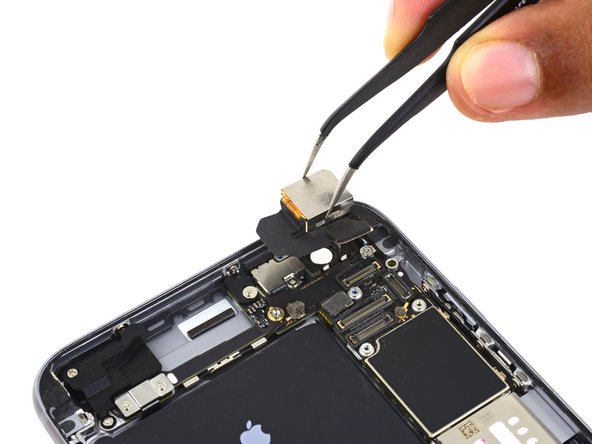
Use the flat end of a spudger to disconnect the Lightning connector flex cable from the logic board.
-
-
Bu adım çevrilmemiş. Çevrilmesine yardım edin
-
Deroute the antenna cable from the two clips on the right edge of the logic board.
-
-
Bu adım çevrilmemiş. Çevrilmesine yardım edin
-
Remove the following screws:
-
One 1.3 mm Phillips screw
-
One 2.6 mm Phillips screw
-
One 2.2 mm standoff screw
-
-
Bu adım çevrilmemiş. Çevrilmesine yardım edin
-
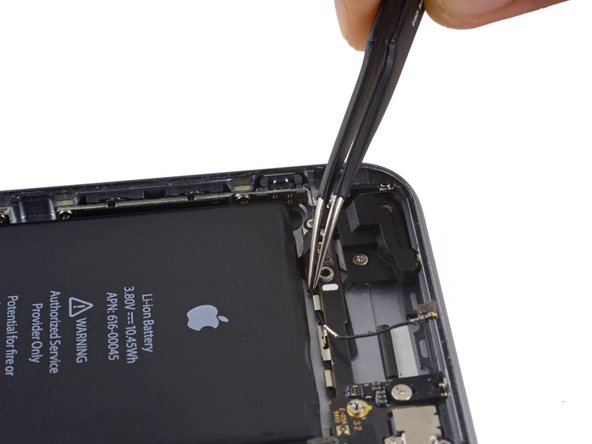
Deroute the upper left cellular antenna cable from the first logic board clip by nudging it out from under the clip, towards the battery.
-
-
Bu adım çevrilmemiş. Çevrilmesine yardım edin
-
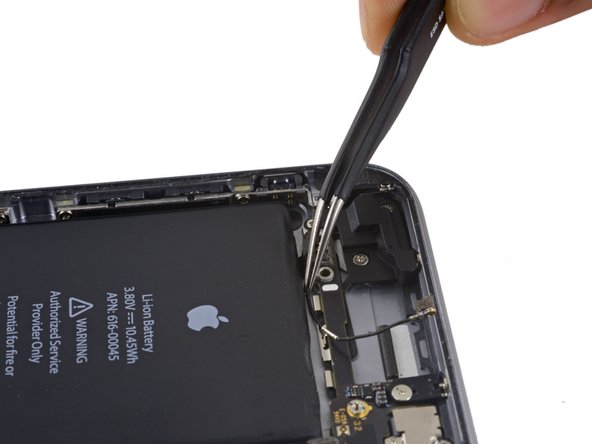
Continue derouting the cellular antenna cable from the second and third logic board clips.
-
Use the pointed tip of a spudger to gently pry the cellular antenna cable from the middle logic board clip.
-
-
Bu adım çevrilmemiş. Çevrilmesine yardım edin
-
Remove the final 2.0 mm Phillips screw directly below the SIM card reader.
-
-
Bu adım çevrilmemiş. Çevrilmesine yardım edin
-
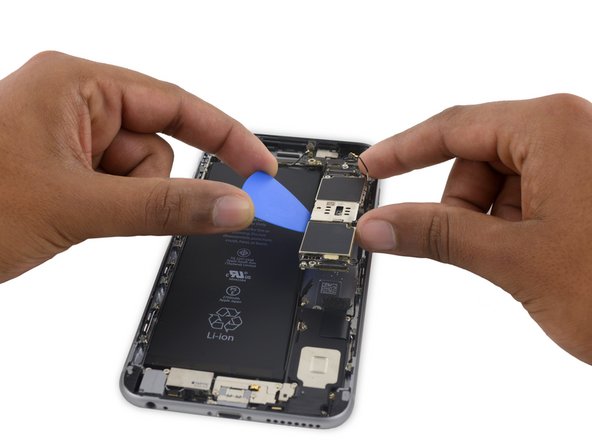
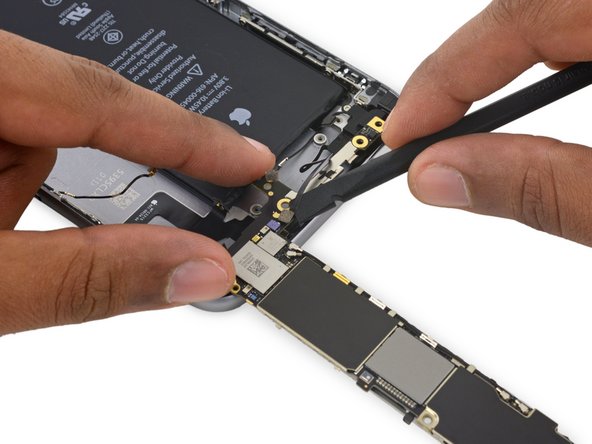
Carefully raise—but do not remove—the logic board, lifting it from the bottom edge nearest the Lightning connector.
-
-
Bu adım çevrilmemiş. Çevrilmesine yardım edin
-
Tip the logic board up to a vertical position to expose the single antenna connector on the underside, near the top edge of the board.
-
-
Bu adım çevrilmemiş. Çevrilmesine yardım edin
-
Gently lay the logic board upside-down, with the top portion resting against the rear case of the iPhone.
-
Use the flat end of the spudger to disconnect the Wi-Fi/Bluetooth antenna cable from its socket on the back of the logic board.
-
-
Bu adım çevrilmemiş. Çevrilmesine yardım edin
-
Remove the sticker over the third screw holding the cellular antenna in place.
-
-
Bu adım çevrilmemiş. Çevrilmesine yardım edin
-
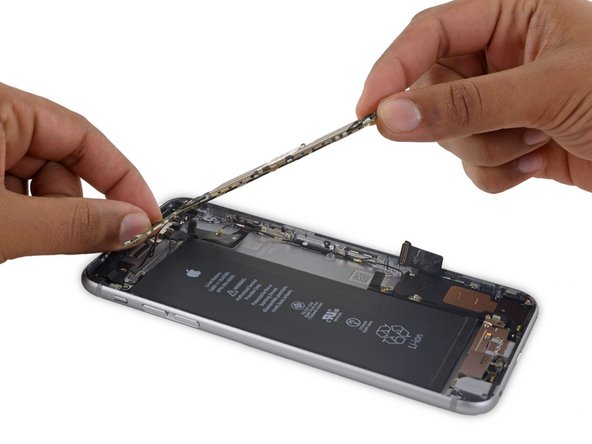
Remove the following three Phillips screws holding the cellular antenna in place:
-
One 2.7 mm screw
-
One 1.7 mm screw
-
One 1.3 mm screw
-
-
Bu adım çevrilmemiş. Çevrilmesine yardım edin
-
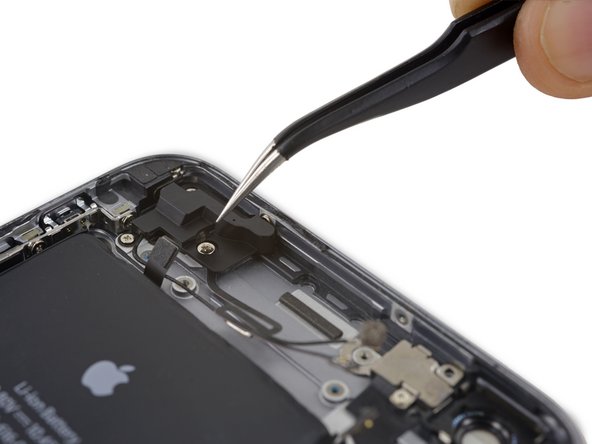
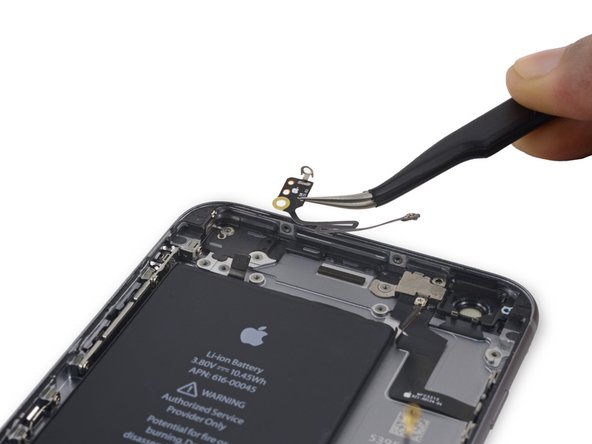
Remove the single 1.3 mm Phillips screw securing the antenna to the rear case.
-


İptal et: Bu kılavuzu tamamlamadım.
33 farklı kişi bu kılavuzu tamamladı.

15 Yorum
Omg
That was an intense read.
in iphone 6s 4.7" wifi antenna is the same and is in the same place?
Didn't you forget to mention first step to remove the two little screws by the power connector? First time doing this and I ended up breaking the metal threaded tabs that the screws go into :(
I guess I should have realized it would have screws somewhere and also researched some more before attempting the repair.
Oh well, looks like I will need to get some teflon tape or something to hold things together.
Exactly! I also broke them, but fortunately I was also replacing the LCD Screen/Digitizer.
Hi, is this repair guide (and the antenna you sell) also valid for the non functioning bluetooth of an Iphone 6S ?