Ana içeriğe geç

Bu sürüm, hatalı düzenlemeler içerebilir. En son doğrulanmış bellek kopyası dönün.

Salt Önkoşul
Bu kılavuz yalnızca diğer kılavuzlar için bir ön koşul olarak kullanılmak üzere tasarlanmıştır. Tek başına eksiktir.

Neye ihtiyacın var

  1. Bu adım çevrilmemiş. Çevrilmesine yardım edin

    : adım 1, 2 resimden 1. : adım 1, 2 resimden 2.
    Bu adımda kullanılan alet:
    Magnetic Project Mat
    $19.95
    Satın Al
    • Remove three 1.2 mm Y000 screws securing the battery connector cover bracket.

    • Remove the bracket.

    • Throughout this repair, keep track of each screw and make sure it goes back exactly where it came from to avoid damaging your iPhone.

    • During reassembly, this is a good point to power on your iPhone and test all functions before you seal the display in place. Be sure to power your iPhone back down completely before you continue working.

  2. Bu adım çevrilmemiş. Çevrilmesine yardım edin

    : adım 2, 2 resimden 1. : adım 2, 2 resimden 2.
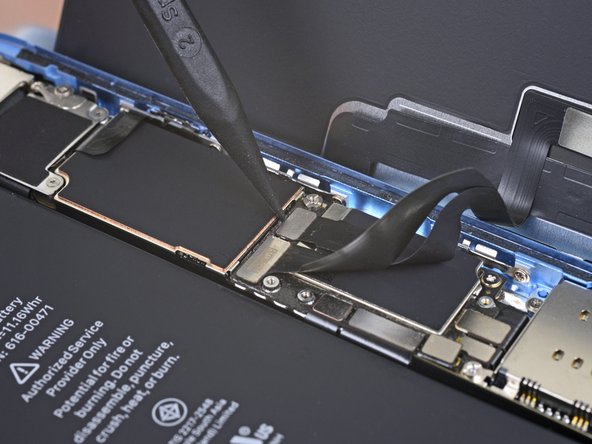
    • Use the point of a spudger to pry the battery connector straight up out of its socket.

    • Try not to damage the black silicone seal surrounding this and other board connections. These seals provide extra protection against water and dust intrusion.

    • Bend the connector slightly away from the logic board to prevent it from accidentally making contact with the socket and providing power to the phone during your repair.

  3. Bu adım çevrilmemiş. Çevrilmesine yardım edin

    : adım 3, 2 resimden 1. : adım 3, 2 resimden 2.
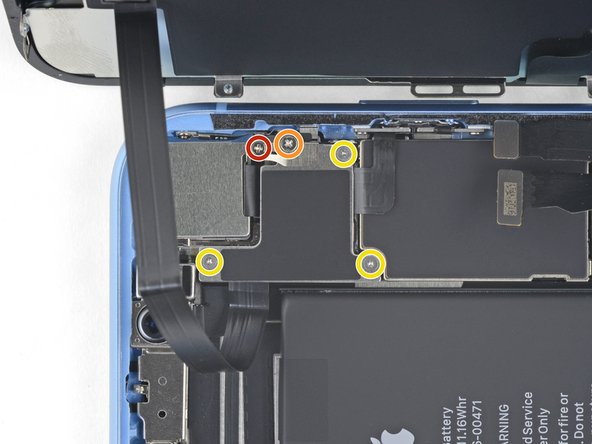
    • Remove the two 1.2 mm Y000 screws securing the display connector bracket.

    • Remove the bracket.

  4. Bu adım çevrilmemiş. Çevrilmesine yardım edin

    : adım 4, 2 resimden 1. : adım 4, 2 resimden 2.
    • Use the tip of a spudger to pry up and disconnect the digitizer cable.

    • To re-attach press connectors like this one, carefully align and press down on one side until it clicks into place, then repeat on the other side. Do not press down on the middle. If the connector is misaligned, the pins can bend, causing permanent damage.

    • If any part of your screen doesn't respond to touch after your repair, disconnect the battery and then re-seat this connector, making sure it clicks fully into place and that there's no dust or other obstruction in the socket.

  5. Bu adım çevrilmemiş. Çevrilmesine yardım edin

    : adım 5, 2 resimden 1. : adım 5, 2 resimden 2.
    • Use the tip of a spudger to disconnect the display cable connector.

  6. Bu adım çevrilmemiş. Çevrilmesine yardım edin

    : adım 6, 2 resimden 1. : adım 6, 2 resimden 2.
    • Remove the five screws securing the logic board connector bracket to the rear case:

    • One 1.3 mm Phillips #000 screw

    • One 1.5 mm Phillips #000 screw

    • Three 1.2 mm Y000 screws

    • Remove the bracket.

    • Be careful not to lose the smaller bracket clipped onto the edge. It's secured with a small clip and is easy to accidentally knock off of the larger bracket.

  7. Bu adım çevrilmemiş. Çevrilmesine yardım edin

    : adım 7, 2 resimden 1. : adım 7, 2 resimden 2.
    • Use the tip of a spudger to pry the front sensor assembly connector up from its socket.

  8. Bu adım çevrilmemiş. Çevrilmesine yardım edin

    : adım 8, 1 resimden 1.
Bitiş Çizgisi

2 farklı kişi bu kılavuzu tamamladı.

Adam O'Camb

Üyelik tarihi: 04/11/15

196.194 İtibar

416 adet Kılavuz yazıldı

0 Yorum

Yorum Ekle

İstatistikleri Görüntüle:

Son 24 Saat: 0

Son 7 gün: 0

Son 30 gün: 2

Her zaman: 638