Ana içeriğe geç

iPod Shuffle 4th Generation Control Button Cover Replacement

Neye ihtiyacın var

  1. iPod Shuffle 4th Generation Control Button Cover Replacement, Rear Panel: adım 1, 1 resimden 1.
    • Accessing the internals of the 4th generation Shuffle is extremely difficult, as the rear panel is both glued to the front case and secured by metal retaining clips. It is highly unlikely that you will be able to remove the rear panel without inflicting cosmetic and/or structural damage.

    • Before proceeding, be sure your Shuffle is switched off.

  2. iPod Shuffle 4th Generation Control Button Cover Replacement: adım 2, 2 resimden 1. iPod Shuffle 4th Generation Control Button Cover Replacement: adım 2, 2 resimden 2.
    • Use a combination of iPod opening tools and metal spudgers to pry the rear panel away from the Shuffle by the seam nearest the ON/OFF switch.

  3. iPod Shuffle 4th Generation Control Button Cover Replacement: adım 3, 1 resimden 1.
    • Remove the rear panel from the Shuffle.

  4. iPod Shuffle 4th Generation Control Button Cover Replacement, Logic Board Assembly: adım 4, 1 resimden 1.
    • If present, remove the thin black moisture seal covering the Shuffle's internals.

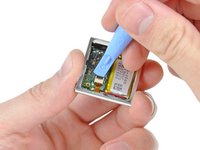
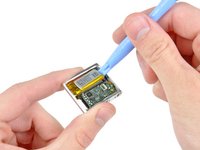
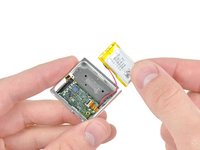
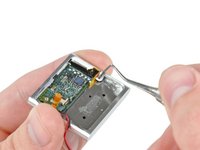
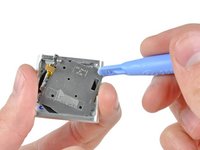
    • Remove the single 2.1 mm Phillips screw securing the logic board to the front case.

  5. iPod Shuffle 4th Generation Control Button Cover Replacement: adım 5, 2 resimden 1. iPod Shuffle 4th Generation Control Button Cover Replacement: adım 5, 2 resimden 2.
    • Use the edge of an iPod opening tool to flip up the retaining flap on the control button cable ZIF socket.

    • Be sure you are prying up on the hinged retaining flap, not the socket itself.

    • Use a pair of tweezers to gently pull the control button ribbon cable out of its socket.

  6. iPod Shuffle 4th Generation Control Button Cover Replacement: adım 6, 2 resimden 1. iPod Shuffle 4th Generation Control Button Cover Replacement: adım 6, 2 resimden 2.
    • Use an iPod opening tool to gently pry the battery off the adhesive securing it to the front case.

    • Lift the battery out of the front case, being sure not to strain its delicate leads.

  7. iPod Shuffle 4th Generation Control Button Cover Replacement: adım 7, 2 resimden 1. iPod Shuffle 4th Generation Control Button Cover Replacement: adım 7, 2 resimden 2.
    • Insert the tip of a metal probe into the hole molded into the logic board retainer nearest the logic board.

    • Pry the retainer first away from the front of the front case, then pull it away from the side of the front case.

    • Remove the logic board retainer from the Shuffle.

  8. iPod Shuffle 4th Generation Control Button Cover Replacement: adım 8, 2 resimden 1. iPod Shuffle 4th Generation Control Button Cover Replacement: adım 8, 2 resimden 2.
    • Use the edge of an iPod opening tool to push the headphone jack down toward the center of the Shuffle.

  9. iPod Shuffle 4th Generation Control Button Cover Replacement: adım 9, 2 resimden 1. iPod Shuffle 4th Generation Control Button Cover Replacement: adım 9, 2 resimden 2.
    • Continue pushing the logic board down away from the top edge of the Shuffle.

    • Pull the logic board out of the front case by the side nearest the ON/OFF button and gently maneuver the headphone jack out of its recess in the front case.

    • Remove the logic board assembly from the Shuffle.

  10. iPod Shuffle 4th Generation Control Button Cover Replacement, Control Buttons: adım 10, 1 resimden 1.
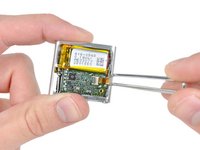
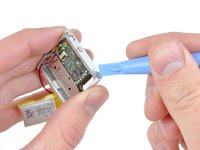
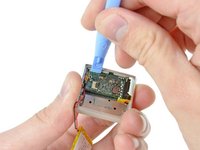
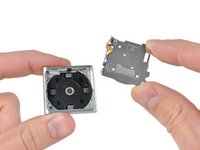
    • Remove the following four screws:

    • Two 1.2 mm Phillips screws with large heads.

    • Two 1.6 mm Phillips screws with small heads.

  11. iPod Shuffle 4th Generation Control Button Cover Replacement: adım 11, 2 resimden 1. iPod Shuffle 4th Generation Control Button Cover Replacement: adım 11, 2 resimden 2.
    • Use an iPod opening tool to pull the control button plate out of the front case.

    • Remove the control buttons from the Shuffle.

  12. iPod Shuffle 4th Generation Control Button Cover Replacement, Control Button Cover: adım 12, 1 resimden 1.
    • Push the rubber control button cover out of the front case.

    • When reinstalling the control button cover, be sure it is properly aligned and that its top and bottom edges are seated in the grooves cut into the front case.

Sonuç

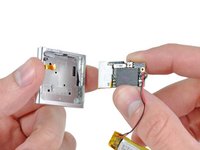
To reassemble your device, follow these instructions in reverse order.

2 farklı kişi bu kılavuzu tamamladı.

2 Yorum

Hola, quisiera saber donde poder localizar las piezas de repuesto de la botonera play/pause tanto la pieza electrónica como la botonera. Gracias

Verónica - Yanıt

Yorum Ekle

İstatistikleri Görüntüle:

Son 24 Saat: 2

Son 7 gün: 10

Son 30 gün: 20

Her zaman: 8,858