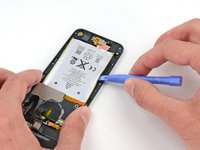
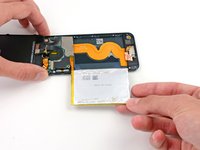
Ana içeriğe geç

iPod Touch 5th Generation Battery Replacement

Salt Önkoşul
Bu kılavuz yalnızca diğer kılavuzlar için bir ön koşul olarak kullanılmak üzere tasarlanmıştır. Tek başına eksiktir.

Neye ihtiyacın var

  1. iPod Touch 5th Generation Battery Replacement, Battery: adım 1, 1 resimden 1.
    • Remove three 1.6 mm #000 Phillips screws securing the logic board to the rear case.

  2. iPod Touch 5th Generation Battery Replacement, Warm back of iPod with heat gun or hair dryer: adım 2, 1 resimden 1.
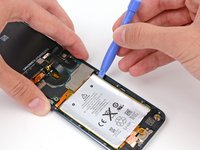
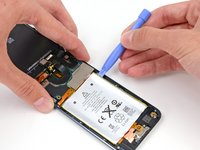
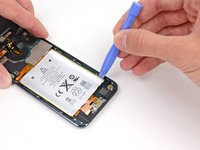
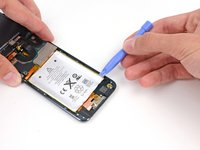
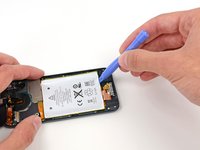
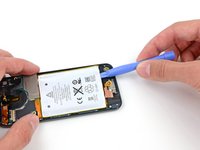
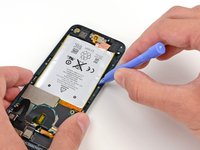
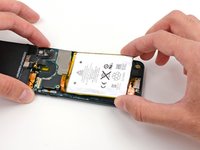
    • There are two strips of adhesive keeping the battery in place.

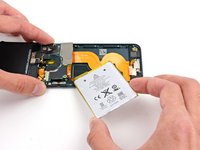
    • Turn the iPod over and heat the BACK of the aluminium iPod case. Do not heat the battery.

    • The aluminium case does not have to be hot; you should always be able to touch heated parts with your fingers at all times without it being uncomfortable.

  3. iPod Touch 5th Generation Battery Replacement: adım 3, 2 resimden 1. iPod Touch 5th Generation Battery Replacement: adım 3, 2 resimden 2.
    • There are three notches on either side of the battery. In the next few steps, you will be using these notches to gradually pry the battery up from the rear case.

    • The battery is secured with large amounts of adhesive, so you'll need to go slowly and carefully to avoid puncturing or creasing the battery.

    • Insert a plastic opening tool into the top right notch and gently pry up on the battery.

    • Do not attempt to pry up the entire battery at this point; you just want to start to loosen the adhesive at each of the prying points, in turn.

  4. iPod Touch 5th Generation Battery Replacement: adım 4, 2 resimden 1. iPod Touch 5th Generation Battery Replacement: adım 4, 2 resimden 2.
    • Continue with the lower right notch. Insert the plastic opening tool into the notch, and gently pry up on the side of the battery.

  5. iPod Touch 5th Generation Battery Replacement: adım 5, 2 resimden 1. iPod Touch 5th Generation Battery Replacement: adım 5, 2 resimden 2.
    • Continue prying the battery up from the bottom.

    • When prying along the bottom, be careful not to press down too hard against the speaker or headphone jack.

  6. iPod Touch 5th Generation Battery Replacement: adım 6, 2 resimden 1. iPod Touch 5th Generation Battery Replacement: adım 6, 2 resimden 2.
    • Pry along the left side as well.

    • You may need to move back and forth between the sides and bottom of the battery, prying a small amount at a time until the battery is entirely free from the adhesive.

  7. iPod Touch 5th Generation Battery Replacement: adım 7, 3 resimden 1. iPod Touch 5th Generation Battery Replacement: adım 7, 3 resimden 2. iPod Touch 5th Generation Battery Replacement: adım 7, 3 resimden 3.
    • Once all of the adhesive is loosened, lift the battery up from the bottom and swing it out over the left side of the rear case.

    • Be sure not to yank it out, as it is soldered to the logic board.

    • Flip the battery over to straighten its cable and set it down.

Sonuç

To reassemble your device, follow these instructions in reverse order.

Bir başkası bu kılavuzu tamamladı.

Andrew Optimus Goldheart

Üyelik tarihi: 10/17/09

502.275 İtibar

407 adet Kılavuz yazıldı

Ekip

iFixit iFixit üyesi

Staff

136 Üyeler

16.560 adet Kılavuz yazıldı

3 Yorum

You skipped steps.

Nick - Yanıt

This isn't even half of the procedure - the battery isn't even completely removed, much less replaced! Helpful but nowhere near complete.

Paul Pearah - Yanıt

Yeah, you might have skipped the most critical steps, like glass and bezel removal, desoldering, soldering etc..

dominic benavente - Yanıt

Yorum Ekle

İstatistikleri Görüntüle:

Son 24 Saat: 0

Son 7 gün: 0

Son 30 gün: 0

Her zaman: 2,691