Ana içeriğe geç

iRobot Roomba 860 Debris Extractor Cleaning / Replacement

Neye ihtiyacın var

  1. iRobot Roomba 860 Debris Extractor Cleaning / Replacement, Debris Extractors: adım 1, 2 resimden 1. iRobot Roomba 860 Debris Extractor Cleaning / Replacement, Debris Extractors: adım 1, 2 resimden 2.
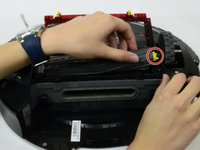
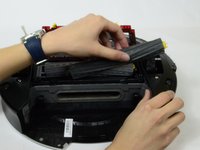
    • To remove the debris extractor, first begin by removing and emptying the trash bin.

    • Push down and pull out on the silver button located on the top of the Roomba in the back.

    • The trash bin should then slide out.

  2. iRobot Roomba 860 Debris Extractor Cleaning / Replacement: adım 2, 2 resimden 1. iRobot Roomba 860 Debris Extractor Cleaning / Replacement: adım 2, 2 resimden 2.
    • With the Roomba upside down, locate the two yellow buttons by the extractor.

    • To open the flap holding the extractos in place, pinch the two yellow buttons together towards the center and pull up on the flap at the same time

  3. iRobot Roomba 860 Debris Extractor Cleaning / Replacement: adım 3, 3 resimden 1. iRobot Roomba 860 Debris Extractor Cleaning / Replacement: adım 3, 3 resimden 2. iRobot Roomba 860 Debris Extractor Cleaning / Replacement: adım 3, 3 resimden 3.
    • Once the flap is open, grab the yellow end of the dark gray extractor and pull up slightly.

    • After lifting it up about an inch, pull it out towards one of the side wheels.

    • The extractor should slide out with ease. Repeat the same procedure for the light gray debris extractor.

Sonuç

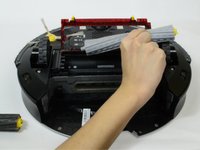
To reassemble your device, follow these instructions in reverse order.

2 farklı kişi bu kılavuzu tamamladı.

Ryan Murphy

Üyelik tarihi: 03/02/17

446 İtibar

4 adet Kılavuz yazıldı

Ekip

USF Tampa, Team S13-G5, Cagle Spring 2017 USF Tampa, Team S13-G5, Cagle Spring 2017 üyesi

USFT-CAGLE-S17S13G5

4 Üyeler

4 adet Kılavuz yazıldı

0 Yorum

Yorum Ekle

İstatistikleri Görüntüle:

Son 24 Saat: 1

Son 7 gün: 3

Son 30 gün: 15

Her zaman: 1,410