Ana içeriğe geç

HomePod Teardown

Adım 10 çevriliyor

İngilizce
Almanca
Adım 10
HomePod Teardown: adım 0, 3 resimden 1. HomePod Teardown: adım 0, 3 resimden 2. HomePod Teardown: adım 0, 3 resimden 3.
  • De-shielding that board shows us some of the fun that's running the light show up top:

  • Texas Instruments TLC5971 LED driver

  • Cypress CY8C4245LQI-483 Programmable System-on-Chip, likely tasked with touch control

  • ON Semiconductor FPF1039 slew-rate-controlled load switch

  • Texas Instruments TPS62135 4 A step-down converter

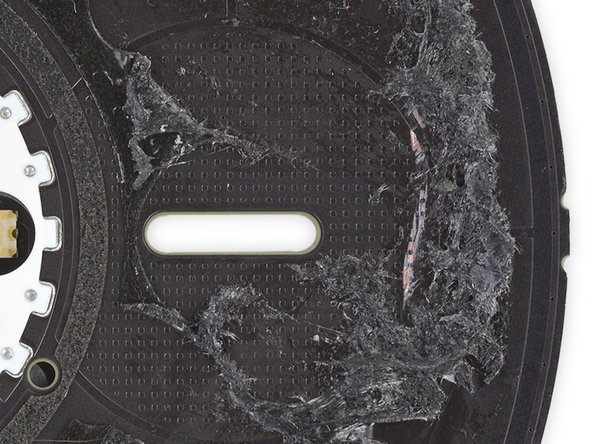
  • The flip side of the board houses the LEDs and the diffuser that gives the indicator its cloudy look.

  • The plus and minus symbols are cut straight through the board, and each has its own little triad of LEDs plus a light guide to aim the photons where they're needed most.

  • The top side of the board (second photo) sports a neatly organized pattern of tiny divots—possibly a capacitive grid, like on the Google Home, for registering your taps and touches on the surface above.

Das Lösen der Platine zeigt uns das Spielzeug, das die Lichtshow auf dem Deckel betreibt:

Texas Instruments TLC5971 LED-Treiber

Cypress CY8C4245LQI-483 Programmierbarer System-on-Chip, vermutlich für die Touch-Steuerung

ON Semiconductor FPF1039 drehzahlgeregelte (slew rate) Lastschaltung

Texas Instruments TPS62135 4 A Abwärtswandler

Die Rückseite der Platine beherbergt die LEDs und den Diffusor, der der Anzeige ihren verwaschenen Look gibt.

Die Plus- und Minus-Symbole sind direkt durch die Platine geschnitten. Jedes Symbol hat seine eigenen drei LEDs, um die Photonen dahin zu richten, wo sie am meisten gebraucht werden.

Die Oberseite der Platine (zweites Bild) beinhaltet ein sauber angeordnetes Muster kleiner Elemente - vermutlich ein kapazitives Raster, wie auf dem Google Home, um deine Berührungen und Bewegungen auf der Oberfläche darüber zu registrieren.

Katkılarınız, açık kaynak Creative Commons lisansı altında lisanslanmaktadır.