Ana içeriğe geç

Reemplazo del conjunto de pantalla del iPad Pro 12.9"

Uyarı: Ön koşul olan bir kılavuzu düzenliyorsunuz. Yapacağınız herhangi bir değişiklik bu adımın yer aldığı bütün 4 kılavuzları etkileyecektir.

İngilizce
İspanyolca
Adım 9
iPad Pro 12.9" Display Assembly Replacement: adım 0, 3 resimden 1. iPad Pro 12.9" Display Assembly Replacement: adım 0, 3 resimden 2. iPad Pro 12.9" Display Assembly Replacement: adım 0, 3 resimden 3.
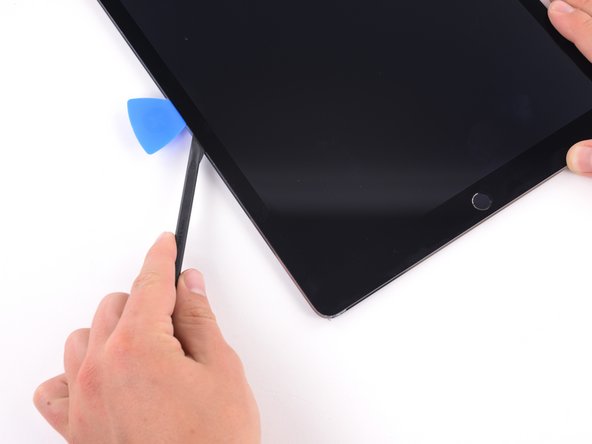
  • Lay a hot iOpener along the bottom left corner of the iPad, spanning from the opening pick to the home button.

  • After letting the adhesive soften, insert an opening pick or halberd spudger into the gap next to the Smart Connector.

  • Be careful not to insert the halberd spudger more than 2 mm.

  • Use an opening pick or halberd spudger to slice the adhesive along the bottom left side of the iPad. If the slicing becomes difficult, reheat the edge and try again.

Coloca un iOpener caliente a lo largo de la esquina inferior izquierda del iPad, desde la selección de apertura hasta el botón de inicio.

Después de dejar que el adhesivo se ablande, inserta una púa de apertura o un spudger halberd en el espacio junto al conector inteligente.

Ten cuidado de no introducir la púa de apertura más de 2 mm.

Usa una púa de apertura o un spudger de alabarda para cortar el adhesivo a lo largo del lado inferior izquierdo del iPad. Si el corte se vuelve difícil, vuelve a calentar el borde y vuelve a intentarlo.

Katkılarınız, açık kaynak Creative Commons lisansı altında lisanslanmaktadır.