Ana içeriğe geç

Smontaggio controller Oculus Quest 2

İngilizce
İtalyanca
Adım 6
Oculus Quest 2 Controller Disassembly, Disconnect The Ribbon from Main Circuit Board: adım 0, 3 resimden 1. Oculus Quest 2 Controller Disassembly, Disconnect The Ribbon from Main Circuit Board: adım 0, 3 resimden 2. Oculus Quest 2 Controller Disassembly, Disconnect The Ribbon from Main Circuit Board: adım 0, 3 resimden 3.
Disconnect The Ribbon from Main Circuit Board
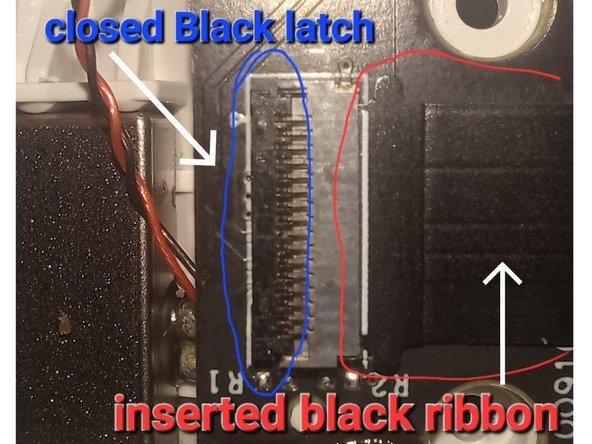
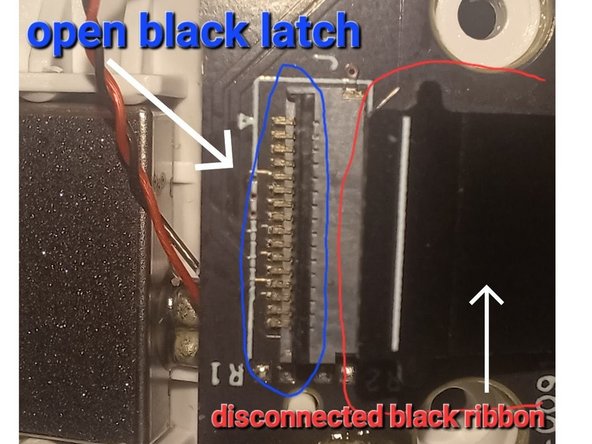
  • Disconnect the ribbon. There is a latch (possibly black - opposite from the ribbon side of the connector) you flip up on the main circuit board (blue arrow). This is easy to take apart but a pain to put back together. Make sure you have needle-nose pliers or tweezers for this when you put it back together.

  • The main circuit board is not the battery circuit board you first come to. As seen in the 2nd and 3rd images.

  • Blue arrow points to ribbon connector on main circuit board. White arrows on 2nd & 3rd images point to ribbon and connector latch on battery circuit board.

  • The connector can be damaged if you are not careful.

Scollega il cavo a nastro. C'è una linguetta (possibilmente nera - opposta al lato del cavo nel connettore) che devi sollevare sulla scheda madre (freccia blu). È facile da smontare, ma complicato da rimettere insieme. Assicurati di avere delle pinze a punta fine o delle pinzette quando lo rimonti.

La scheda madre non è la scheda del circuito della batteria che incontri per prima. Come si vede nella seconda e terza immagine.

La freccia blu indica il connettore del cavo a nastro sulla scheda madre. Le frecce bianche nella seconda e terza immagine indicano il cavo a nastro e la linguetta del connettore sulla scheda del circuito della batteria.

Il connettore può essere danneggiato se non presti attenzione.

Katkılarınız, açık kaynak Creative Commons lisansı altında lisanslanmaktadır.