Ana içeriğe geç

iPhone 5s Displayeinheit ersetzen

Uyarı: Ön koşul olan bir kılavuzu düzenliyorsunuz. Yapacağınız herhangi bir değişiklik bu adımın yer aldığı bütün 32 kılavuzları etkileyecektir.

Adım 10 çevriliyor

İngilizce
Almanca
Adım 10
iPhone 5s Front Panel Assembly Replacement: adım 0, 2 resimden 1. iPhone 5s Front Panel Assembly Replacement: adım 0, 2 resimden 2.
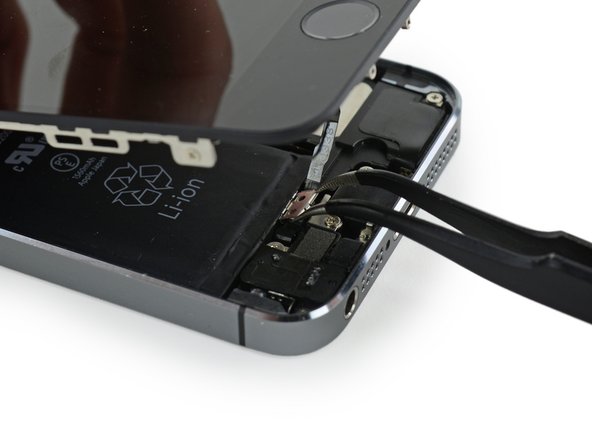
  • During reassembly, you will need to reinstall the Touch ID cable bracket. The top of the bracket needs to slide between the battery and Touch ID cable connector, in front of the metal tab. The bottom must latch down over the connector.

  • Slide the top of the bracket over the Touch ID cable connector from left to right.

  • Alternatively, lay the bracket directly over the connector. The edge with the "leg" will prop the bracket up at a slight angle, and the opposite edge must be between the cable connector and the metal tab near the battery. With the edge of a spudger flat against the bracket, apply gentle downward pressure to snap in the back and front clasps.

Beim Wiederzusammenbau musst du die Touch ID Kabelhalterung wieder einsetzen. Die obere Kante der Halterung muss sich vor die Metalllasche zwischen den Akku und dem Kabelstecker des Touch ID Kabels schieben. Die Unterkante muss über dem Stecker einrasten.

Schiebe die Oberseite von links nach rechts über den Anschluss des Touch ID Kabels.

Du kannst die Halterung auch direkt über den Stecker legen. Die Kante mit dem "Füßchen" hebt die Halterung leicht schräg an und die gegenüberliegende Kante liegt zwischen dem Kabelstecker und der Metalllasche nahe am Akku. Drücke mit dem flachen Ende eines Spudgers die Halterung leicht herunter, bis die vorderen und hinteren Klammern einrasten.

Katkılarınız, açık kaynak Creative Commons lisansı altında lisanslanmaktadır.