Ana içeriğe geç

why! N240BU Hard Drive M.2 Replacement

Neye ihtiyacın var

  1. why! N240BU Hard Drive M.2 Replacement, Battery: adım 1, 2 resimden 1. why! N240BU Hard Drive M.2 Replacement, Battery: adım 1, 2 resimden 2.
    • Start by unlocking the right locking latch.

    • Then, by simultaneously unlocking the left latch, lift the battery out of its socket.

  2. why! N240BU Hard Drive M.2 Replacement, Access to main components: adım 2, 2 resimden 1. why! N240BU Hard Drive M.2 Replacement, Access to main components: adım 2, 2 resimden 2.
    • Begin by spotting the dummy memory card.

    • Then, remove it and put it on your workplan.

  3. why! N240BU Hard Drive M.2 Replacement: adım 3, 3 resimden 1. why! N240BU Hard Drive M.2 Replacement: adım 3, 3 resimden 2. why! N240BU Hard Drive M.2 Replacement: adım 3, 3 resimden 3.
    • Locate the 15 screws that hold the bottom cover of the device in place.

    • Unscrew them and place them on your work surface.

    • Then, un-clip the bottom cover, starting with the side shown in the third picture.

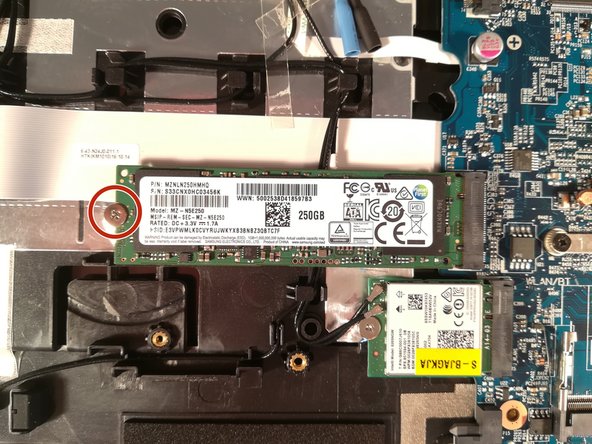
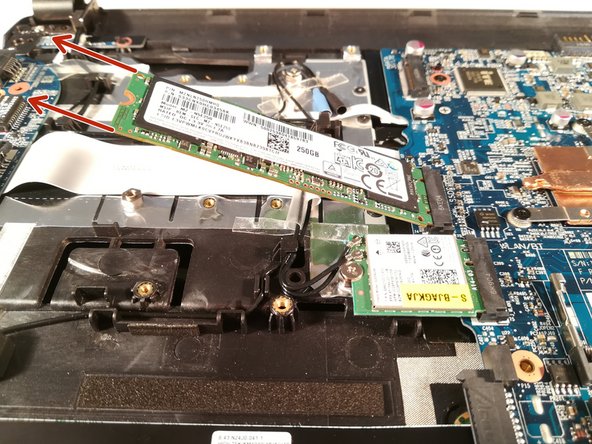
  4. why! N240BU Hard Drive M.2 Replacement, SSD Hard Drive: adım 4, 3 resimden 1. why! N240BU Hard Drive M.2 Replacement, SSD Hard Drive: adım 4, 3 resimden 2. why! N240BU Hard Drive M.2 Replacement, SSD Hard Drive: adım 4, 3 resimden 3.
    • Unscrew the screw circled in red

    • Pull out the M.2 SSD in the direction of the red arrows

Sonuç

To reassemble your device, follow these instructions in reverse order.

Bir başkası bu kılavuzu tamamladı.

Bu çevirmenlere özel teşekkürler:

fr en

100%

Bu çevirmenler dünyayı onarmamıza yardım ediyor! Katkıda bulunmak ister misiniz?
Çeviriye Başlayın ›

Felice Suglia

Üyelik tarihi: 06/15/13

31.100 İtibar

264 adet Kılavuz yazıldı

0 Yorum

Yorum Ekle

İstatistikleri Görüntüle:

Son 24 Saat: 0

Son 7 gün: 3

Son 30 gün: 4

Her zaman: 222