Ana içeriğe geç

why! N240JU Replacing SSD M.2 Disk

Neye ihtiyacın var

  1. why! N240JU Replacing SSD M.2 Disk, Battery: adım 1, 2 resimden 1. why! N240JU Replacing SSD M.2 Disk, Battery: adım 1, 2 resimden 2.
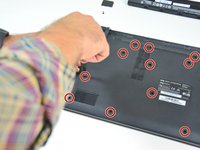
    • Start by unlocking the right locking latch.

    • Then, by simultaneously unlocking the left latch, lift the battery out of its socket.

  2. why! N240JU Replacing SSD M.2 Disk, Access to main components: adım 2, 2 resimden 1. why! N240JU Replacing SSD M.2 Disk, Access to main components: adım 2, 2 resimden 2.
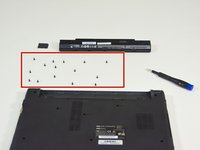
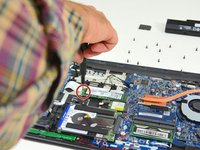
    • Begin by spotting the dummy memory card.

    • Then, remove it and put it on your workplan.

  3. why! N240JU Replacing SSD M.2 Disk: adım 3, 3 resimden 1. why! N240JU Replacing SSD M.2 Disk: adım 3, 3 resimden 2. why! N240JU Replacing SSD M.2 Disk: adım 3, 3 resimden 3.
    • Locate the 15 screws that hold the bottom cover of the device in place.

    • Unscrew them and place them on your work surface.

    • Then, un-clip the bottom cover, starting with the side shown in the third picture.

  4. why! N240JU Replacing SSD M.2 Disk, SSD M.2 disk: adım 4, 3 resimden 1. why! N240JU Replacing SSD M.2 Disk, SSD M.2 disk: adım 4, 3 resimden 2. why! N240JU Replacing SSD M.2 Disk, SSD M.2 disk: adım 4, 3 resimden 3.
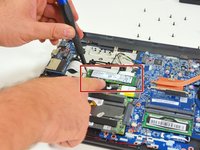
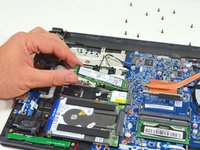
    • Locate the M.2 SSD in its slot.

    • Unscrew the fastening screw of the latter.

    • Lift and remove the SSD M.2 drive from its connector.

Sonuç

To reassemble your device, follow the instructions in reverse order.

Bu çevirmenlere özel teşekkürler:

fr en

100%

Israel dünyayı onarmamıza yardım ediyor! Katkıda bulunmak ister misiniz?
Çeviriye Başlayın ›

Felice Suglia

Üyelik tarihi: 06/15/13

31.100 İtibar

264 adet Kılavuz yazıldı

0 Yorum

Yorum Ekle

İstatistikleri Görüntüle:

Son 24 Saat: 0

Son 7 gün: 1

Son 30 gün: 3

Her zaman: 382