Ana içeriğe geç

Neye ihtiyacın var

Bu teardown bir tamir kılavuzu değildir. Car and Drivers Auto HandHeld Vacuum Bagless cihazınızı onarmak için, servis kılavuzumuzu kullanın.

  1. Car and Drivers Auto HandHeld Vacuum Bagless Teardown, Car and Drivers Auto HandHeld Vacuum Bagless Teardown: adım 1, 3 resimden 1. Car and Drivers Auto HandHeld Vacuum Bagless Teardown, Car and Drivers Auto HandHeld Vacuum Bagless Teardown: adım 1, 3 resimden 2. Car and Drivers Auto HandHeld Vacuum Bagless Teardown, Car and Drivers Auto HandHeld Vacuum Bagless Teardown: adım 1, 3 resimden 3.
    • Locate the four screws locate outer gray shelll

    • ''I REMOVED THE SCREWS WITH PH #OO SCREWDRIVER FROM (IFIXIT)

    • New PLace four screws to the side

  2. Car and Drivers Auto HandHeld Vacuum Bagless Teardown: adım 2, 1 resimden 1.
    • Here are the four screws from vacuum

  3. Car and Drivers Auto HandHeld Vacuum Bagless Teardown: adım 3, 3 resimden 1. Car and Drivers Auto HandHeld Vacuum Bagless Teardown: adım 3, 3 resimden 2. Car and Drivers Auto HandHeld Vacuum Bagless Teardown: adım 3, 3 resimden 3.
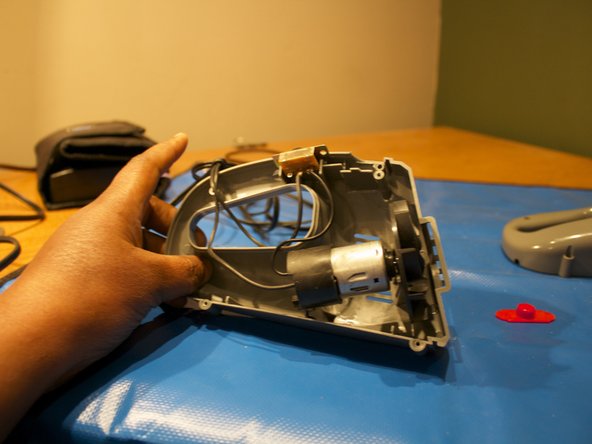
    • Remove the top grey shell of the vacuum

    • Place a red tab to the side

    • Let start looking at the 9volt motor with wire and on/off switch.

    • I remove the outer shell . I remove the motor and wires and on/off switch.

  4. Car and Drivers Auto HandHeld Vacuum Bagless Teardown: adım 4, 1 resimden 1.
    • This it complete teardown on Car and Driver HandHeld Vacuum bagless!

kempc8

Üyelik tarihi: 11/22/13

899 İtibar

7 adet Kılavuz yazıldı

Ekip

K and K Fixit K and K Fixit üyesi

Business

1 Üye

11 adet Kılavuz yazıldı

0 Yorum

Yorum Ekle

İstatistikleri Görüntüle:

Son 24 Saat: 0

Son 7 gün: 4

Son 30 gün: 11

Her zaman: 1,015