Ana içeriğe geç

Neye ihtiyacın var

Bu teardown bir tamir kılavuzu değildir. Epson Stylus Photo 820 cihazınızı onarmak için, servis kılavuzumuzu kullanın.

  1. Epson Stylus Photo 820 Teardown, Epson Stylus Photo 820 Teardown: adım 1, 1 resimden 1.
    • This is a teardown of the Epson Stylus 820 Photo color printer.

    • Caution: Along with being the most epic, this is also the messiest teardown on iFixit. If you decide to do this, make sure you do it on a surface that you will not care if it gets covered in ink.

  2. Epson Stylus Photo 820 Teardown: adım 2, 2 resimden 1. Epson Stylus Photo 820 Teardown: adım 2, 2 resimden 2.
    • The ink cartridges are replaceable. That is a good sign.

  3. Epson Stylus Photo 820 Teardown: adım 3, 3 resimden 1. Epson Stylus Photo 820 Teardown: adım 3, 3 resimden 2. Epson Stylus Photo 820 Teardown: adım 3, 3 resimden 3.
    • Only one screw on the outside. That looks like a good sign.

    • After removing the screw, the three tabs on the back can be unhooked.

  4. Epson Stylus Photo 820 Teardown: adım 4, 2 resimden 1. Epson Stylus Photo 820 Teardown: adım 4, 2 resimden 2.
    • What are these strange slots on the bottom of the printer?

    • Answer: according to the existing iFixit guide, they allow access to the tabs holding the cover in place.

    • Opening this printer is a lot harder than it looks.

  5. Epson Stylus Photo 820 Teardown: adım 5, 3 resimden 1. Epson Stylus Photo 820 Teardown: adım 5, 3 resimden 2. Epson Stylus Photo 820 Teardown: adım 5, 3 resimden 3.
    • Now it is time to unlatch two more tabs.

    • The case has started to separate.

  6. Epson Stylus Photo 820 Teardown: adım 6, 1 resimden 1.
    • It was necessary to pry this piece of plastic away from the USB port while removing the case.

  7. Epson Stylus Photo 820 Teardown: adım 7, 2 resimden 1. Epson Stylus Photo 820 Teardown: adım 7, 2 resimden 2.
    • The cover is finally off!

    • Not much more can be seen by taking off the cover.

  8. Epson Stylus Photo 820 Teardown: adım 8, 2 resimden 1. Epson Stylus Photo 820 Teardown: adım 8, 2 resimden 2.
    • Next step: the stepper motor.

    • The drive belt can be easily removed by pressing on a tensioner on the other side of the printer. +1 for reparability!

  9. Epson Stylus Photo 820 Teardown: adım 9, 2 resimden 1. Epson Stylus Photo 820 Teardown: adım 9, 2 resimden 2.
    • After removing 4 screws, the stepper motor comes out.

  10. Epson Stylus Photo 820 Teardown: adım 10, 2 resimden 1. Epson Stylus Photo 820 Teardown: adım 10, 2 resimden 2.
    • The stepper motor cable is routed through a series of plastic tabs that hold it down.

    • It eventually connects to the (hidden) logic board.

  11. Epson Stylus Photo 820 Teardown: adım 11, 2 resimden 1. Epson Stylus Photo 820 Teardown: adım 11, 2 resimden 2.
    • A closer look at the stepper motor.

    • If you know what voltage this motor runs at or its pinout, please leave a comment!

  12. Epson Stylus Photo 820 Teardown: adım 12, 3 resimden 1. Epson Stylus Photo 820 Teardown: adım 12, 3 resimden 2. Epson Stylus Photo 820 Teardown: adım 12, 3 resimden 3.
    • In order to access the paper tray, 3 screws must be removed.

    • One in an obvious place.

    • One in a less-obvious place.

    • And one hidden in a dark place.

  13. Epson Stylus Photo 820 Teardown: adım 13, 3 resimden 1. Epson Stylus Photo 820 Teardown: adım 13, 3 resimden 2. Epson Stylus Photo 820 Teardown: adım 13, 3 resimden 3.
    • The paper tray has been removed.

    • This magnificent specimen was found deep inside the paper tray.

  14. Epson Stylus Photo 820 Teardown: adım 14, 1 resimden 1.
    • A close look at what is behind the paper tray.

    • While this padding at the bottom looks harmless, do not treat it that way. Skip the next step if you do not want to know what might be hiding inside your printer.

  15. Epson Stylus Photo 820 Teardown: adım 15, 1 resimden 1.
    • The object at the bottom of the last photo was 5 layers of absorbent padding to contain all the ink that the printer has wasted while cleaning its nozzles, in this case almost 8 years of ink.

    • At least the mess wasn't as bad as this or this.

  16. Epson Stylus Photo 820 Teardown: adım 16, 2 resimden 1. Epson Stylus Photo 820 Teardown: adım 16, 2 resimden 2.
    • The power supply is held in place by 3 screws, but it seems to be missing two on the front.

  17. Epson Stylus Photo 820 Teardown: adım 17, 2 resimden 1. Epson Stylus Photo 820 Teardown: adım 17, 2 resimden 2.
    • The power supply is connected to the main board by 4 surprisingly thin wires.

  18. Epson Stylus Photo 820 Teardown: adım 18, 1 resimden 1.
    • The inside of the power supply.

    • The large capacitor (circled in orange) can hold up to 400 volts, which will hurt if you touch it while plugged in.

  19. Epson Stylus Photo 820 Teardown: adım 19, 2 resimden 1. Epson Stylus Photo 820 Teardown: adım 19, 2 resimden 2.
    • The logic board's shielding is held in place with 4 screws.

    • Two cables remain connected to the logic board.

  20. Epson Stylus Photo 820 Teardown: adım 20, 3 resimden 1. Epson Stylus Photo 820 Teardown: adım 20, 3 resimden 2. Epson Stylus Photo 820 Teardown: adım 20, 3 resimden 3.
    • The heatsink is attached to the logic board by these screws.

    • The large dual ribbon cable for the printhead attaches to two connectors on the logic board, one on each side.

  21. Epson Stylus Photo 820 Teardown: adım 21, 1 resimden 1.
    • The chips on the logic board.

    • A2037 and C5694 transistors

    • A6615SED stepper motor driver

    • 219A254UN proprietary EPSON chip

    • IC41LV16256 256K x 16 bit dynamic RAM

    • M62510FP bus termination regulator

    • 29LV400TC 8 mBit CMOS flash memory

    • LVCZ161284A high speed IEEE 1284 transceiver

  22. Epson Stylus Photo 820 Teardown: adım 22, 3 resimden 1. Epson Stylus Photo 820 Teardown: adım 22, 3 resimden 2. Epson Stylus Photo 820 Teardown: adım 22, 3 resimden 3.
    • The plastic clip that holds the dual ribbon cable in a folded position.

  23. Epson Stylus Photo 820 Teardown: adım 23, 2 resimden 1. Epson Stylus Photo 820 Teardown: adım 23, 2 resimden 2.
    • The main axle/rod/shaft/round metal thingy is held in by spring clips.

  24. Epson Stylus Photo 820 Teardown: adım 24, 3 resimden 1. Epson Stylus Photo 820 Teardown: adım 24, 3 resimden 2. Epson Stylus Photo 820 Teardown: adım 24, 3 resimden 3.
    • The other side.

  25. Epson Stylus Photo 820 Teardown: adım 25, 2 resimden 1. Epson Stylus Photo 820 Teardown: adım 25, 2 resimden 2.
    • The rod can now be extracted from the printer.

  26. Epson Stylus Photo 820 Teardown: adım 26, 3 resimden 1. Epson Stylus Photo 820 Teardown: adım 26, 3 resimden 2. Epson Stylus Photo 820 Teardown: adım 26, 3 resimden 3.
    • Now that the rod has been removed, the print head can be unhooked from the drive belt.

  27. Epson Stylus Photo 820 Teardown: adım 27, 3 resimden 1. Epson Stylus Photo 820 Teardown: adım 27, 3 resimden 2. Epson Stylus Photo 820 Teardown: adım 27, 3 resimden 3.
    • The print head

    • The six lines on the print head visible in the second and third pictures are actually rows of microscopic ink nozzles.

  28. Epson Stylus Photo 820 Teardown: adım 28, 3 resimden 1. Epson Stylus Photo 820 Teardown: adım 28, 3 resimden 2. Epson Stylus Photo 820 Teardown: adım 28, 3 resimden 3.
    • An unusual metal bar in the paper feed path is held in by two screws.

  29. Epson Stylus Photo 820 Teardown: adım 29, 2 resimden 1. Epson Stylus Photo 820 Teardown: adım 29, 2 resimden 2.
    • The metal strip contains many spiked wheels rotating on springs which allow them to be pushed out of the feed path.

    • Please comment if you know what this passive component does.

  30. Epson Stylus Photo 820 Teardown: adım 30, 3 resimden 1. Epson Stylus Photo 820 Teardown: adım 30, 3 resimden 2. Epson Stylus Photo 820 Teardown: adım 30, 3 resimden 3.
    • This inky mess is the nozzle cleaner.

    • The assembly is spring loaded so the nozzles can be pushed into a pad to collect ink, which is then somehow transferred into the large absorbent ink pad.

  31. Epson Stylus Photo 820 Teardown: adım 31, 3 resimden 1. Epson Stylus Photo 820 Teardown: adım 31, 3 resimden 2. Epson Stylus Photo 820 Teardown: adım 31, 3 resimden 3.
    • To remove the metal midframe of the printer, three screws must be removed.

  32. Epson Stylus Photo 820 Teardown: adım 32, 1 resimden 1.
    • The midframe can now be lifted out of the printer.

  33. Epson Stylus Photo 820 Teardown: adım 33, 2 resimden 1. Epson Stylus Photo 820 Teardown: adım 33, 2 resimden 2.
    • After removing a gear, another metal rod can be removed.

  34. Epson Stylus Photo 820 Teardown: adım 34, 3 resimden 1. Epson Stylus Photo 820 Teardown: adım 34, 3 resimden 2. Epson Stylus Photo 820 Teardown: adım 34, 3 resimden 3.
    • After removing another screw, the second stepper motor can be removed.

  35. Epson Stylus Photo 820 Teardown: adım 35, 2 resimden 1. Epson Stylus Photo 820 Teardown: adım 35, 2 resimden 2.
    • The tensioner wheel and drive belt can be removed by pushing it down out of the tensioner.

  36. Epson Stylus Photo 820 Teardown: adım 36, 2 resimden 1. Epson Stylus Photo 820 Teardown: adım 36, 2 resimden 2.
    • The gearbox is going to be the next thing to be removed...

  37. Epson Stylus Photo 820 Teardown: adım 37, 3 resimden 1. Epson Stylus Photo 820 Teardown: adım 37, 3 resimden 2. Epson Stylus Photo 820 Teardown: adım 37, 3 resimden 3.
    • The gearbox drives the paper feed and the nozzle cleaning processes all from one motor.

  38. Epson Stylus Photo 820 Teardown: adım 38, 3 resimden 1. Epson Stylus Photo 820 Teardown: adım 38, 3 resimden 2. Epson Stylus Photo 820 Teardown: adım 38, 3 resimden 3.
    • A close look at the peristaltic pump used to move ink from the nozzle cleaner to the large absorbent pads.

  39. Epson Stylus Photo 820 Teardown: adım 39, 1 resimden 1.
    • This is what is left of the paper feed mechanism. The circuit board contains two microswitches to detect if there is paper present.

  40. Epson Stylus Photo 820 Teardown: adım 40, 1 resimden 1.
    • Another rod is removed from the printer.

    • This rod is coated in something that helps it grip onto the paper better.

  41. Epson Stylus Photo 820 Teardown: adım 41, 1 resimden 1.
    • Lastly, here are the three spring-loaded rollers removed from the paper feed mechanism.

  42. Epson Stylus Photo 820 Teardown: adım 42, 1 resimden 1.
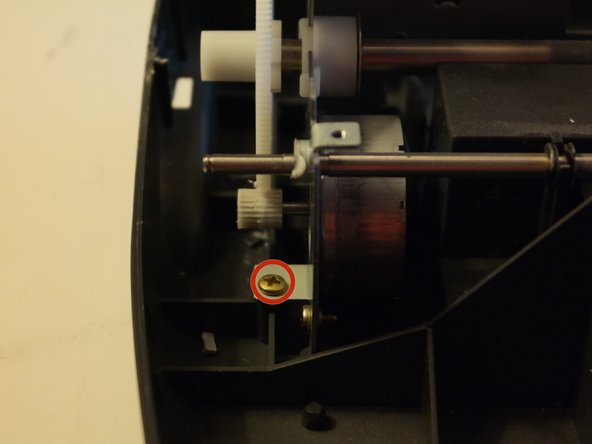
    • The main stepper motor, the part most likely to fail, is easy to remove.

    • The ink cartridges are easily replaceable.

    • Many parts inside the printer have ink on them, making repairs messy.

    • The other stepper motor is very hard to access and requires disassembling most of the printer.

    • The midframe, which contains the gearbox and secondary stepper motor, is attached to the case with blobs of melted plastic that must be cut off to remove.

    • The case is very hard and tedious to open without breaking tabs.

  43. Epson Stylus Photo 820 Teardown: adım 43, 2 resimden 1. Epson Stylus Photo 820 Teardown: adım 43, 2 resimden 2.
    • Bonus Teardown Time!

    • Time to see what is underneath the 'Do not remove' sticker located on the ink cartridge.

    • What is this network of labyrinthine passageways?

    • The answer is a capillary tunnel to reduce ink pressure. The lower row of holes leads into the cartridge itself, while the top row leads to the ink nozzles.

jdp23

Üyelik tarihi: 08/22/13

1.302 İtibar

23 adet Kılavuz yazıldı

3 Yorum

THANK YOU

WHILE I BUSTED UP CASE A BIT

FOUND STUFF IN PAPER FEED AND THOUGH IT LOOKS LIKE S+&T IT WORKS

ALSO YOUR TEARDOWNS ON OLD MAC LAPTOPS HELPED ME years ago when i got a ‘lot’ salvage and canibalised them for profit (not much but some) you folks are GGGRRRRRR8

mike - Yanıt

Thanks for sharing this blog with us.

Epson Stylus Photo R280 Ultra Hi-Definition Photo Printer is the fast, easy way to print brilliant, 4 x 6" photos or text documents.

Ethereum price

Wavex is a US-based Coin that specializes in crypto-enabled financial services.

Nick Jones - Yanıt

Excellent work, thank you!

djzatorze - Yanıt

Yorum Ekle

İstatistikleri Görüntüle:

Son 24 Saat: 0

Son 7 gün: 4

Son 30 gün: 6

Her zaman: 4,905