Giriş
On ne démontera pas l'enceinte à 100%, juste les plus gros morceaux.
Cette enceinte a été bricolée au niveau de port de charge (installation d'un neuf).
Neye ihtiyacın var
Videoya Genel Bakış
-
-
Utilisez une spatule en plastique ou une carte de crédit pour ouvrir les grilles
-
Vous devriez pas avoir à exercer trop de force sur les grilles. Il y a un petit peu de colle dessus.
-
-
-
Enlevez les 4 premières vis
-
Faites sauter le rond de plastique puis occupez-vous des 4 vis restantes.
-
-
-
-
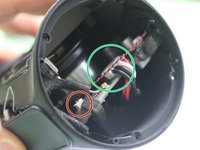
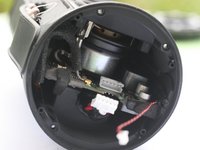
Vous pouvez maintenant accéder à la carte mère
-
Pour déconnecter la batterie, déconnectez d'abord le micro pour vous faciliter la tâche
-
-
-
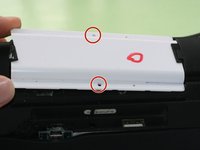
Dévissez les deux vis du cache blanc
-
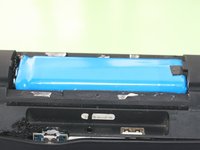
Sortez le de son encoche, et voilà la batterie !
-
Pour réassembler votre appareil, suivez les instructions dans l'ordre inverse.
Pour réassembler votre appareil, suivez les instructions dans l'ordre inverse.
İptal et: Bu kılavuzu tamamlamadım.
10 farklı kişi bu kılavuzu tamamladı.
13Kılavuz Yorumları
About to try this, will give feedback
This is the charge2 + not the charge2
there aren,t any screws in the cap
I have the same problem. I think this is a TL model, but I have not been able to find any information on how to correctly remove the end caps. I don’t want to scratch or break anything trying to pop the end caps off.
Bobcov -
Thanks so much! I had a broken bit of plastic inside the tube after I left my speaker in my checked luggage and it got smashed around. I followed the instructions and managed to get it out, the speaker is purring again without the annoying ass rattle!! You're a legend my friend. TY


