Neye ihtiyacın var
-
Bu adım çevrilmemiş. Çevrilmesine yardım edin
-
Here's what LG's L9 P769 holds hardware-wise:
-
Dual-core 1.0 GHz CPU
-
4.5 inch IPS LCD with a resolution of 540 x 960 pixels
-
4 GB of internal storage
-
5MP Primary camera and VGA front facing camera
-
Wi-Fi 802.11 a/b/g/n, dual-band, Wi-Fi Direct, hotspot, DLNA
-
-
Bu adım çevrilmemiş. Çevrilmesine yardım edin
-
Power off the device and gently lift the battery cover off to access the battery
-
-
Bu adım çevrilmemiş. Çevrilmesine yardım edin
-
Lift and remove the battery from the notch in the edge of the battery compartment
-
-
Bu adım çevrilmemiş. Çevrilmesine yardım edin
-
Remove all 10 of the 4.5mm screws that hold the back frame to the case of the phone using the PH000 headtype
-
-
Bu adım çevrilmemiş. Çevrilmesine yardım edin
-
Using a small prying tool, carefully remove the back frame by prying on the sides of the device.
-
-
Bu adım çevrilmemiş. Çevrilmesine yardım edin
-
Carefully remove vibration and speaker module using the prying tool
-
-
Bu adım çevrilmemiş. Çevrilmesine yardım edin
-
Remove both connections of the antenna by pulling up with tweezers
-
-
-
Bu adım çevrilmemiş. Çevrilmesine yardım edin
-
Remove Micro-USB Cache by unscrewing both 2.9mm screws with the PH000 headtype
-
-
Bu adım çevrilmemiş. Çevrilmesine yardım edin
-
Remove 1.8mm screw to free Micro-USB module for removal using the PH000 headtype
-
-
Bu adım çevrilmemiş. Çevrilmesine yardım edin
-
Remove screw at top of phone to release speaker with PH000 screwdriver
-
-
Bu adım çevrilmemiş. Çevrilmesine yardım edin
-
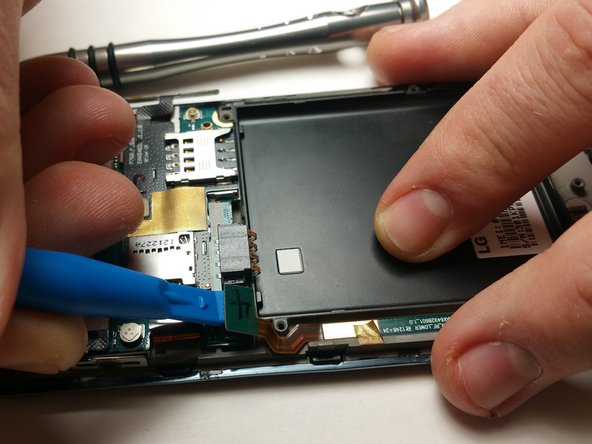
Use a small prying tool to release all motherboard connections.
-
-
Bu adım çevrilmemiş. Çevrilmesine yardım edin
-
Remove rear facing camera by using the small prying tool
-
-
Bu adım çevrilmemiş. Çevrilmesine yardım edin
-
Gently lift the motherboard with small prying tool to remove and set aside
-
-
Bu adım çevrilmemiş. Çevrilmesine yardım edin
-
Using a spudger or small prying tool, pry off the latches that connects the digitizer to the chassis carefully.
-
-
Bu adım çevrilmemiş. Çevrilmesine yardım edin
-
Carefully remove the digitizer from case by sliding out connected ribbon cable
-
-
Bu adım çevrilmemiş. Çevrilmesine yardım edin
-
Use a small prying tool to detach the screen circuitry from the case
-
-
Bu adım çevrilmemiş. Çevrilmesine yardım edin
-
Remove the remaining circuitry utilizing a smaller prying tool or a small flathead screwdriver
-
Carefully slide out circuity to remove phone display
-
-
Bu adım çevrilmemiş. Çevrilmesine yardım edin
-
Use tweezers to disconnect the 3.5mm headphone jack from the phone
-
-
Bu adım çevrilmemiş. Çevrilmesine yardım edin
-
Use a small prying tool to detach the Micro-USB circuitry from the case of the phone
-


Ekip

IUPUI, Team S2-G1, Harley Spring 2017 IUPUI, Team S2-G1, Harley Spring 2017 üyesi
IUPUI-HARLEY-S17S2G1
4 Üyeler
6 adet Kılavuz yazıldı