Ana içeriğe geç

Neye ihtiyacın var

Bu teardown bir tamir kılavuzu değildir. MacBook Unibody Model A1342 cihazınızı onarmak için, servis kılavuzumuzu kullanın.

  1. MacBook Unibody Model A1342 Mid 2010 Teardown, MacBook Unibody Model A1342 Mid 2010 Teardown: adım 1, 1 resimden 1.
    • The new revision of the MacBook Unibody Model A1342 has been kind enough to grace us with its presence.

    • Tech Specs:

    • 2.4 GHz Intel Core 2 Duo processor with 3 MB on-chip L2 shared cache.

    • NVIDIA GeForce 320M graphics processor with 256 MB of shared DDR3 SDRAM.

    • 10 hour 63.5 Wh lithium-polymer battery.

    • Mini Display port with audio out support. *GASP*

  2. MacBook Unibody Model A1342 Mid 2010 Teardown: adım 2, 2 resimden 1. MacBook Unibody Model A1342 Mid 2010 Teardown: adım 2, 2 resimden 2.
    • Much like its predecessor, the lower case is held by eight Phillips #00 screws.

  3. MacBook Unibody Model A1342 Mid 2010 Teardown: adım 3, 3 resimden 1. MacBook Unibody Model A1342 Mid 2010 Teardown: adım 3, 3 resimden 2. MacBook Unibody Model A1342 Mid 2010 Teardown: adım 3, 3 resimden 3.
    • The battery looks very similar to the previous one. So similar, in fact, that it's identical in size and shape, and has the same model number (A1331).

    • Even so, it still makes continued use of Tri-Wing screws to secure the battery in place. Why Apple? Why? Why can't you free us from the oppression and tyranny that is Tri-Wing screws?

    • Be wary though...appearances can be deceiving, and that is certainly the case here.

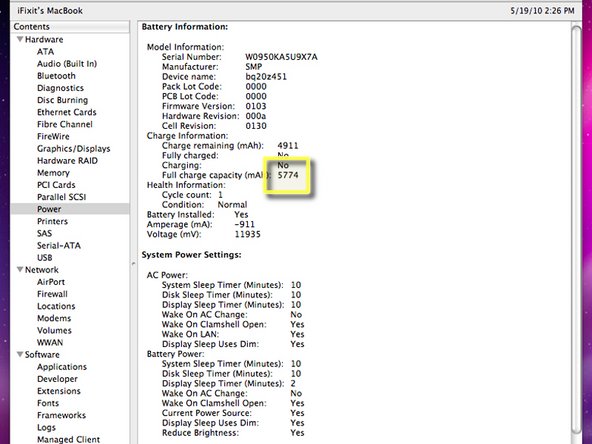
    • The battery in the A1342 Mid 2010 is 63.5 watt-hours and weighs 355 grams.

    • In contrast, the earlier A1342 has a battery of 60 watt-hours and weighs 347.5 grams.

  4. MacBook Unibody Model A1342 Mid 2010 Teardown: adım 4, 2 resimden 1. MacBook Unibody Model A1342 Mid 2010 Teardown: adım 4, 2 resimden 2.
    • Lo and behold, the new battery works in the A1342!

    • Both of these screenshots were taken from the previous iteration, the MacBook Unibody A1342.

    • You can get an extra 350 mAh of juice if you're willing to add 7.5 grams to your "older" MacBook.

  5. MacBook Unibody Model A1342 Mid 2010 Teardown: adım 5, 2 resimden 1. MacBook Unibody Model A1342 Mid 2010 Teardown: adım 5, 2 resimden 2.
    Bu adımda kullanılan alet:
    T6 Torx Screwdriver
    $9.99
    Satın Al
    • After removing two Phillips screws and the hard drive bracket, lift the drive out of the MacBook by its pull tab and disconnect the SATA connector.

    • If you're installing a new hard drive, you'll need a T6 Torx screwdriver to transfer the mounting screws to your new hard drive.

  6. MacBook Unibody Model A1342 Mid 2010 Teardown: adım 6, 2 resimden 1. MacBook Unibody Model A1342 Mid 2010 Teardown: adım 6, 2 resimden 2.
    • Removing the speaker assembly and AirPort/Bluetooth board requires a bit of work, but nothing we at iFixit can't handle.

    • Bluetooth model number is BCM943224PCIEBT.

    • This is the same card used in the previous model, the A1342.

  7. MacBook Unibody Model A1342 Mid 2010 Teardown: adım 7, 1 resimden 1.
    • After removing the final few screws, lift the optical drive out of its comfy abode.

    • You'll be glad to know that MacBook Unibody Model A1342 Mid 2010 continues to use the 8x SATA superdrive manufactured by Panasonic, model UJ898.

  8. MacBook Unibody Model A1342 Mid 2010 Teardown: adım 8, 2 resimden 1. MacBook Unibody Model A1342 Mid 2010 Teardown: adım 8, 2 resimden 2.
    • Removal of the fan was no biggie. It simply required a Phillips screwdriver and a spudger.

  9. MacBook Unibody Model A1342 Mid 2010 Teardown: adım 9, 3 resimden 1. MacBook Unibody Model A1342 Mid 2010 Teardown: adım 9, 3 resimden 2. MacBook Unibody Model A1342 Mid 2010 Teardown: adım 9, 3 resimden 3.
    • Obviously the logic board needs to come out, or else this isn't a teardown.

    • With the flick of our trusty spudger, we continue to disconnect several connectors around the perimeter of the logic board, as well as removing the RAM.

    • Carefully maneuver the logic board assembly out of the upper case.

  10. MacBook Unibody Model A1342 Mid 2010 Teardown: adım 10, 1 resimden 1.
    • The heat sink must be removed prior to revealing the newly optimized processor and graphics chips.

  11. MacBook Unibody Model A1342 Mid 2010 Teardown: adım 11, 2 resimden 1. MacBook Unibody Model A1342 Mid 2010 Teardown: adım 11, 2 resimden 2.
    • Parts numbers found thus far:

    • Intel Core 2 Duo Mobile Processor E006B705 SLDGZ AV80577P8600 2.40/3M/1066

    • NVIDIA GeForce 320M integrated chipset graphics card: The successor to the GeForce 9400M.

    • Realtek RTL8251CA GigE Ethernet

    • CYPRESS CY8C24 16 KB Flash PSoC

    • TDK 6T213HF

    • Cirrus Logic 4206ACNZ

  12. MacBook Unibody Model A1342 Mid 2010 Teardown: adım 12, 1 resimden 1.
    • The display assembly is secured by two large T8 screws, one on each side.

    • Shameless plug: We sell a screwdriver kit that will enable you to remove these screws.

  13. MacBook Unibody Model A1342 Mid 2010 Teardown: adım 13, 1 resimden 1.
    • In Apple's everlasting effort to aid in the reduction of environmental impacts, the LED-backlit display in the MacBook A1342 and Mid 2010 A1342 are Mercury-free.

    • Wondering how to replace the display assembly? Well look no further, simply follow these steps and you'll be up and running in no time.

    • Spoiler alert: Coming soon to a browser near you, replacing the LED-backlit display...stay tuned!

  14. MacBook Unibody Model A1342 Mid 2010 Teardown: adım 14, 1 resimden 1.
    • Disclaimer: No MacBooks were hurt, in any way, shape, or form, during the process of this teardown.

    • Now that we've taken care of that legal mumbo jumbo that some people care about (most people don't), here is the final layout of what used to be a MacBook Unibody Model A1342 Mid 2010.

12 Yorum

Step 3

New battery is 63.5 watts not 65

mkaz13 - Yanıt

Just wanted to let people know, the A1278 13" macbook pro 'black' keyboard is interchangeable with the 'white' 2009/2010 macbook A1342 .. It looks pretty cool to! :) . Just remove the metal bracket and use epoxy to stick the keyboard and metal bracket back on :). Cheers.

techetc - Yanıt

Including the Backlight? That'd be crazy awesome!

Maximilian Willert -

I don’t think the backlight would work because there is no hardware to power it present on the logic board of the MacBook

Isaiah Hollingworth -

Many thanks for this awesome teardown!

Maximilian Willert - Yanıt

Yorum Ekle

İstatistikleri Görüntüle:

Son 24 Saat: 2

Son 7 gün: 22

Son 30 gün: 100

Her zaman: 189,862