Ana içeriğe geç

Bu teardown bir tamir kılavuzu değildir. PlayStation 3 cihazınızı onarmak için, servis kılavuzumuzu kullanın.

  1. PlayStation 3 Fat 4 USB Teardown, The console case: adım 1, 1 resimden 1.
    • Inserir instruções aqui.

  2. PlayStation 3 Fat 4 USB Teardown, Remove the screws: adım 2, 3 resimden 1. PlayStation 3 Fat 4 USB Teardown, Remove the screws: adım 2, 3 resimden 2. PlayStation 3 Fat 4 USB Teardown, Remove the screws: adım 2, 3 resimden 3.
    • Inserir instruções aqui.

  3. PlayStation 3 Fat 4 USB Teardown, Open the console: adım 3, 1 resimden 1.
    • Inserir instruções aqui.

  4. PlayStation 3 Fat 4 USB Teardown, Remove the power supply: adım 4, 2 resimden 1. PlayStation 3 Fat 4 USB Teardown, Remove the power supply: adım 4, 2 resimden 2.
    • Inserir instruções aqui.

  5. PlayStation 3 Fat 4 USB Teardown, The power supply board: adım 5, 3 resimden 1. PlayStation 3 Fat 4 USB Teardown, The power supply board: adım 5, 3 resimden 2. PlayStation 3 Fat 4 USB Teardown, The power supply board: adım 5, 3 resimden 3.
    • Inserir instruções aqui.

  6. PlayStation 3 Fat 4 USB Teardown, Remove the bluray driver: adım 6, 3 resimden 1. PlayStation 3 Fat 4 USB Teardown, Remove the bluray driver: adım 6, 3 resimden 2. PlayStation 3 Fat 4 USB Teardown, Remove the bluray driver: adım 6, 3 resimden 3.
    • Be very careful to do not break the data connector because it is very fragile.

  7. PlayStation 3 Fat 4 USB Teardown, Remove the SD card slot: adım 7, 3 resimden 1. PlayStation 3 Fat 4 USB Teardown, Remove the SD card slot: adım 7, 3 resimden 2. PlayStation 3 Fat 4 USB Teardown, Remove the SD card slot: adım 7, 3 resimden 3.
    • Inserir instruções aqui.

  8. PlayStation 3 Fat 4 USB Teardown, Remove the bluethoot board: adım 8, 2 resimden 1. PlayStation 3 Fat 4 USB Teardown, Remove the bluethoot board: adım 8, 2 resimden 2.
    • Inserir instruções aqui.

  9. PlayStation 3 Fat 4 USB Teardown, Remove the intire motherboard from the case: adım 9, 3 resimden 1. PlayStation 3 Fat 4 USB Teardown, Remove the intire motherboard from the case: adım 9, 3 resimden 2. PlayStation 3 Fat 4 USB Teardown, Remove the intire motherboard from the case: adım 9, 3 resimden 3.
    • Inserir instruções aqui.

  10. PlayStation 3 Fat 4 USB Teardown, Remove the coller and mother board shield: adım 10, 3 resimden 1. PlayStation 3 Fat 4 USB Teardown, Remove the coller and mother board shield: adım 10, 3 resimden 2. PlayStation 3 Fat 4 USB Teardown, Remove the coller and mother board shield: adım 10, 3 resimden 3.
    • Inserir instruções aqui.

  11. PlayStation 3 Fat 4 USB Teardown, The cooler specifications and ball bearing: adım 11, 2 resimden 1. PlayStation 3 Fat 4 USB Teardown, The cooler specifications and ball bearing: adım 11, 2 resimden 2.
    • Inserir instruções aqui.

  12. PlayStation 3 Fat 4 USB Teardown, The gigantic and unefective cooler: adım 12, 3 resimden 1. PlayStation 3 Fat 4 USB Teardown, The gigantic and unefective cooler: adım 12, 3 resimden 2. PlayStation 3 Fat 4 USB Teardown, The gigantic and unefective cooler: adım 12, 3 resimden 3.
    • Inserir instruções aqui.

  13. PlayStation 3 Fat 4 USB Teardown, The mother board: adım 13, 3 resimden 1. PlayStation 3 Fat 4 USB Teardown, The mother board: adım 13, 3 resimden 2. PlayStation 3 Fat 4 USB Teardown, The mother board: adım 13, 3 resimden 3.
    • Inserir instruções aqui.

  14. PlayStation 3 Fat 4 USB Teardown, The processors: adım 14, 3 resimden 1. PlayStation 3 Fat 4 USB Teardown, The processors: adım 14, 3 resimden 2. PlayStation 3 Fat 4 USB Teardown, The processors: adım 14, 3 resimden 3.
    • Inserir instruções aqui.

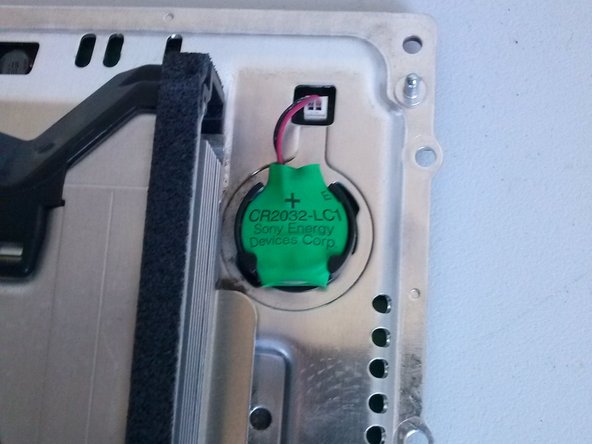
  15. PlayStation 3 Fat 4 USB Teardown, Some details: adım 15, 3 resimden 1. PlayStation 3 Fat 4 USB Teardown, Some details: adım 15, 3 resimden 2. PlayStation 3 Fat 4 USB Teardown, Some details: adım 15, 3 resimden 3.
    • Bios battery

    • Power on and eject sensors

    • Main AC power conector and ground conector

  16. PlayStation 3 Fat 4 USB Teardown, Some details: adım 16, 2 resimden 1. PlayStation 3 Fat 4 USB Teardown, Some details: adım 16, 2 resimden 2.
    • HD Slot

    • HD case screw

Vinicius Rodrigues Bellini

Üyelik tarihi: 12/12/22

956 İtibar

6 adet Kılavuz yazıldı

0 Yorum

Yorum Ekle

İstatistikleri Görüntüle:

Son 24 Saat: 8

Son 7 gün: 66

Son 30 gün: 326

Her zaman: 5,375