Bu Teardown'da Kullanılan Aletler
Giriş
This is a teardown of an original launch 60GB PlayStation 3 system. One of the best units out there that had backwards compatibility and the card readers. Sadly this unit has a GPU a problem so it's broken.
Edit: Nickname fix, formerly Karasumachitose. Apologies to any inconvenience this causes.
-
There she is, one of the two original PS3 models available at launch (60GB).
-
It's got PS2/PS1 backwards compatibility and a multi-card reader. The current PS3 Slim doesn't have the card reader. The other launch model lacked the card reader and WiFi (20GB).
-
Let's get started!
-
Remove the hard drive access cover from the bottom of the PS3.
-
Use the Phillips screwdriver #1 to remove the blue screw.
-
Lift up the metal lever.
-
Slide the hard drive towards the front of the case.
-
Pull it straight up and out of the unit.
-
This is all you need to do to access the PS3's hard drive.
-
-
Remove the warranty sticker.
-
Use your fingers and pry up and remove the foot underneath the sticker.
-
Use the Torx Screwdriver (T8 or T10) to remove the torx screw from the space behind the rubber foot.
Mine was a T10
this screw came out using a phillips #1or#2 with no issue.
-
Place PlayStation face up such that "PlayStation 3" is oriented so you can read it.
-
Place your palm on the PlayStation 3 logo and slide the plastic front cover towards you and off of the outer plastic shell. Set it aside.
-
Remove the metal receiver that held the torx screw you just removed.
Some PlayStation3 gen 1 consoles do not have a removable receiver. If yours does not, just skip this step.
-
Remove the 9 screws from the outer plastic shell using a #2 Philips driver.
-
6 large screws
-
1 medium screw
-
2 small screws
-
Quote from paulius:
The annotation on the photo in Step 9 is inaccurate. The blue circle should be aqua/cyan coloured, while the two cyan/aqua coloured circles should be blue. No biggie, great disassembly otherwise.
I double checked it, it should be correct. There is only one medium screw and two small screws.
If you leave the two small screws until after you remove the top (they aren't attached) it will make things easier because the card readers will stay down and there will be no ribbon cable to deal with when removing the top.
I have found the same. It can be a mess otherwise.
-
Disconnect the ribbon cable and set the shell aside.
-
If you want to remove the plastic card reader, locate its two locking plastic tabs that hold the card reader to the shell, spread them, and lift the card reader off of the shell.
-
To remove the plastic card reader, locate its two locking plastic tabs that hold the card reader to the shell, spread them, and lift the card reader off of the shell.
-
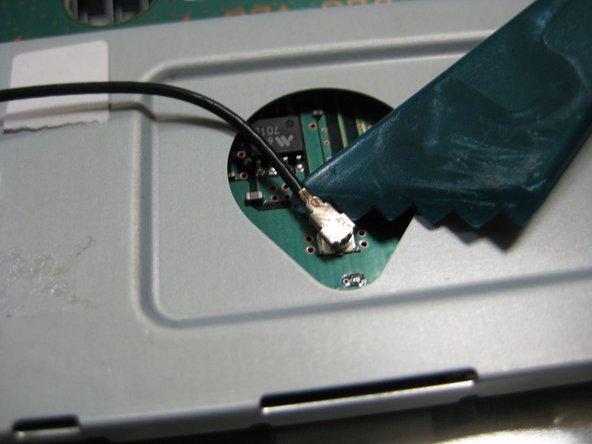
Working on the main unit, lift up on and disconnect the black RF wire from the wireless assembly using a spudger.
-
Remove the flat ribbon cable from the wireless assembly.
-
Remove the four Philips #2 screws from the top of the wireless assembly.
-
Lift the wireless assembly off the main board and set it aside.
-
Disconnect the ribbon cable from the main board and place it with the wireless assembly.
-
Locate the other wireless assembly which the black RF wire is connected to.
-
Remove the one Philips #2 screw retaining it to the main board and lift off the assembly and set it aside.
-
Remove the cables that attach the power supply to the main board.
-
Remove the AC connector from the power supply.
-
Remove the 5 screws from the power supply, and lift the power supply straight up and off of the main body. Set it aside.
Power connector on my 20gig launch unit was epoxied. If this is the case with yours be VERY careful. Mine popped off the board, now searching for a fix.
-
Remove the 5 screws using a Philips #2 from the power supply, and lift the power supply straight up and off of the main body. Set it aside.
-
Unplug the power connector (gray) on the side of the player.
-
READ THIS ENTIRE STEP BEFORE PROCEEDING. Lift the player up slowly to expose the folded ribbon cable beneath it.
-
Remove that ribbon cable from the main board and set the drive/cable aside.
Remove the ribbon cable from the drive end, not the motherboard end. The clip holding the ribbon cable to the motherboard is difficult to reattach and will often snap. It does make it a bit more difficult to disassemble but far safer.
I had to use two spudgers to pry the clip UP on the motherboard to release the cable.
-
Remove the ribbon cable attaching the on/off and eject switch circuit board to the main board.
-
Remove the 4 Philips #2 screws retaining the circuit board to the case.
-
Remove the circuit board from the case.
-
Remove the 9 screws from the main body.
-
5 Medium Philips #2 Screws
-
2 Small Philips #1 Screws
-
1 Ground Philips Screw with Washer
-
1 Bolt Philips Screw (under AC cord)
-
-
Grab the main board at the locations shown in the picture and lift the main board off of the back casing.
-
Set aside the black shell.
-
On the main body, locate the 5 plastic locking tabs holding the rear plastic I/O shield to the main body.
-
Pry the tabs away from the body and lift the rear shield away.
-
Remove the fan power connector.
-
Remove the 3 Philips #2 screws holding the fan to the main body.
-
These are extra small screws
-
-
Lift the fan straight up and out of the body.
-
Check out the size of this thing.
-
-
On the top of the mainboard, EVENLY remove the four large Philips #2 screws holding the heat sink.
-
Remove the plates and the screws from the main board.
I broke off one of these screws, 'Philips #2 screw' has not gotten me a correct screw from google.
Any clue what exact screw this would be?
PS
I have an idea how I could remove the broken screw, but any suggestions?
Search on Ebay under PS3 Screw there are some on there with clamps.
-
Flip the main board over.
-
Lift (or pry with fingers) the heat sink straight off of the mainboard and processors.
Looks to me if your goal is to replace the thermal paste, this is as far as you need to go. Apply the new paste and begin reassembly. Here's a video showing how to apply the paste: http://www.youtube.com/watch?v=EyXLu1Ms-...
Wich is the best way to apply the paste and what brand do you reccomend?
Just use a small dot, not bigger than a pea right in the middle. Let the heatsink spread it out.
-
Remove the 2 Phillips #0 screws from the hard drive enclosure.
-
To expose the mainboard, remove the watch battery from the mainboard.
-
Using spudger, carefully pry the metal shielding away from and off of the top of motherboard.
-
Turn the motherboard over and remove the metal shielding on the opposite side. Pry with a spudger or with your fingers.
-
Check out all the chips with heatspreaders on this thing.
-
There's the Emotion Engine chip and Graphics Synthesis chip that allows the sweet backwards compatibility.
-
IBM Cell processor... This CPU has 9 cores, 10 threads and it runs @ 3.2GHz .
-
i have a SERIOUS PROBLEM. i put my ribbon cable from my bluray drive into my ps3 while it was on and i heard a pop. the drive was no loner able to recieve power and i saw someone else had the same problem but on a differnt ps3. they said it was the ic chip on the daughter board and i dont even know where that is.... im only 16 and i plan on being an electronic engineer can anyone please help me because im a SEMI-noob future genius noob now.
Advice- Next time make sure the system does NOT have power.
-
More Chips!
-
IBM Cell CPU
-
Nvidia RSX GPU
-
Consider your PS3 disassembled.
10 Yorum
ii got a broken ps3 from my step dad, it turns on but theres no picture. I've taken it apart 3 times now and couldnt figure out how to get it fully apart. I've put everything back together and it does the same thing. So i didnt mess it up and more than it was. lol. From what i was told it was on top of a tv and a dog caught the cord and pulled it down. It slammed down on the back of the system and hasnt been able to show video and sound. Like i've said, i've tryed to mess with it but i know nothing about this stuff. Any ideas as to what could be broken? The port itself is cracked, but i've tryed HDMI and that doesnt work either. Any advice is helpful. Thank you.
lol couple years later, no all u have to do is switch out the fan inside your ps3 :) it happen to mine or buy a new ps3 and switch hard drives :)
Can i use any other screwdriver besides a torx?
I juss want mine fixed... it keeps saying data corrupted... then it loads to 100 thrn screen goes blank
I love the way you post a warning as to how fragile the ribbon cable is and then say, "remove ribbon cable" without any detail as to how to release it. Thanks. Now my PS3 is trash.
Instructions not clear enough. Stuck my finger in a light socket.
10/10, would electrocute self again.
watch ifixit's video on youtube, it helps a lot, these pictures help out more after you see the video...
Can you fix it again after splitting it? Bc. My Ps can't turn on, only in 1 second and then it turns it self off. So i told it too my dad, and he said "can you get in to the computer itself, without breaking it and then fix it again, after that" and i aswered "i don't know, i'll go chek" and here i am, knowing how to split it but not fixing it again. Uhh so please answer me... Can it be fixed again after splitting it??!