Neye ihtiyacın var
Videoya Genel Bakış
-
-
Ports on the side:
-
Headphone Jack
-
SD/SDHC/SDXC card slot
-
Ports on the Back:
-
USB 3.0
-
USB 2.0
-
HDMI
-
40W DC in charging port
-
-
-
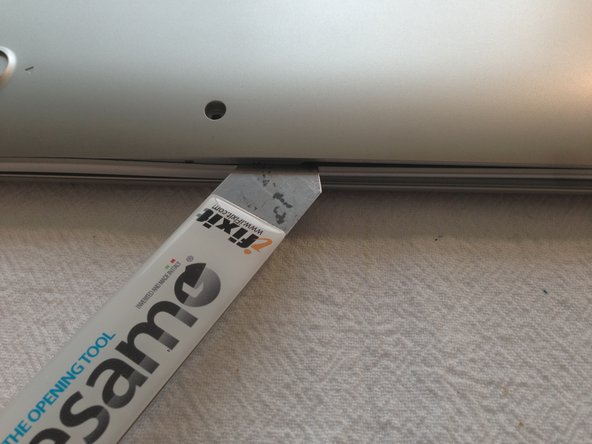
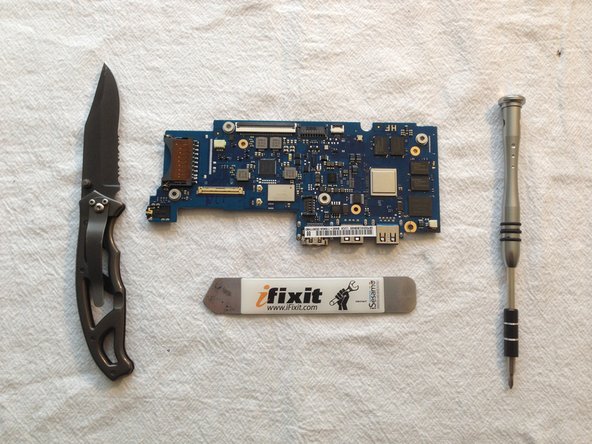
Time to grab the tools and open the case. Nothing fancy needed here, just a simple phillips screwdriver, a knife and a spudger.
-
Remove the 5 visible Phillips #0 screws.
-
Remove the 4 hidden screws under the rubber feet (one under each rubber foot). If you only partially pry up each foot enough to get to the screws, you can reuse the feet without having to re-glue them.
-
-
-
-
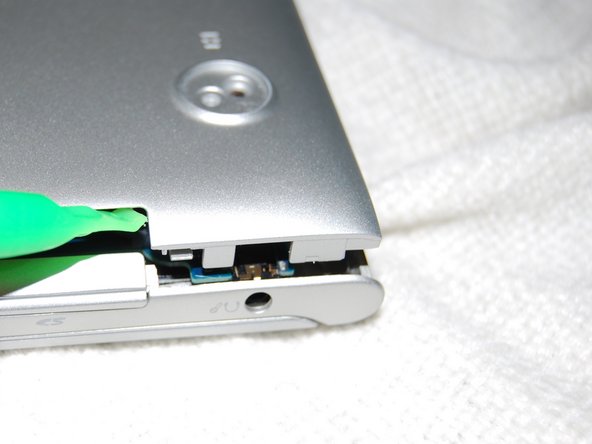
With the under case set aside, we now have an open case and a preview of the components to come
-
Remove the 6 battery screws then carefully pry the battery connector straight up to remove it.
note - the battery connector pushes down to engage. The instruction is correct pull the connector up to release - not pull on the leads
-
-
-
Battery removed, it's now time to remove the screen and pull the main board
-
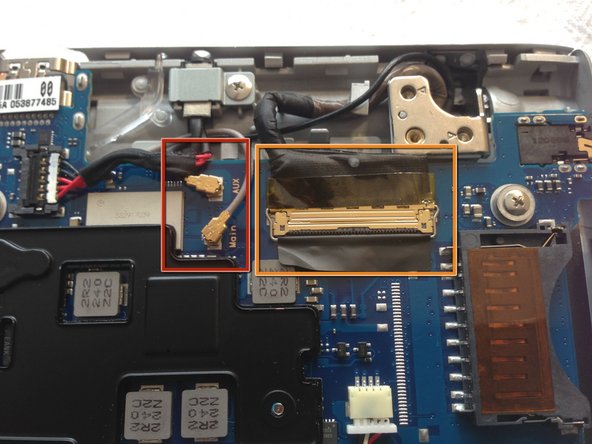
Disconnect the 2 antennae lines from the main board
-
Disconnect the screen cable
-
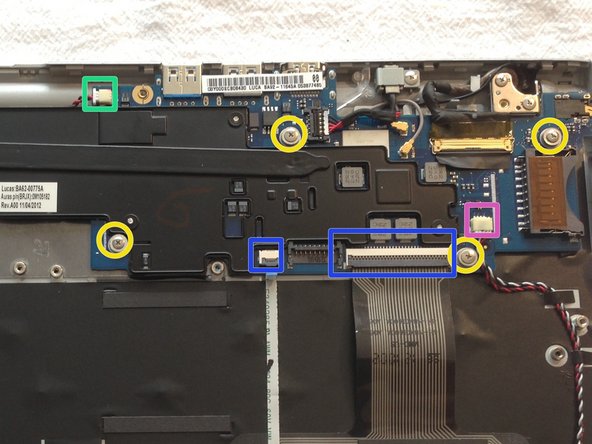
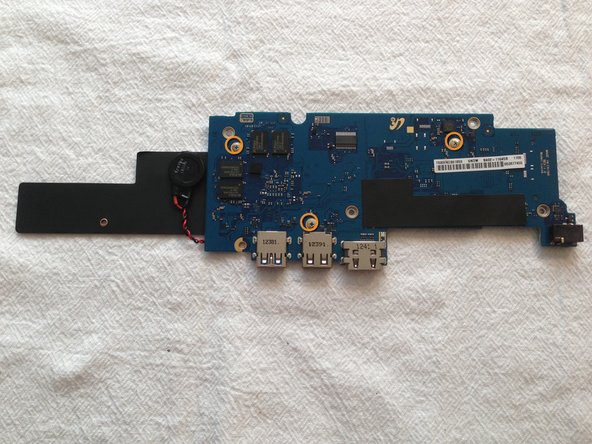
Remove the 5 screws holding the main board
-
Probably a good idea to disconnect the remaining 4 cables as well
-
Keyboard and trackpad ribbon cables
-
Audio cable
-
CMOS Battery Cable
the connector on the top left of the third picture, is not an audio connector but the CMOS battery connector.
great catch... updated and thanks
u say "pop the battery connector". Des it come straight up from the board or at a angle or what do you mean by Pop it?
Interesting, mine has the wire and CMOS battery but nowhere to plug it in! See here: http://i.imgur.com/02kVaRG.jpg
I'm having an issue where the TPM chip is bad and I noticed the CMOS connector in this pic and was hoping that was my problem. Weird that the batter and wire would be there, but nowhere to plug them in. Makes me wonder if this board had already been replaced, but the original heatsink/CMOS battery was kept?
-
-
-
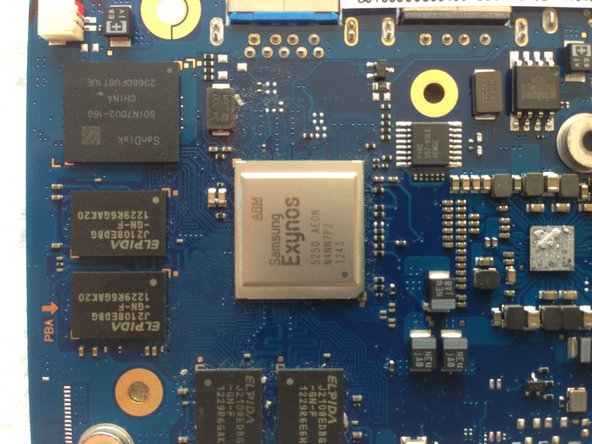
Top of the main board
-
Samsung Exynos 5250 AEON main proc
-
SanDisk SDIN7DU2-16G NAND Flash
-
4 x ELPIDA J2108EDBG-GN-F (4 more on the rear)
-
MAX 77686 EWE 1237
-
TPS65090 TI 291
-
"Servo" dev/debug interface.
-
Connector for 3G daughterboard.
-
-
-
The Embedded Controller, according to Google's documentation is STM32F100R8, although it is marked as "32F100B6"
-
Trusted Platform Module, Infineon SLB9635
-
Not much more on the rear but the rest of RAM
Infineon SLB9635 is a dead link. https://www.infineon.com/dgdl/Infineon-T... is a relevant PDF, Although the information has no use for troubleshooting or repair, anyways. Even in it’s intended purpose, to protect against attacks where the attacker already has physical access and administrative rights (admin passwords) any Trusted Platform Module https://en.wikipedia.org/wiki/Trusted_Pl... has quite limited utility. Nice attempt to provide complete information, I suppose.
-
-
This is a bit overdramatic, especially now in 2018, when a new Samsung Chromebook 3, with twice the RAM memory is going for $150 at Walmart. Anyone who is already set on opening one of these up, with knowledge that neither the RAM nor disk drive can be upgraded, is already taking a lot of chances on bricking the device. Anyone looking to re-purpose one of these that was distributed to school use is bound to be disappointed. I dare say, giving warnings in red lettering and even shouting in capital letters at someone who is already doing a “teardown” is counterproductive. There is no further danger of physical injury, or additional electrocution hazard which I think capitalized red-lettered warnings should be reserved for. Sorry Josh, I just disagree with your choice here. In fact, I may change it.
Well then, it seems this computer has a self-destruct… kind of like the Note 7”


37 Yorum
@Josh Thomas
When re-assembling the chromebook, I have noticed that the factory assembly is done in a different order (and thus the disassembly should be done in a different order as well). Let me explain: there is a small plastic piece, long and low, in the back part of the laptop (where the connectors are). For me, it is 100% clear that this is the latest part in the assembly process at the factory, because of the position of the plastic clicks.
So for disassembly it should be the first part to be removed. It helps a lot removing this part first, in order to avoid any click to be broken.
But prior to modifying the teardown I would like to know if you agree in that this is the correct process (or your opinion).
(BTW I know that Google has posted some disassembly instructions on their chromiumos page, but for me those instructions are not correct as well. Note that the manufacturer is Samsung and not Google, and that's why I'm afraid the instructions are not precise).
Both of my Samsung Chromebooks are on loan to friends, so I will have a hard time verifying your question for a couple of weeks. Please update the teardown as you see fit.
I can always come back and update the photos (or take new ones) if you like, but it will be delayed.
If the part you are referring to covering the screen to body hinge? That part actually doesn't need to be removed at all if you are just digging for internals. The screen can stay connected.
Josh, I've just added the instructions along with some photos. Feel free to delete or modify the steps inserted if you consider so, as the teardown is your property.
All the best!
Jacobo
Awesome! It' not my teardown, it's for the community so any addition is a good one :)
Thanks!
Where to get adaptor for eathernet connection.
can you let us know what the connector that isn't connected is for in step six between the hd connector to the left and the keyboard connector to the right?
Hi,
Is there a way to remove the touchpad from the palmrest assembly?
Thanks!
Yes, its stuck on with a thick adhesive. In two squares around the open the open sections on the understand. I used an eye dropper, 70% isopropyl, and a thin plastic sprudger to slowly work it up. Take a look at replacement parts, you'll see what you need to look out for. All of the components are inside the center square where the IC is, the only thing outside the square is the cable connector, and the click button at the very bottom directly in line with the IC (the round metal bit is the spring contact for the button). Just flip the black part of the connector up to release the ribbon cable. Work the adhesive slowly and don't slice any traces.
Tank R -
Can anyone tell me what the "L Front" is and what it does. I have a broken chromebook and have been told the L Front needs to be replace. The initial problem was the display got very dim and would not brighten. Thanks, aharmon@oceanschools.org
I assume they mean Left front. What left front refers to, I have no idea. Possibly panel illumination, supposing its edge lit?
Tank R -
The bottom can be removed by tilting it up from the bottom edge, like you ae opening the laptop. The plastic hinges wont be damaged this way. I didnt even know that top edge came off. Also, can you elaborate on the metal ring bootloader protection? I feel this might aid me in reflashing the TMP chip.
Where is the connector for the 3G daughter board? Can one be added to the WiFi only version?
I have two broken Samsung chromebooks.
1. Trackpad messed up, but otherwise ok.
2. OS not responding, but good trackpad.
So, I thought it would be easier to restore the one with broken OS. Do I just need to take working motherboard with hard drive to put in the unit with working trackpad?
Thanks
same exact model?.
i have a question. my samsung chromebook doesnt have a 3g sim hardware piece but i would like to add one any ideas if this is possible?
and on another note is it possible to upgrade the ssd in the samsung chromebook ? i have the same on in the viewed model if this is somethign possible could you by chance please email me and help me with the specifics.
It is not possible to upgrade the SSD as it is soldered on. It is theoretically possible to upgrade the Chromebook with 3G but it's not practical.
Gabe -
@Josh Thomas @Jacobo Pantoja
I am working on a samsung chromebook xe303c12, it's my mom's. She managed to break the female charger cable, that inserts into male power pin at rear of book, off. It is nearly flush. I'm unable to get it with tweezers or pliers... ideas?? Please & thanks
Hi!
I would try to get a new charger and the small piece (see the teardown) that has the external connector and that connects to the motherboard. Probably on eBay you'll find both of them.
However, while tearing down, you might find a way to extract the "female" pin from the connector, because it will probably be more exposed when removing the plastic covers. And this way you should only buy a new charger.
Good luck!
i have problem with this samsung chromebook model xe303c12-wz1my,the problem is i cannot on and the charging port led not turn on when i plug the charger,but i check with multimeter on the connector i got 12.30v,i check again where got short circuit or burn mark there is no burn mark or what so ever,then i assemble back and try,is still cannot on,really make me stress
same problem, what did you come up with?.
Hola mi equipo no puede hacer la recuperación del sistema chrome, quiero saber si es posible cambiar la SSD para instalar.
O si hay otro proceso para recuperar ya que da error al introducir la memoria de recuperación.
Si alguien puede responder por favor.
Gracias
Can I install Linux without removing the protect screw
Hi I’m trying to make a USB wireless adapter but i need a wireless chip set i was curios if anyone could identify where the wireless chip is on the Chromebook mother board
Hello Hudson!
Did you solve problem with Wifi IC?
Please read my answer few message below.
alexandr -
Hello,
Can additional RAM be added to a series 3? I purchased one with 2G and really wish it had 4G. Runs out of memory too often.
Do you know of anyone who has done that?
Steve
I have a #0 screwdriver but it isn’t working with the screws here. I literally just bought the driver too. Really frustrating
On step 8, there is one large white chip that is not mentioned, do you know what it is?
Thank you for specifying the direction to remove the battery cable. Just because you can do something doesn’t mean you can (or should) explain it. Best instructional I’ve found. Good job.
same problem, what did you come up with?.