Ana içeriğe geç

Neye ihtiyacın var

Bu teardown bir tamir kılavuzu değildir. steelseries 710 cihazınızı onarmak için, servis kılavuzumuzu kullanın.

  1. Steelseries 710 Rival Mouse Teardown, Steelseries 710 Rival Mouse Teardown: adım 1, 1 resimden 1.
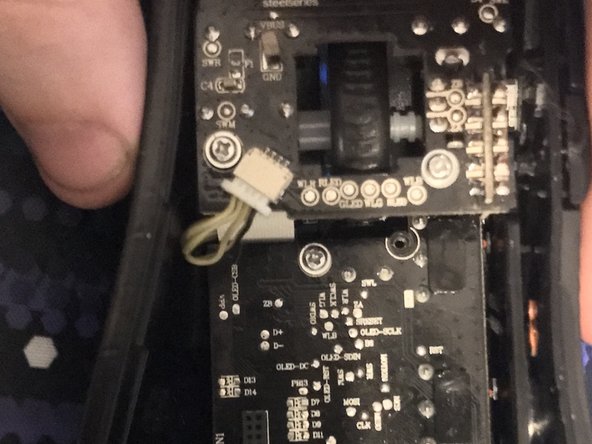
    • This is a small teardown guide because i had to change the mouse click thingy thing.

  2. Steelseries 710 Rival Mouse Teardown: adım 2, 3 resimden 1. Steelseries 710 Rival Mouse Teardown: adım 2, 3 resimden 2. Steelseries 710 Rival Mouse Teardown: adım 2, 3 resimden 3.
    • First we will remove the rubber rival mark.

    • The third photo you will have to pry it a bit and it should pop off.

  3. Steelseries 710 Rival Mouse Teardown: adım 3, 3 resimden 1. Steelseries 710 Rival Mouse Teardown: adım 3, 3 resimden 2. Steelseries 710 Rival Mouse Teardown: adım 3, 3 resimden 3.
    • Now lets remove the sensor, we will need to do this to remove the bottom of the mouse.

  4. Steelseries 710 Rival Mouse Teardown: adım 4, 3 resimden 1. Steelseries 710 Rival Mouse Teardown: adım 4, 3 resimden 2. Steelseries 710 Rival Mouse Teardown: adım 4, 3 resimden 3.
    • Now we need to remove the feet of it and remove the screw and then from here we pop off the top. Now just pry down the words and it also should pop off.

    • Now lets remove all the screws from here and store them in a good and safe spot and take out the small connector at the wheel.

  5. Steelseries 710 Rival Mouse Teardown: adım 5, 3 resimden 1. Steelseries 710 Rival Mouse Teardown: adım 5, 3 resimden 2. Steelseries 710 Rival Mouse Teardown: adım 5, 3 resimden 3.
    • On the second photo we will have to pop out the small board.

    • There are two small plastic restrainers.

    • Before we flip the PCI board around you will need to take out the screws from the small vibrator.

  6. Steelseries 710 Rival Mouse Teardown: adım 6, 2 resimden 1. Steelseries 710 Rival Mouse Teardown: adım 6, 2 resimden 2.
    • Now with all the screw's removed from the larger board, we can flip it upside down to see the small ricer cable.

    • We have to pull it slowly so not to damage the ricer cable

    • Now you can remove all the screws that you see on the smaller board.

    • Sadly, I haven't found a way to remove that board nor the wheel as of right now.

yoda

Üyelik tarihi: 06/26/22

133 İtibar

1 Kılavuz yazıldı

0 Yorum

Yorum Ekle

İstatistikleri Görüntüle:

Son 24 Saat: 0

Son 7 gün: 1

Son 30 gün: 6

Her zaman: 595