Giriş
A look inside the Technics EAH-AZ70 (Japan) / EAH-AZ70W (Outside Japan) Bluetooth Headphones
Neye ihtiyacın var
-
-
Features:
-
Highest Level of Dual Hybrid Noise Cancelling. Multiple MEMS microphones
-
Graphene coated PEEK diaphragm speaker for smooth, clean, and elegant sound
-
Stable Connection in crowed areas
-
Excellent Quality Call Sound
-
Approximately 6.5 hours of playback, and up to 20 Hours of use with charger
-
Bluetooth® 5.0
-
Capacitive touch sensor control
-
-
Bu adımda kullanılan alet:Tweezers$4.99
-
Since the Technics Headphone enclosure is glued together, the only way in was to cut into the headphone.
-
This is a destructive teardown
-
A Razsor knife was use to cut into the Technics headphone along the seam in the headphone. Then a Jimmy Tool was used to open up the headphone. Tweezers and a Pick Tool were used to removed the electronics from the enclosure
-
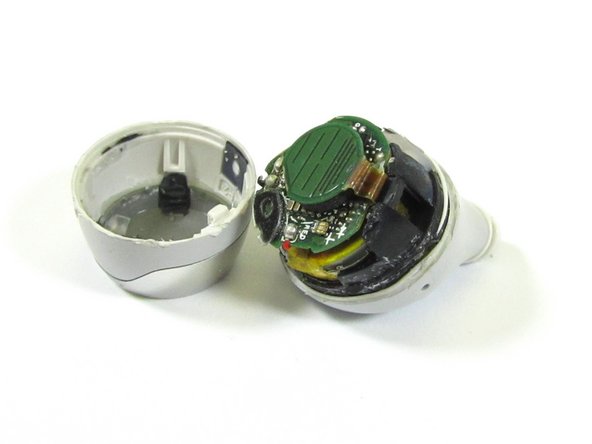
Once opened, we get our first look at the inside of the headphone
-
Double sided foam tape was used to hold the main the PCB to the Battery and to the Touch Sensor / Antenna PCB. This foam tape had to be cut free. Then Denatured Alcohol was used to remove the foam tape glue from the PCBs and Battery
-
Double Sided Foam Tape
-
-
-
-
At first, I wasn't sure about the solder balls. Then I realized they were used to anchor the USB and Power Interface pins on the outside of the Headphone to the internal circuit board.
-
I had to used a solder iron to remove the solder balls, so that the internal interface circuit board could be removed. I had to also remove solder from the speaker wires to free up the internal circuit board.
-
Internal Circuit Board that interface Power and USB to the Headphones
-
-
-
The internal circuit board was also attached a MEMS Microphone that appeared to be monitoring the Speaker Chamber of the Headphone, since it was faced in
-
I had to remove the outside panel with 'R' on it with a Razor Knife to free the MEMS Microphone. Once the MEMS Microphone was freed, the interface board circuit could be pulled out
-
USB and Power (Charger) Interface
-
Sound Ports
-
Internal Circuit Board that interface Power and USB to the Headphones
-
MEMS Microphone from plastic collar in the Headphone
-
MEMS Microphone separated from the Interface Circuit Board when removed from the side of the Speaker Chamber
-
-
-
Closeup view of the Battery
-
Li-Ion 3.7V, 0.32Wh
-
The battery appears to be from VDL Electronics Co., Shenzhen, China
-
-
-
Closeup view of the Antenna/Touch Sensor side of the Main PCB
-
DSP Group - C2A1A Hybrid Active Noise Cancellation (ANC) Codec and Audio Digital Signal Processor (DSP)
-
651DF1M9 - Could not cross part number, but during a web search found out that it may be an integrated battery management IC
-
W25Q32JWUUIMTR- SPI FLASH 32Mb
-
MEMS Microphone Port
-
-
-
Closeup view of some of the components on the Antenna/Touch Sensor side of the Main PCB
-
DSP Group - C2A1A Hybrid Active Noise Cancellation (ANC) Codec and Audio Digital Signal Processor (DSP)
-
Winbond-W25Q32JWUUIMTR SPI FLASH 32Mb
-
651DF1M9 - Could not cross part number, but during a web search found out that it may be an integrated battery management IC
-
-
-
Battery side close up view of the Main PCB
-
AIROHA AB1552 - ARM Cortex M4/Bluetooth 5.0 Dual Mode
-
913 MPS1 MEMS Microphone. The Headphone uses three MEMS microphones with this part number
-
Could not cross the part number. If you know the part, please leave a comment below. The 2D bar code on the part reads as STM9135G15JAS011
-
Crystal Oscillator
-
Unknown component. Labelled B2A. Please leave a comment if you happen to know this component
-
Unknown component. Labelled SV4CP 240. Please leave a comment if you happen to know this component. Separated from PCB during teardown
-
-
-
Closeup view of some of the components on the Battery side of the Main PCB
-
AIROHA AB1552 - ARM Cortex M4/Bluetooth 5.0 Dual Mode
-
913 MPS1 MEMS Microphone. The Headphone uses three MEMS microphones with this part number
-
Could not cross the part number. If you know the part, please leave a comment below. The 2D bar code on the part reads as STM9135G15JAS011
-
Unknown component. Labelled SV4CP 240. Please leave a comment if you happen to know this component. Separated from PCB during teardown
-


4Kılavuz Yorumları
same. can you post the teardown of the charging case?