Ana içeriğe geç

Replace broken tabs to keep ram in place

Well…I'm the idiot. When swapping out my ram, I broke the tabs that keep the ram boards in place. (See step 4 - RAM in the topic called "Installing MacBook Pro 15" Core 2 Duo Model A1211 RAM").

What part(s) do I need to replace? Apple says I need to replace the mother board. But when I look at the mother board, it doesn't show the ram assemble/tabs.

Any ideas?

Peter

Yanıtlandı! Cevabı görüntüle Ben de bu sorunu yaşıyorum

Bu iyi bir soru mu?

Puan 3
2 Yorum

I repaired one for a customer with a 5mm cable tie I cut to span from the screws on either side of the ram slots. I drilled holes in the cable tie and used longer screws in place of the originals. He also broke the bottom retainer so I added some non conductive filler to keep them both in place when the Bridge is tightened down.

tarafından

This was my solution. Wide enough cable tie measured and marked to make holes with ice pick. Used existing screws (each with different diameter threads so be careful to not make holes too big). Use fingernail clipper to cut off excess tie. I have photo but don't see how to upload into this post.

tarafından

Yorum Ekle

7 Cevap

Filtre ölçütü:
Seçilen Çözüm

Here's a picture of the logic board showing the tabs. http://www.usedmac.com/catalog/images/18...

After breaking the first tab, you continued and broke the second? To avoid more costly repairs, and the logic board is pretty expensive, I would suggest taking it to a older experienced technician who might be able to secure the RAM modules without replacing the logic board. Soldering a new RAM receptacle onto a logic board is not something even I would want to attempt. Honestly some people are just not cut out to do delicate computer repairs.

Bu yanıt yardımcı oldu mu?

Puan 4

9 Yorum:

Yes. I know I will be booed for this answer but I'm looking at what's best for Peter.

tarafından

I happen to agree. When upgrading my RAM I tried to force the RAM in place and broke the top case ribbon cable. Patience is key when doing any repair. +

tarafından

Agreed. Ralph +

tarafından

A heavy rubber band around both sticks might hold it in place. Putting weight on it and superglueing it into place might be another option

tarafından

Superglue -jeez. Actually something i'd McGyver myself, but think a moment about the next repair guy. Poor chap

tarafından

4 tane daha yorum göster

Yorum Ekle

There should be a way to install a foam spacer between the memory door and the ram stick that would make pressure on the ram stick and keep it down in its slot.

Bu yanıt yardımcı oldu mu?

Puan 3

1 Yorum:

Be sure its non-conductive foam. Ralph +

tarafından

Yorum Ekle

Don't feel too guilty. I did the same thing on an old MacBook when I started out repairing Mac laptops. Luckily it was a "practice" laptop to experiment on and wasn't an actual job. Im glad it happened then because now I am extra careful when doing RAM upgrades for friends and clients.

There are many delicate and extremely small screws, parts and wires inside a Mac laptop and no matter how careful you are, something could be pulled off the logic board. When this happens, sometimes a part can be soldered, sometimes not and the logic board has to be replaced which is expensive to do.

The only way I found out about repairing Mac laptops was getting old practice machines that people were throwing out anyway, opening them up, taking them apart, trying out various tools, and studying the inside with a magnifier light.

I always use a Black Stick spudger to gently tweak the RAM clips on laptops to check the resistance. I have had some laptops that it took both hands and a lot of push to get the RAM chip seated properly. This usually happens on the older machines. Good luck though next time

Bu yanıt yardımcı oldu mu?

Puan 1

2 Yorum:

+ for the comprehensive anwer. I noticed that RAM chips on older Macbooks sometimes look corrodet. Anybody with any knowlegde about the whys and fors?

tarafından

I've seen a lot of factory Apple RAM with white stuff on it that looked like corrosion but wasn't

tarafından

Yorum Ekle

I used a plastic shim to cause pressure on the ram from the bottom case. Works perfectly. Never a problem since!!!

Bu yanıt yardımcı oldu mu?

Puan 1

2 Yorum:

I used some rolled toilet paper as the 'shim'

tarafından

dear sir...

i have the same problem now. One of the ram clip is broken. would you briefly explain how did you solved the prob with the plastic shim? If you could recalled, would you able to post a picture here? thank you and appreciate your help and time

tarafından

Yorum Ekle

Here’s my fix with a plastic spudger

Block Image

Bu yanıt yardımcı oldu mu?

Puan 1
Yorum Ekle

I accidently broke one clip off, stopped to ponder and came up with a what i think is a nice solution:

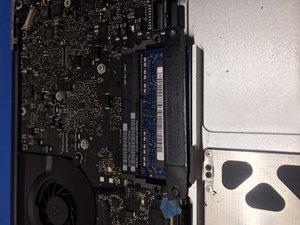
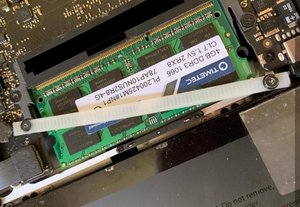
I went on and broke off the other clip. By doing so, i managed to create an clear path between both logic board screws to the right and left of the ram. then i went and found a thin plastic piece, which i cut to the correct rectangle size and drilled a couple of holes, one on each side.

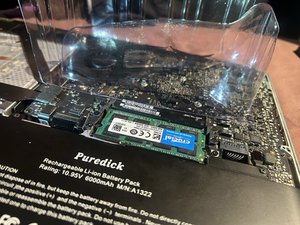
I then seated the ram in, pushed it down with the plastic rectangle, and screwed in the logic board screws to firmly hold the ram from jumping out.

I DID have to use the longer fan screws since the originals in those places were too short for the added plastic width.

I used the shorter screw on the fan instead.

It works… and it’s pretty easy to do with a simple ruler, exacto knife, and a heated nail… (or more sophisticated tools if you have them).

Bu yanıt yardımcı oldu mu?

Puan 0
Yorum Ekle

Mid 2010 Macbook Pro. I used a zip tie as suggested in previous post - worked great. Zip tie is connected by existing screws.

  • Choose zip tie wide enough to fit screw holes. Measure and cut the zip tie to approximate length from screw 1 (lower right) to screw 2 (upper left). You will trim this later. Mark on zip tie where to place first hole (lower right screw).
  • Use ice pick to create hole in zip tie - this takes a bit of back and forth to get it to match the screw thread size.
  • Screw the first screw into the zip tie and then into the socket. Mark zip tie where 2nd screw hole is to be made.
  • Remove first screw (and zip tie) and then make hole for 2nd screw. I made the hole just a little smidge lower down the zip tie to give extra tightening across ram.
  • Note: 2nd screw thread is smaller diameter so don’t make that hole as big as the first one.
  • Screw in both screws to the zip tie first and then they are held in place when you screw into the sockets. Screw each into sockets.
  • Use fingernail clipper to snip off excess tie on each end.

Block Image

Bu yanıt yardımcı oldu mu?

Puan 0
Yorum Ekle

Yanıtını ekle

Peter sonsuza kadar minnettar olacak.
İstatistikleri Görüntüle:

Son 24 Saat: 0

Son 7 gün: 11

Son 30 gün: 51

Her zaman: 17,673