Ana içeriğe geç

The Smart Oven® with Element IQ® is a trustworthy tool for the cook who wants a countertop oven that roasts succulent meat, broils, bake pizza, reheas leftovers and toasts evenly. Convection setting reduces cooking time by up to 30%. Model: BOV800XL

28 Soru Tümünü görüntüle

Fixing the start button

Pressing the start button on my Breville BOV800XL toaster oven also triggers the convection button, and sometimes the Fahrenheit/Centigrade button, instead of turning on. I have to press the button many times, carefully, before the cycle actually begins.

I suspect the button is flexing the PCB behind the control panel and display.

How do I get the cover off, and how could I fix this?

Yanıtlandı! Cevabı görüntüle Ben de bu sorunu yaşıyorum

Bu iyi bir soru mu?

Puan 34
13 Yorum

Have you been able to fix this? Mine just started doing the same thing

tarafından

No, unfortunately.

tarafından

I added instructions on how to fix it. Hope it helps!

tarafından

I had the same thought. So I too switched the ºF/ºC button for the on/off button. At first it appeared to help, but a few more tests and the problem was back. There must be another part on the circuit board that is out of tolerance...likely a capacitor. High heat can age capacitor more quickly.

I found a work around that helps sometimes. Press and hold the convection button then press the on/off button, and lastly release the convection button.

tarafından

2 SECOND Solution! I had this same problem. One day, I was struggling to push the button hard enough to make "contact" to start the toaster when I used the back of a butter knife to depress the button. Barely touching the button, the oven turned on. I couldn't believe it....so I tried it again and again. The metal contact from the knife must create enough of a static charge to easily turn the toaster on/off. I was so happy I could get a lot more life out of this toaster oven without taking in a part!

tarafından

8 tane daha yorum göster

Yorum Ekle

22 Cevap

Filtre ölçütü:
Seçilen Çözüm

Here's where to get parts for it: http://www.ereplacementparts.com/brevill...

Bu yanıt yardımcı oldu mu?

Puan 5

2 Yorum:

TERRIFIC instructions. Thank you, Chris!

tarafından

Super helpful. Note that there are apparently two different versions of the circuit board, make sure you get the one that is compatible with your oven.

tarafından

Yorum Ekle
En Yararlı Yanıt

I had this same problem and fixed it today. Boy was it a pain in the butt!

The issue is with the push button on the "Control PCB". It appears that one of the legs in the switch no longer connects or shorts and it causes it to trigger the "Convection" button instead. The fix is to replace that switch or order a new circuit board. I ended up un-soldering the button used to switch from °F to °C and swapped that switch with the On/Off switch.

Here's how to get to that board (you'll need hands and arms similar to that of an 8-year-old child):

  • Start by flipping the toaster oven over and removing the feet.
    • There are two screws on each foot and another two in the middle
    • The plastic part is slotted and will need to slide back in place when you put it back together. Keep this in mind for the re-assembly portion.
    • After you have the feet off, remove the screws underneath that they were covering up. There is one screw in each corner on the bottom. These are the only screws you should need to remove from the bottom.
  • Remove the back:
    • Look at the back of the toaster oven and remove every screw that's facing the back. There's a lot of them and they're all the same size.
    • Next, slide the back of the toaster oven down by approximately 1/2" and remove it. It's on there pretty tight.
  • Remove the top case from the toaster:
    • When looking from the back, the top and right side are slotted and held in place by tension.
    • Above the control panel and on the left side (same side as the control panel) there are 5 black screws. 3 are on the side and two are along the top. They are not easy to get to. I suggest starting with the one in the bottom corner and work your way to the top, then get the two that are at the top. Again, this part sucks.
  • Remove the control panel:
    • Looking at the bottom of the toaster oven and about an inch in, there is a hole cut in the bottom and a single screw pointing "up" toward the top of the toaster oven. Remove it.
    • Unplug the 9-wire red-and-white cable.
    • Unplug the white nylon 2-wire cable.
    • The Control PCB should now be free.
  • Remove the PCB from the assembly:
    • Remove the metal piece that's over the white plastic. 2 screws.
    • Remove the screws in the white plastic and take off the white plastic
    • Remove the single screw holding the PCB down and take it off.
  • Fix the PCB! Yay!
    • The busted switch will be labeled on the "yellow" side as K101 and will be in between two LEDs. Remove the switch using a soldering iron.
    • The °C/°F switch will be labeled on the "yellow" side as K103. Remove it with a soldering iron. Don't mix the two up!
    • The switches all go in the same way, the feet come out the left and right sides.
    • Solder the switches back in place but swapping the K101 switch with the K103 switch.
  • Put everything back together. Just do it all in reverse.
    • When putting the white plastic piece back on the back of the PCB assembly, hook the long rubber strip on it first. Then put the bent metal piece on and into the slot on the rubber strip.
    • Note that the three knobs on the front control panel are keyed and must fit into their respective PCB-mounted sensors in a particular orientation. If not, the PCB will jut out a little bit depth-wise and result in an incorrect fit during reassembly. (Thanks, Vladimir Kutz)

Good luck and god speed!

Pictures of the PCB with K101 already removed. Placement of the 5 black screws holding the front control panel to the top case. Picture of the bottom screw holding the front control panel to the top case.

Block Image

Block Image

Block Image

Bu yanıt yardımcı oldu mu?

Puan 36

30 Yorum:

Great instructions! I've gotten it apart but am seriously wondering how in the world I am going to get those top screws backs in because they were such a bear to get out. Did you really get yours back together? Any hints on those 5 screws?

tarafından

I did get them back in but it wasn't fun. I had to flex the outer case quite a bit just to fit my hand in there. Use a long screw driver and skinny hands!

tarafından

And is your oven working correctly now? I took the circuit board to a shop since I’m not a solderer and they said the switch did not seem bad and started talking about switch leakage in a circuit and that I would not be changing anything by swapping switches. My eyes glazed over and I left - just wondering if I should try another shop or give up.

tarafından

Hi Kathy, I have this problem too, but I haven't had the time to address it yet. The instructions Chris provided are phenomenal. I just wanted to let you know that I'm also "not a solderer", but it can be done by a novice. Youtube is loaded with "how-to" videos. It's a little scary at first, but you can do it too! You don't need a blow torch, but a small, pen-like tool that has a pointy tip that heats up like an iron. You just touch the hot tip on the silver solder material and it simply melts it away, so you can removed the part. Once the part is removed, you just add new solder by melting the solder material over the part you need to attach to the circuit board. Amazon has kits available with the solder material and the iron for less than $20. You just have to look up "solder kit". Good luck.

tarafından

It is working correctly now. The switches have two feet on the left and two feet on the right. The top feet are interconnected and the bottom feet are interconnected. When you press the button, it connects both top feet to both bottom feet. One of the feet on the switch _is_ connected to the same circuit as the convection button.

My best guess is one of the legs _inside_ the switch is broken and only allowing 3 of them to connect. Since one of the legs is connected to the convection circuit, I think this is causing it to think that the convection button is being triggered instead of the Start button.

Kate is correct. This is a very simple and basic job as far as soldering goes. You'd want to put something like a small screwdriver under the switch on the front of the board and melt the solder on the back of the board. If you keep pressure and keep moving the soldering iron from foot to foot it should be enough to eventually get it to wiggle out of the board. I think a 40 watt soldering iron should be good.

tarafından

25 tane daha yorum göster

Yorum Ekle

Maybe I don't fully understand the "black screw" problem. When I reassembled mine I reattached the control panel assembly to the housing with all the screws, put the housing in place, pulled the control panel side of the housing out slightly and I was able to easily reach in and connect the two connectors to the board. Seems to me it would have been just as easy to do this in reverse. If I needed to do this again I would do everything the same up to the "remove the back" step in Chris Helming’s instructions, then, from here, instead of fighting with the black screws, I would:

1) Remove the one screw from the bottom of the toaster pointing up, and which holds the bottom of the control panel to the toaster chassis.

2) Detach the outer housing from the toaster chassis by gently (but firmly as it takes some force) pulling the outer housing of the toaster (plus the control panel which is attached to it) backwards, but only until it disengages from the chassis - the control panel is still connected to the toaster via ribbon and power cables!

3) You should now be able to pull the control panel side of the housing outward and be able to reach in to disconnect the two connectors which go from the control panel to the board on the toaster.

4) With the connectors disconnected, the housing + control panel can be easily removed from the rest of the toaster.

5) Now, with the housing off the toaster, you can then easily access and remove all the black screws which attach the control panel to the housing, disassemble the control panel, work on the board, etc, then reassemble in reverse order.

Bu yanıt yardımcı oldu mu?

Puan 12

1 Yorum:

This step made things so much easier. Thanks for posting this! Was able to successfully perform the repair using Chris's instructions above along with this tip. First time de-soldering and soldering. Was sure it wasn't going to work but it did.

tarafından

Yorum Ekle

Thanks to Chris and Phil for the great info on how to get at the circuit board!

I checked all four switches with a multi-meter, and all but the bottom ‘frozen’ button were flaky. When pressed the resistance should be steady and near zero, but the resistance readings on the upper three when pressed bounced around and were not near zero. This leads me to believe that the problem is environment (heat and moisture) rather than mechanical wear, as I never use the F/C button and rarely the convection button. This also means that swapping switches is not likely to lead to a long-term solution. Here is a link with a bunch of switches that will work (don’t get the ones where the picture shows very long legs) : Switches from DigiKey. This one, Best switch has gold plated contacts and is made for corrosive harsh environments (It is also vastly more expensive than the others, but still only $3 each)

Bu yanıt yardımcı oldu mu?

Puan 6

3 Yorum:

Awesome! I was just wondering if mouser or digikey had this switch so I wouldn't have to do a switch swap. Thanks Tim

tarafından

I bought 4 of the “best switch” Tim recommended from digi-key. Put them in today, and it’s back to working properly. It cost $16.60, but I have been living with the bad switches for a couple of years because I didn’t I want to deal with all those screws again after I fixed the heat by re-soldering the power relay (just before reading here that it was a switch problem. I thought the controller was just nuts.) I had to open it up again now because the door spring broke, and I’m hoping the gold contact switches will keep me from having to mess with it for another ten years.

Thanks to all you fixers, especially Tim

tarafından

Which switches did you buy. I have the same problem with the start/stop and C/F switched

tarafından

Yorum Ekle

A couple of months our Breville BOV800XL started giving trouble. It would do the preheating but then not carry on heating at the set temperature at all. Sometimes it would work but mostly not. The START button seemed to be the problem, I thought. It would be intermittent and sometimes the fan would come on but no heat.

I took it apart and did not see anything obviously wrong. Then I re-arranged the small switches, discussed here, making sure one of those rarely used ones ended up in the START position. Still no joy, but sometimes the work-around suggested seemed to work. I decided to replace the switches and still no consistent performance. I could get it working on my workshop bench but when I put it all back together and back in the kitchen still no luck from time to time.

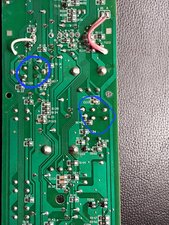
With the unit back on the bench and dis-assembled but with the 9 pin cable and 2 pin one connected, I noticed that if I moved the 9 pin cable near the connector on the main PCB I could get all sorts of odd behaviour when plugging the unit in, including the E5 error. I thought the cable that gets folded from the front panel to the PCB was the problem. I managed to get a few such cables cheaply (Ali-Express) and put a new one in, soldering it carefully on the control board. Astonishingly it did not solve the problem. I cut the front of the plastic on the 9 pin connector on the PCB. When I attached and then removed the connector plug I noticed a couple of the pins on the board were not at the same height and had moved slightly.

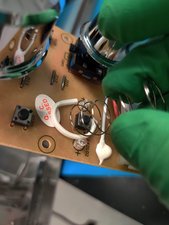
I then removed the PCB. Removing the spade connectors has to be done with long needled nosed pliers to release the connector. (You have to mark which connector goes where, especially 2 on the lower rhs of the board.) I then measured the resistance from each pin in the connector to a soldered component position on the correct metal trace on the non-component side of the board. Most of them had zero resistance but a couple a few kilo-ohm. When I measured the resistance from the solder of a problem pin to the same place on the metal trace I got zero ohms. When I looked at the solder joint of the pin on the board with a magnifying glass I found a hair line gap/crack where the base of the pin went into the solder, all around it! If you knew where to look you could hardly see it without the a magnifying glass. I re-soldered all the pins to get a good small lump of solder on each, and for good measure soldered the cable wires onto the pins of the connector, getting rid of the connector plug.

With this done I tested the unit. No problems at all, anymore! I found that if I plugged in a bench (non-dimmable) LED lamp to the same circuit as the unit, the light would flicker very slightly when the elements were on. Once the unit come up to the set temperature the elements switch on an off – it is hard to see them glow (Roast function) except in the dark. I also used a digital oven temperature probe to watch the unit maintain roughly the set temperature.

The unit gave trouble before I disassembled it so the pin problems on the PCB existed before I removed the 9 pin connector. I could have made it worse I suppose, but this is unlikely the original cause. Any good soldered joint should last for ages but when the unit has been used perhaps more than 1000 times by us, it could deteriorate since the board and the soldered connector gets hot each time the unit is used. It there is a small gap/crack that does not go all around the base of a pin the unit could work most of the time. A signal from the front control panel might be corrupted and a relay might not then work properly. Depending on which pin(s) have the problem you’d get different problems. I suspect some of the problems people have had might be related to the one I had. It is possible that with new switches the signal to the PCB board is good enough to overcome the resistance between a pin and its soldered joint to a metal trace.

So first when trouble shooting looking at the connector pins on the PCB might be a good place to start.

I nearly gave up a number of times. It was the fact that the unit worked sometimes that gave me hope. If I counted the hours I spent on this it might be embarrassing.

Bu yanıt yardımcı oldu mu?

Puan 6

4 Yorum:

We have corroborating evidence with three or four of these Breville toaster ovens that components separate from the circuit board over time.

tarafından

Wow thanks for the write-up! BOTH my Brevilles do this, what bad QC. Any photos?

tarafından

This relentlessness of figuring out the root cause here warms my heart. Bravo! I'm on my 2nd oven now, the first one died due to this intermittent failure, so now i know how to fix it!

tarafından

I did not take any photos, maybe I should have. I'd have needed a macro setup not just regular camera usage. (I do have one.) To see the minute gap demands a magnifying glass, especially because you get reflections from the silvery solder blob. The 'blobs' on the connector pins I was looking at were not as large or as good ones on the component leads. Maybe this was due to the wave soldering process and/or the solder 'wettability' of the connector pins.

Relentless is not the word my wife would use - maybe obsessive!

I have been on a roll these last 2 weeks fixing things - from the main unit of a home theatre system of a 100 year-old friend to a cordless drill (the chuck) to an old kitchen blender etc. I told my wife I should pay myself for all these repairs to buy a few more 'toys'.

tarafından

Yorum Ekle

I was able to fix the start button issue using the great comments above. Thanks for posting them.

A few things to add that might help.

I replaced the Control PCB Assembly with a new assembly from eReplacementParts, using the link above (part number SP0010507, for $41.03). The part was backordered and took 2.5 months to arrive. The new screen is bright and the start/stop button works every time; feels like new. I did not solder.

I used both methods described above (by Chris and Phil). I used Chris’ method first. I was actually not able to fully remove the top case, only the left side of it (when looking from the back); the black screws were definitely a challenge.

Later, I read Phil’s method and decided to give it a try. For me, the top and right sides of the top case were held in very tightly, so it took a lot of wiggling and a fair bit of force, to finally pull them free. Remember to remove the screw on the bottom of the oven first. The top and right sides have a tongue-and-groove fit with the front of the oven. And, it also wasn’t the easiest thing in the world to put the tongue back in the groove when re-assembling. Note that with Phil’s method, you do not have to remove the back of the toaster oven.

Once the top case, with the control panel still attached to it, are free, and the two wires are disconnected, it’s easy to remove the black screws, as Phil says. So, having tried both methods, I would use Phil’s if I had to do it again.

One final thing. When I removed the white plastic cover from the control assembly, a spring fell out. I assumed that it fell out from the start/stop button and that’s where I put it back when re-assembling the control unit.

Bu yanıt yardımcı oldu mu?

Puan 4

3 Yorum:

Correct, the spring is from beneath the start/stop button.

tarafından

I ordered the replacement pcb and received the wrong one, don't know if the number above is wrong, or I was shipped the wrong board. Inspect the board you receive before starting the job. If you have a board with pot rotors, sticking up, it was the wrong board for me. It's possible there are two versions of the toaster over. Luckily, I had also ordered some of the digikey switches recommended, so I swapped the switch instead. My pcb had some kind of circular pots that were low and close to the board, and the knobs on the panel would fit into them.

tarafından

@debaets The exact same thing happened to me. Both the cable and the pots were different on the replacement board.

tarafından

Yorum Ekle

Changing the switches around fixed mime for awhile only: the uncontrolled pressing of the switch by kids flexes the board and does all kinds of havoc on the multiple connections.

Using a very thin tipped soldering iron, I remelted a lot of the contacts all over the board (using my best reading glasses) and even added a bit of lead in a couple of places that seemed thin. Flawless for a couple of months now. I had nothing to lose, saved me from buying a new board.

Bu yanıt yardımcı oldu mu?

Puan 3
Yorum Ekle

Thanks to original poster and posters suggesting better ways to get the oven apart! I just found this after fighting my pushbutton for a couple of months. On a lark I looked on DigiKey and I think I found the switch. I have ordered some and will report if they fit. The switch I ordered is ALCOSWITCH Switches 1825910-6. they are a whopping $0.10 each.

Bu yanıt yardımcı oldu mu?

Puan 2

2 Yorum:

Did they work?

tarafından

The shipping kills the new switch cost...

tarafından

Yorum Ekle

Block Image

data sheet from Digikey

Bu yanıt yardımcı oldu mu?

Puan 2
Yorum Ekle

After at least 2 years of putting up with the switches, I finally took it apart. I removed all 4 switches and replaced them with the ones I had bought a couple years ago. The unit is now working perfectly, hopefully it stays that way as we use this thing almost everyday.

Bu yanıt yardımcı oldu mu?

Puan 2

2 Yorum:

Which switches did you buy ? I am trying to fix my breville after putting up with it for the last 2 ye

tarafından

Back for another update. Found a BOV800XL at Goodwill. Tested it at the station and it had the all too familiar button issue. Bought it, got it home and taken apart. Brought out my bag of switches and took the old ones out. New buttons put in and it's back in business. Still have the one we originally fixed working perfectly.

tarafından

Yorum Ekle

Just to second all the previous posts, the start button is a fairly easy item to replace on the PCB. I bought a bag of 100 switches from Amazon and used three of them to replace three bad switches. They worked perfectly. See the link below.

DAOKI 100Pcs 6x6x5 mm Miniature... https://www.amazon.com/dp/B01CGMP9GY?ref...

Bu yanıt yardımcı oldu mu?

Puan 1
Yorum Ekle

To anyone who finds this years later that has an older Breville BOV800XL/A: Besides having a few switches that were bad on my board, I also had a couple of rotary knobs that weren’t working consistently and one of them failed after I made the switch repair (likely from pulling the knobs off from disassembly). I ordered replacement control boards from 2 places online but I kept getting sent the updated board that has a 10-pin connector and different knobs. After a lot of digging I think I found the part on Mouser that seems to be a direct replacement. I couldn't figure out the specs of the original encoders but these are dimensionally accurate and seem to be working fine after soldering them in and testing for a while.

https://www.mouser.com/ProductDetail/Bou...

Part information just in case the link is ever down

Bourns 23mm Low Profile Increment-Ring Encoder

Mfr. part number: PER231-P19-N0010

Bu yanıt yardımcı oldu mu?

Puan 1
Yorum Ekle

So after a month or so, the original problem returned and continues to happen intermittently. I only swapped the switches so am now considering trying to replace it and change the position of that spring while I’m at it. Was wondering if Dustin Rhoades had success with the switches he ordered? Or if anyone else can tell me what switch to buy?

Bu yanıt yardımcı oldu mu?

Puan 0

6 Yorum:

I ordered 2 kinds of micro switches. I do have them but I haven't tried the repair yet. I have about 50 of each kind. I can mail you out a couple of each. Send me an email, my gmail is my username here.

tarafından

Sorry but not sure I understand your email - is it dustinrhoades@gmail - one word?

tarafından

no, it's my @ username, my2k2zx2.

tarafından

How can I get 2 micro switches ? have same problem .chwaldner@ gmail.com

tarafından

Switching an unused switch did not help. I was only able to resolve it by replacing the circuit board. As Duane reports as well. I suspect other components prematurely aged due to the oven heat on earlier models, without the white insulation Breville later surrounded the oven with.

As Duane says it's approx $40.

tarafından

1 tane daha yorum göster

Yorum Ekle

I’m glad to have found this thread.


I removed the front control board and powered things back up.

My BOV845 is buzzing loudly from the front temperature control knob. When i turn the knob, the buzzing changes a bit. I’m thinking that maybe it’s not the switches but the rotating (pots?). Has anyone tried to replace those? Its very weird to me that i’m hearing buzzing from them, seems to suggest a short of some sort, and a lot of current passing through!?

Bu yanıt yardımcı oldu mu?

Puan 0

2 Yorum:

Our ~4 year fold 650xl is on the fritz. It won’t go into standby mode and the lower knob for time/temp selection isn’t changing the lcd display. Powers on, heats up. Any ideas? Thank!!

tarafından

My BOV 845 has a similar issue, and not just buzzing but also sometimes da-da looks like the relay is fury... When I touch any buttons or knobs, it's gone and seems the grounding is an issue. My solution now is to punch the oven side to get it to work...

tarafından

Yorum Ekle

Great thread.

I’m having a problem with a slightly different part, it’s the rotary function dial labeled KS101 in the picture of the board that Chris posted. Any idea what part that is and where I can order it?

Thanks!

Bu yanıt yardımcı oldu mu?

Puan 0

1 Yorum:

I know that it's been more than a year after you posed this question but if you scroll down further in this thread to where I've posted some answers, you'll see that I've identified the replacement rotary encoder that you can get on Mouser and Digikey. Digikey won't have stock until at least late May '23 so Mouser's your best bet there.

tarafından

Yorum Ekle

I bet Sean found the root cause. If I remember correctly, the thin white sheet insulating the circuit board from the oven heat was not there on the earlier version we had. This supports what Sean found, and that Breville tried to remedy the problem. It’s unfortunate they cannot control the manufacturing quality tight enough to get better solder joints.

Bu yanıt yardımcı oldu mu?

Puan 0

1 Yorum:

The return Spring for the starting knob could contact the PC board connections and give problems. I insulated the components with plastic dip and did the same with the spring. I haven't had any problems in 2yrs.

tarafından

Yorum Ekle

The return Spring for the starting knob could contact the PC board connections and give problems. I insulated the components with plastic dip and did the same with the spring. I haven't had any problems in 2yrs.

Bu yanıt yardımcı oldu mu?

Puan 0
Yorum Ekle

Agree with @coleman_ that replacing the start button with a new switch is better than swapping. Actually any new press button would do. I fixed by replacing the start button and adding 104 capacitor across the new button to reduce some noise. After reading the PCB traces, it seems that Breville uses voltage devide circuit and one ADC pin to catch signals for all buttons:

VCC
   |
1kohm
   |-- ADC pin on MCU
   |
1kohm -- start button -- GND
   |
1kohm -- convection button -- GND
   |
1kohm -- other button -- GND

When different buttons are pressed, ADC will sample the voltage and get different readings, but then the start button is aged and the noise or higher resistor has caused the voltage to be mis-classified as the convection button.

That is why the workaround worked "Press and hold the convection button then press the on/off button, and lastly release the convection button".

The reason the "butter knife" workaround worked sometimes, was because the control pannel was not grounded so it has some induced voltage (which would trigger voltage tester pen).

Bu yanıt yardımcı oldu mu?

Puan 0

4 Yorum:

What are the specs of the "104 capacitor" that you used? Thanks.

tarafından

@Everett - 104 is a 0.1uF 50volt ceramic disc capacitor. You may also see the spec as 100nF 50volt. Searching for "104 capacitor" at your favorite vendor ought to bring up lots of them.

tarafından

Thank you! Never even knew about the 3-digit capacitor code system!

tarafından

Can someone describe or post a link as to how to connect/use this capacitor to reduce noise from the switch? Thanks.

tarafından

Yorum Ekle

Well, that was an irksome couple of hours! But with a new set of switches, my oven works like new.

Buying a 24” screwdriver from Harbor Freight for nine bucks was a very worthy investment for reaching those infamous black screws. I have no idea how they actually built that - I guess the control panel and case are assembled first, then the actual oven box and heating elements are slid in after?

Now I have 118 switches left over. At least 6x6mm tactile switches are plentiful - doing a board swap is currently impossible as the boards are not available from Breville or the usual aftermarket repair outfits.

Bu yanıt yardımcı oldu mu?

Puan 0
Yorum Ekle

Thanks for the OP and other valuable replies. My BOV845BSS started alerting sometime a couple of weeks ago, which may happen when the oven is idle or during heating. I followed the previous solution and switched the on/off button with the c/f one and resoldered some parts of the power board. After I pack the case back, perfect, but somehow the problem still exists. Then I found the issue seems related to the contact. I tried touching the pin of the on/off button and thought maybe the spring played the trick. Then wrapped the spring with the shrinking tube, and ta-da, the problem is gone. Finally, I was happy too early, THE SAME problem came back again. I do believe there are some points that need to be resoldered but couldn't figure out where to go... I am going to order a new panel anyway.

Block Image

Bu yanıt yardımcı oldu mu?

Puan 0
Yorum Ekle

I have problems with the fresh/frozen, convection and F/C buttons all trading functions plus I have another problem that no one else has mentioned having: The temp/darkness dial doesn't work. The person I got the oven from said it will work once the oven is heated up but I haven't seen that yet.

I pulled the control PCB and reflowed the solder on the contacts of the 4 switches plus I did the same on the 5 contacts on each of the three rotary dial switches (are those mechanical encoders?). I also reflowed the 9 contacts for the ribbon cable that goes to the other PCB.

I put the board back in and tested it and nothing had changed. Still have the same issues so reflowing the solder was not the fix for any of the problems. I can order in replacements for the small switches from DigiKey. I didn't see anything on the rotary switches (encoders?) to help me identify what switch that is to see if I can find a replacement for it on Digikey. Does anybody know of a replacement for those rotary switches (encoders?) on Digikey or Mouser?

Bu yanıt yardımcı oldu mu?

Puan 0

3 Yorum:

I checked the rotary encoder for the non-working Temp/darkness dial with a multi-meter and it appears to not be working in the same way as the other 2 (working) rotary encoders for the function selector and the Time/Pizza size selector. All 3 encoders are the same component and the 2 working ones give the same results with the multi-meter test and the non-working one gives a different result. The rotary encoder switch for the Temp/darkness dial is bunned and should be replaced. After searching, I think I found the correct part at Mouser and Digikey.

The encoder is a Bourns PER231-P19-N0010

Mouser Link:

https://www.mouser.ca/ProductDetail/Bour...

Digikey Link

https://www.digikey.ca/en/products/detai...

Digikey has none in stock right now but Mouser does so I guess I'll be ordering the rotary encoders and micro-switches from Mouser this time.

I'll report back on the results after I've received the parts and have installed them on the control board.

tarafından

Can confirm that encoder is the correct one, I soldered out the original encoder dial and soldered in the replacement I found on Mouser & Digikey and now my toaster darkness and Bake temperature adjustment works again.

tarafından

My BOV900BSS has similar problem with the FUNCTION rotary switch. The switch doesn't look like the same. Need help to find the part number.

tarafından

Yorum Ekle

My Breville Toaster Oven (BOV800XL/A) is about ten years old and has been a great unit except the start button is finicky, especially for toast.

I have called Breville several times but they can't help. They pretend it is my problem--like I have stupid fingers

It is an inconvenient but it is too expensive to replace.

This week I am concerned because when on, it has started to make a cracking sound and it may be shorting.Nothing online or in their manual deals with this and I think it may be a fire hazard so have unplugged it.

There are no small appliance repair people around here anymore. Not worth their time.

Bu yanıt yardımcı oldu mu?

Puan 0
Yorum Ekle

Yanıtını ekle

Ken Haugen sonsuza kadar minnettar olacak.
İstatistikleri Görüntüle:

Son 24 Saat: 23

Son 7 gün: 146

Son 30 gün: 695

Her zaman: 51,403