Bu sürüm, hatalı düzenlemeler içerebilir. En son doğrulanmış bellek kopyası dönün.
Neye ihtiyacın var
-
Bu adım çevrilmemiş. Çevrilmesine yardım edin
-
Before starting repairs, take your watch off the charger and power it down.
-
If your touchscreen is broken and you can't power off the watch, use this alternate method to power it down.
-
-
Bu adım çevrilmemiş. Çevrilmesine yardım edin
-
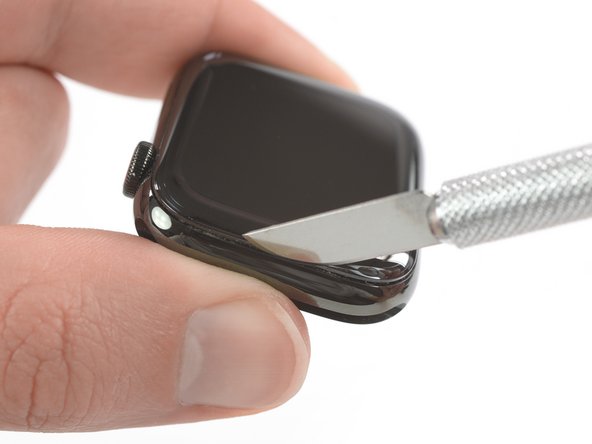
Because the gap between the screen and watch body is so thin, a sharp blade is needed to separate the two. Read the following warnings carefully before proceeding.
-
-
Bu adım çevrilmemiş. Çevrilmesine yardım edin
-
Prepare an iOpener (or use a hair dryer or heat gun) and heat the face of the watch to loosen the display adhesive.
-
Leave the iOpener on the watch for at least two minutes to fully heat the screen and soften the adhesive holding it to the case.
-
-
Bu adım çevrilmemiş. Çevrilmesine yardım edin
-
Place the edge of a curved blade into the thin gap between the display and the outer case. Start at the short side of the display, closest to the digital crown.
-
Press firmly straight down into the gap.
-
Once inserted, tilt the blade to pry the display open slightly.
-
-
Bu adım çevrilmemiş. Çevrilmesine yardım edin
-
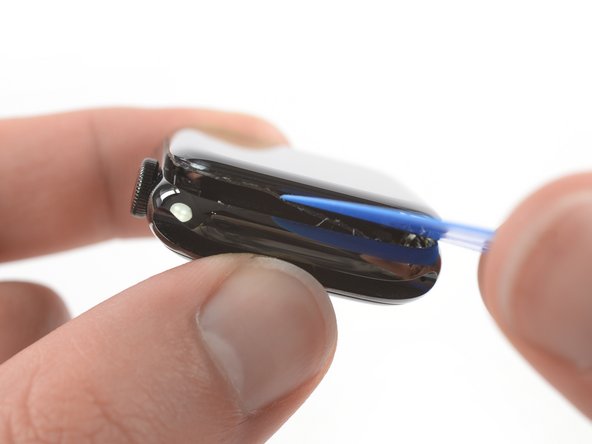
Once you've opened a small gap with the curved blade, remove the blade and insert the thinner edge of an opening tool into the gap.
-
Push the opening tool into the gap, using your thumb as a pivot to lift the display open a bit farther.
-
-
-
Bu adım çevrilmemiş. Çevrilmesine yardım edin
-
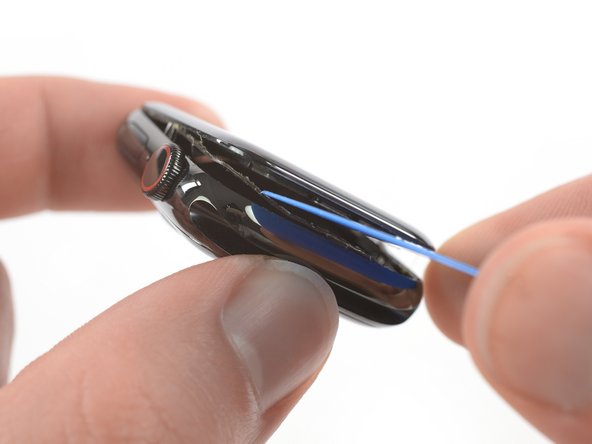
It's likely that the force touch sensor will stick to the display frame instead to the watch's body. In this case, insert an opening pick under the display and carefully separate the Force Touch gasket from the display.
-
Slide the pick around the display to separate the adhesive between the Force Touch gasket and the display.
-
-
Bu adım çevrilmemiş. Çevrilmesine yardım edin
-
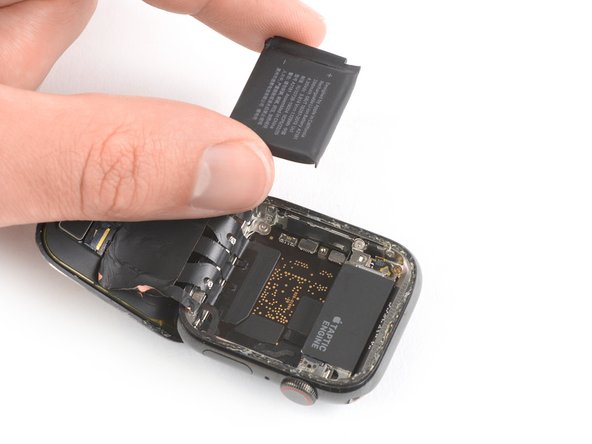
Lift the screen until there's enough space to access the battery.
-
Insert an opening pick between the battery and the Taptic Engine.
-
-
Bu adım çevrilmemiş. Çevrilmesine yardım edin
-
Slide the opening pick along the edge of the battery to loosen the adhesive.
-
Use constant, steady pressure to slowly pry the battery up, separating it from the adhesive securing it to the mainboard.
-
-
Bu adım çevrilmemiş. Çevrilmesine yardım edin
-
Carefully lift the battery to a 75-degree angle.
-
Remove the 1.1 mm-long Y000 screw.
-
-
Bu adım çevrilmemiş. Çevrilmesine yardım edin
-
Use a pair of tweezers to remove the metal plate covering the battery connector.
-
-
Bu adım çevrilmemiş. Çevrilmesine yardım edin
-
Use the flat end of a spudger to pry up and disconnect the battery flex cable.
-
-
Bu adım çevrilmemiş. Çevrilmesine yardım edin
-
Remove the battery.
-
Follow the resealing guide to reseal your watch after reassembly.
-


İptal et: Bu kılavuzu tamamlamadım.
28 farklı kişi bu kılavuzu tamamladı.


8 Yorum
Since WatchOS 7 removed 3D Touch functionality on all Force Touch enabled watches, will damaging or disconnecting the Force Touch gasket affect the functionality of the watch or will the software brick it?
Any tips for applying the adhesive strip without removing the screen? Is removing the screen recommended to seat it properly?
Does the resealing adhesive strip go in between the screen and force touch gasket, or the force touch gasket and the case?
Hi David,
here is a general resealing guide that might help you. Depending on your force touch replacement part you‘ll need one two or no adhesive strips.
If your force touch was never removed you need to place new adhesive on top of it the adhere the screen. If your force touch has adhesive on the bottom side it is the same. Adhere the force touch into the watch frame and place adhesive on top of it to adhere the screen. If there is adhesive on the top of the force touch you need to place the adhesive strip beneath.
If your force touch didn‘t come with any adhesive preinstalled you need adhesive tape below to secure it to the watch frame and on top to secure the screen.
Hi @schnabel , thank you for you reply. I am in the middle of replacing the battery. I managed to save the force touch sensor from getting damaged, but I need to be re-adhere it to both surfaces. Can I use 2 of these adhesive strips on either side?
Apple Watch (44 mm Series 4/5) Adhesive Strip