Giriş
Asus ROG Ally cihazınızdaki M.2 2230 SSD birimini değiştirmek veya yükseltmek için bu kılavuzu takip edin.
ROG Ally, M.2 2230 NVMe PCIe 4.0 yuvasına sahiptir. İçerisinde 256 GB veya 512 GB SSD bulunur, ancak Ally 2 TB'a kadar destekler.
Bu kılavuzda sadece SSD'nizi fiziksel olarak nasıl çıkaracağınız ve değiştireceğiniz anlatılmaktadır. Yeni SSD'nizi kurmak ve cihazınızı tekrar çalışır hale getirmek için Asus Cloud Recovery kullanmanız gerekecektir; bu işlem internet bağlantısı gerektirir.
Eğer taktığınız SSD daha önce kullanıldıysa ve içerisinde hala veri varsa, SSD'yi takmadan önce bu verileri yedekleyin. Kurulum sırasındaki biçimlendirme işlemi sürücüyü tamamen silecektir.
Neye ihtiyacın var
-
-
-
Cihazınızı tamamen kapatın ve tüm kabloları çıkarın.
 FixBot'a Sor
-
-
-
-
Bu adımda kullanılan alet:FixMat$36.95
-
Arka kapağın üst kenarını ve alt köşelerini sabitleyen beş adet 17,2 mm uzunluğundaki vidayı çıkarmak için bir Yıldız tornavida kullanın.
-
Alt kenarın ortasındaki kalan tutucu vidayı tamamen gevşetmek için bir Yıldız tornavida kullanın. Bu işlem, arka kapak ile kasa arasında küçük bir boşluk oluşturacaktır.
-
-
-
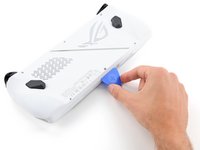
Açma penasının düz kenarını, arka kapağın alt kenarı ile kasa arasına, sabitlenmiş vidanın yakınına yerleştirin.
-
Penayı yukarı doğru eğin ve arka kapağın altına itin.
-
-
-
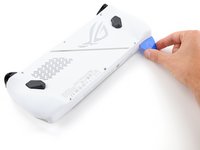
Açma penasını, arka kapağı sabitleyen klipsleri serbest bırakmak için alt kenar boyunca ve köşelerin etrafında kaydırın.
-
-
-
-
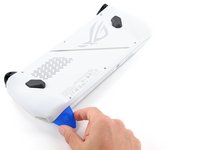
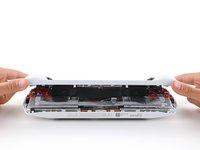
Kalan klipsleri serbest bırakmak için arka kapağın alt kenarını kasadan ayırarak kaldırın.
-
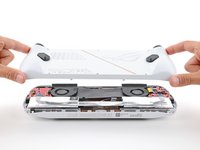
Arka kapağı çıkarın.
-
-
-
-
-
Fanlar arasındaki siyah plastik kapağı parmaklarınızla soyarak çıkarın.
-
-
-
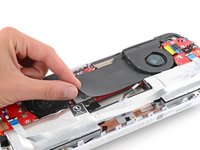
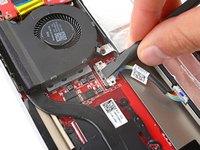
Kilitleme çubuğunu konnektörden uzağa doğru nazikçe itip açmak için plastik kanırtma aparatının düz ucunu kullanın.
-
-
-
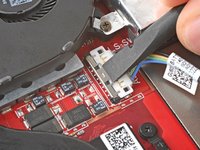
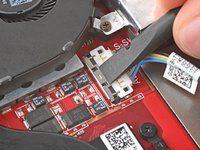
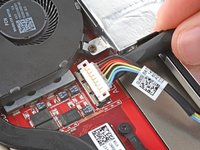
Bir plastik kanırtma aparatının düz ucunu batarya konnektörünün orta kısmının altına yerleştirin.
-
Batarya bağlantısını ayırmak için konnektörü yukarı doğru düz bir şekilde kaldırarak soketinden çıkarın.
-
-
-
-
-
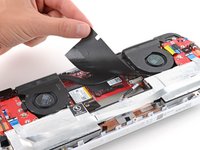
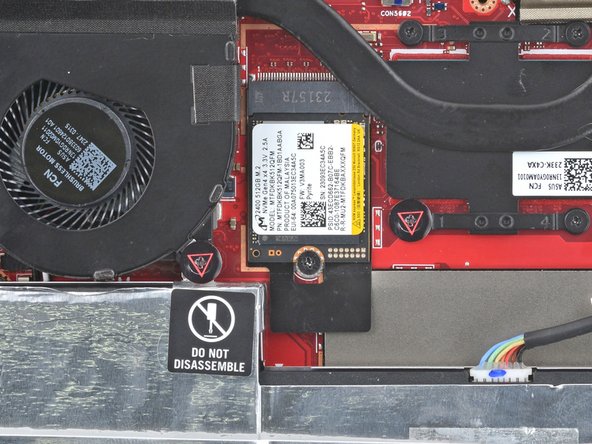
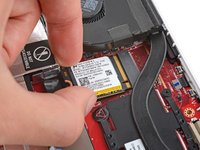
SSD'yi sabitleyen 3,4 mm uzunluğundaki vidayı çıkarmak için bir #0 yıldız tornavida kullanın.
-
-
-
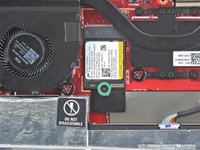
SSD'nin alt köşelerini tutun ve vida yuvasından kurtulana kadar hafifçe kaldırın.
-
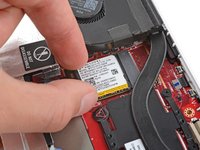
SSD'yi düz bir şekilde çekerek soketinden çıkarın.
-
-
-
Cihazınızı prize takın ve açın. BIOS menüsüne önyükleme yapmalıdır.
-
Advanced (Gelişmiş) sekmesine gidin ve ASUS Cloud Recovery seçeneğine tıklayın.
-
Cihazınızın kurulumunu tamamlamak için ekrandaki yönergeleri izleyin.
-
-


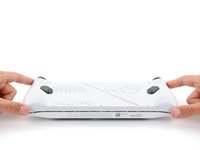


Cihazınızı tekrar toplamak için bu talimatları ters sırayla uygulayın.
Elektronik atıklarınızı R2 veya e-Stewards sertifikalı bir geri dönüşüm merkezine götürün.
Onarım planlandığı gibi gitmedi mi? Temel sorun giderme yöntemlerini deneyin veya yardım için Answers onarım topluluğu sayfamıza danışın.
İptal et: Bu kılavuzu tamamlamadım.
9 farklı kişi bu kılavuzu tamamladı.
Bu çevirmenlere özel teşekkürler:
100%

Translation Bot dünyayı onarmamıza yardım ediyor! Katkıda bulunmak ister misiniz?
Çeviriye Başlayın ›

