Ana içeriğe geç

Asus ZenBook UX303U Motherboard Fan Replacement

Neye ihtiyacın var

  1. Asus ZenBook UX303U Motherboard Fan Replacement, Back Panel: adım 1, 1 resimden 1.
    • Remove the two round rubber feet at the hinge-edge of the laptop.

    The process took me about 30 minutes. If I were to have to do it again then I could probably do it in 10 minutes now that I know what is involved!

    Jon Kerridge - Yanıt

  2. Asus ZenBook UX303U Motherboard Fan Replacement: adım 2, 1 resimden 1.
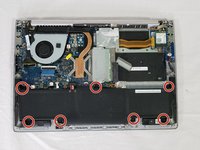
    • Remove the eleven 4 mm Phillips #00 screws from the back panel.

    These screws on other models are Torx T5 or T6, not Phillips

    Dylan Warburg - Yanıt

    T4 screws on all but the two under the rear rubber feet; those are Phillips PH0 (and my model had two square rubber feet).

    Gregg Stanley - Yanıt

    Agree. Same as my laptop.

    Moops -

  3. Asus ZenBook UX303U Motherboard Fan Replacement: adım 3, 2 resimden 1. Asus ZenBook UX303U Motherboard Fan Replacement: adım 3, 2 resimden 2.
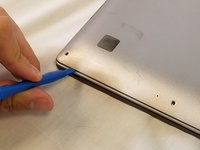
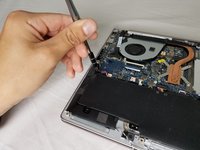
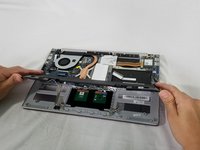
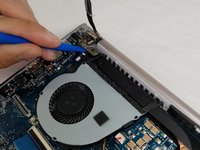
    • Using a plastic opening tool pry the back panel off of the laptop.

    I lift more than the last photo shows. Dark rubber with plots, visible on photo are blocking the opening.

    djibe - Yanıt

    Mine was also stuck at the back with a bit of tape (for grounding?) I did my best to make sure it was replaced during re-assembly.

    Moops - Yanıt

  4. Asus ZenBook UX303U Motherboard Fan Replacement, Battery: adım 4, 2 resimden 1. Asus ZenBook UX303U Motherboard Fan Replacement, Battery: adım 4, 2 resimden 2.
    • Pull the speaker cable out of its four retaining clips with either your fingers, or a plastic opening tool.

    Skip this step on UX430U

    Styyvii - Yanıt

    I skipped this step and was able to gently pull it out when I removed the battery in step 8.

    Moops - Yanıt

  5. Asus ZenBook UX303U Motherboard Fan Replacement: adım 5, 2 resimden 1. Asus ZenBook UX303U Motherboard Fan Replacement: adım 5, 2 resimden 2.
    • Remove all seven 2 mm Phillips #00 screws from the battery.

    Mine was missing the lower left and lower right screws.

    Moops - Yanıt

  6. Asus ZenBook UX303U Motherboard Fan Replacement: adım 6, 2 resimden 1. Asus ZenBook UX303U Motherboard Fan Replacement: adım 6, 2 resimden 2.
    • Pull the speaker connector toward the edge of the laptop to disconnect it from its socket.

    Skip this step on UX430U also

    Styyvii - Yanıt

  7. Asus ZenBook UX303U Motherboard Fan Replacement: adım 7, 2 resimden 1. Asus ZenBook UX303U Motherboard Fan Replacement: adım 7, 2 resimden 2.
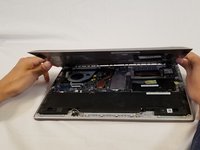
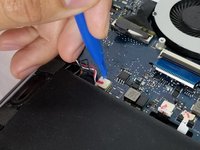
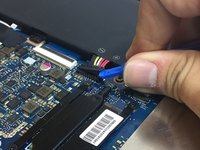
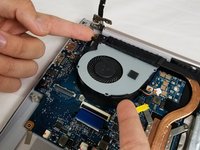
    • Lift the battery connector straight up off its socket to disconnect it from the motherboard.

    • Do not pry on the socket itself or you risk damaging the motherboard.

    The replacement battery I received from ifixit had longer wires than the original battery which made re-installing it a bit awkward, but I was able to bend them to the side a bit.

    Moops - Yanıt

  8. Asus ZenBook UX303U Motherboard Fan Replacement: adım 8, 2 resimden 1. Asus ZenBook UX303U Motherboard Fan Replacement: adım 8, 2 resimden 2.
    • Lift the battery and speakers up and pull out to remove.

    • Check underneath the battery for the wire assembly connecting the touchpad to the motherboard. This connection may stick to the underside of the battery. Be careful not to damage it when removing the battery.

  9. Asus ZenBook UX303U Motherboard Fan Replacement: adım 9, 1 resimden 1.
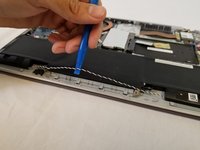
    • Remove the speakers from the old battery.

    This was a bit more fiddly than expected given the speaker arms are stuck to the battery

    Jon Kerridge - Yanıt

    Yes, it was taped on their quite strongly. I just tried to make sure the tape stayed stuck to the speakers and not the battery.

    Moops -

  10. Asus ZenBook UX303U Motherboard Fan Replacement, Motherboard fan: adım 10, 2 resimden 1. Asus ZenBook UX303U Motherboard Fan Replacement, Motherboard fan: adım 10, 2 resimden 2.
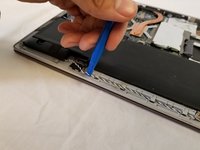
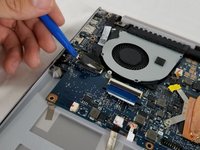
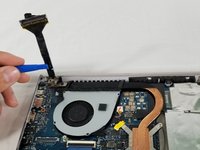
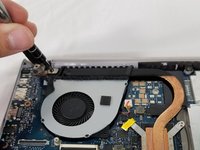
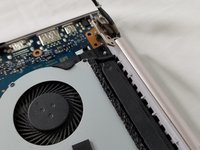
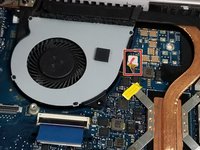
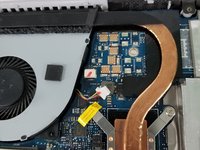
    • Disconnect the display cable from the motherboard with a plastic opening tool.

  11. Asus ZenBook UX303U Motherboard Fan Replacement: adım 11, 2 resimden 1. Asus ZenBook UX303U Motherboard Fan Replacement: adım 11, 2 resimden 2.
    • Remove the three 6mm Phillips #00 screws from the hinge.

    • Remove the 2mm Phillips #00 screw from the plastic housing securing the fan into place.

  12. Asus ZenBook UX303U Motherboard Fan Replacement: adım 12, 2 resimden 1. Asus ZenBook UX303U Motherboard Fan Replacement: adım 12, 2 resimden 2.
    • Lift the bottom of the laptop up slightly in order to unhinge the laptop.

    • Lift the screen assembly hinge up and off of the motherboard fan.

  13. Asus ZenBook UX303U Motherboard Fan Replacement: adım 13, 3 resimden 1. Asus ZenBook UX303U Motherboard Fan Replacement: adım 13, 3 resimden 2. Asus ZenBook UX303U Motherboard Fan Replacement: adım 13, 3 resimden 3.
    Bu adımda kullanılan alet:
    Tweezers
    $4.99
    • Using tweezers, disconnect the cable connector from the motherboard fan.

  14. Asus ZenBook UX303U Motherboard Fan Replacement: adım 14, 2 resimden 1. Asus ZenBook UX303U Motherboard Fan Replacement: adım 14, 2 resimden 2.
    • Lift the fan up and off of the white pegs that secure it into place.

Sonuç

To reassemble your device, follow these instructions in reverse order.

Bir başkası bu kılavuzu tamamladı.

Luis Perez

Üyelik tarihi: 02/14/18

625 İtibar

2 adet Kılavuz yazıldı

Ekip

USF Tampa, Team S3-G5, Nance Spring 2018 USF Tampa, Team S3-G5, Nance Spring 2018 üyesi

USFT-NANCE-S18S3G5

3 Üyeler

9 adet Kılavuz yazıldı

Bir Yorum

The bottom of the pictured device may feature Phillips #00 screws, but I also have this laptop and the screws around the edge of the bottom panel are Torx T5s on my device.

Nick Brennan - Yanıt

Yorum Ekle

İstatistikleri Görüntüle:

Son 24 Saat: 2

Son 7 gün: 5

Son 30 gün: 15

Her zaman: 2,286