Giriş
Follow this guide to remove the gimbal/camera of the DJI Mavic Pro M1P. You will need to remove the battery and upper shell before accessing the gimbal. Before attempting, be aware that you will need to scrape off some plastic adhesive that covers a couple screws. Tweezers and three different sized screwdrivers are required to access the gimbal/camera for this guide, as described below in the tools section.
Neye ihtiyacın var
-
-
Grab both sides of the battery.
-
Pinch the releasing buttons on both sides of the battery.
-
Lift the battery up and out.
-
-
-
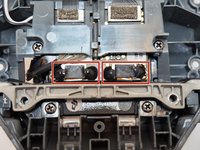
Remove the six 5mm 1.5 Hex screws by turning the screwdriver counterclockwise.
-
-
-
Flip the drone over so that the gimbal is facing up.
-
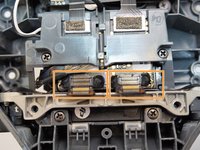
Remove the two 4mm 1.5 Hex screws near the gimbal case by turning the screwdriver counterclockwise.
-
Remove the two 5mm 1.5 Hex screws near the gimbal case by turning the screwdriver counterclockwise.
I must preface what I am about to say with this walk-through is amazing! Everything before and after this and the next step is spot-on!
There needs to be a step in-between this and the next.
UNDER THOSE CAPS ARE MORE SCREWS!!!I pretty much ruined the top case because I missed this and tried to muscle it open for about an hour. Just trying to warn the next.
Like I've said; this is an amazing walk-through
-
-
Bu adımda kullanılan alet:Tweezers$4.99
-
Remove the two small panel pieces near the gimbal case with the tweezers.
BEWARE! The two screws under the covers are not mentioned in step four to be removed, but they show that they have been removed in step five.
Step five should read- Remove the SIX 5mm 1.5 Hex screws that are under the panel pieces by turning the screwdriver counterclockwise.
-
-
-
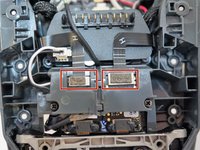
Remove the two 5mm 1.5 Hex screws and two PH000 screws that are under the panel pieces by turning the respective screwdrivers counterclockwise.
What he said!! ^^^
You might notice that there are two crosshead screws with larger heads (top two circled in image). You do NOT need to touch these as they are not part of the gimbal assembly.
Agree with @elfa1 - do not remove the top two screws, or you will put unnecessary strain on the plastic while moving arms. No need for that at all.
-
-
-
Flip the drone back over so the upper shell is facing up.
-
Pry off the upper shell with a nylon spudger.
using pry tool is not necessary - once all top shell screws are removed you should be able to take the top shell off with your hand.
Zudem fehlt hier die Angabe der genauen Lage von beiden vorderen Nasen:
Sie befinden sich von der Mitte aus gemessen jeweils 9mm nach links und rechts. Der obere Gehäuseteil wird von zwei 5mm breiten Bügeln gehalten, die unter die horizontal nach innen zeigenden Nasen vom unteren Gehäuseteil greifen.
Sorry “KopaZ Maymay”, but the plastic opener is “so necessary” because otherwise you unfortunately risk the two plastic noses in the front.
In addition, the exact position of both front noses is missing in the description:
They are measured 9mm from the center to the left and right. The upper part of the housing is held by two 5mm wide brackets that grip under the noses pointing horizontally inwards from the lower part of the housing.
Hi, is it a simple replacement. Ie you do not have to reprogram? Thanks
-
-
-
-
Remove the white connector at the back of the flight controller board by gently pulling at the base.
Hello there, can anyone tell me, please, what type of connector is this? I ruined mine and i like to fixit.
-
-
-
Remove the one 5mm JIS #0 screw from the small micro controller board at the front of the DJI Mavic Pro by turning counterclockwise.
what does this small board do? can i buy one as the 4 wires have come off mine
You do not need to unscrew compass to remove gimbal. This is unnecessary.
-
-
-
Expose the two small ZIF connectors near the front of the board by removing the plastic coverings.
-
Then, remove the two ZIF connectors under the coverings using a nylon spudger.
these plastic coverings were not present on my Mavic Pro. It’s a refurbished model so maybe it previously had a gimbal/camera replacement
I made a mistake - be careful that you remove the connectors closest to the front side of the drone which have a compound seal over the connector. The compound can be scratched away. I mistakenly thought it was the pair closer to the rear that has no compound covering them.
The front sensor screws (on light grey plastic) were removed on this photo. This is not needed to remove gimbal. Though it is worth mentioning that silicon glue can sometimes hold the gimbal assembly to that plastic, and may require some wiggle or gentle removal of part of the silicon to detach.
-
-
-
Remove two 6mm JIS #00 screws from the plastic board cover at the front of the DJI Mavic Pro.
-
-
-
Flip the DJI Mavic Pro back over, with its top side facing up.
-
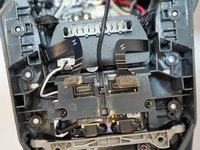
Remove the two ZIF connectors located behind the plastic covers by using a nylon spudger.
the two screws pictured here, between the top set of connectors and the bottom set of connectors appears in place here. But in the following step the screws are removed. Why were the screws removed? Was this to replace the gimbal circuit board?
oops, these are removed in Step 11
Tip: During reassembly go ahead and complete step 11 early, this will ensure the gimbal is properly seated so you don't have issues with the connectors being too far down in the housing.
-
-
-
Scrape away the plastic adhesive covering the two 5mm JIS #000 screws connected to the gimbal board.
-
Remove the two 5mm JIS #000 screws from the gimbal board by turning the screwdriver counterclockwise.
Was ist das für eine Klebemasse, mit denen die Schrauben respektive Connectoren befestigt werden sollten?
Kennt jemand ein Fabrik und/oder Bezugsquelle?
-
-
-
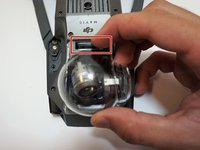
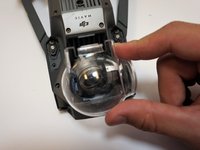
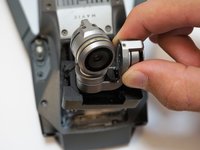
Flip the DJI Mavic Pro over, with the camera facing you.
-
Gently pull the gimbal/camera assembly up and out.
There's a little plastic piece on mine that is broken off behind and the platform of the camera that looks like it almost helps secure it down any idea what that would be called? Does the front camera sensor piece support the gimble and camera in any way physically?
-


To reassemble your device, follow these instructions in reverse order.
To reassemble your device, follow these instructions in reverse order.
İptal et: Bu kılavuzu tamamlamadım.
52 farklı kişi bu kılavuzu tamamladı.
Ekip

Cal Poly, Team S17-G3, White Fall 2018 Cal Poly, Team S17-G3, White Fall 2018 üyesi
CPSU-WHITE-F18S17G3
4 Üyeler
14 adet Kılavuz yazıldı
9 Yorum
THANK YOU!!!!!! Perfect!
Bonjour,
Merci pour cette tuto qui m’a permis d’effectuer la manipulation sans problème. Mais il se fait qu’après le changement de tout le cadran de la caméra avec le câble plat (Gimbal) achété sur amazon, tout s’affiche normalement, sauf que l’écran reste noir, aucun retour vidéo et aucune photo enregistrée. J’ai vérifié que toutes les connexions sont bien effectuées.
Pourriez-vous avoir une idée de ce qui peut être la cause?
Merci d’avance
Alain
Alain J'ai eu ce même problème (avec une surcharge de cardan et une erreur de gyroscope) j'ai remplacé le câble tressé de la caméra (celui avec un tas de fils collés ensemble) et cela a réparé ma caméra et mon cardan. Maintenant, mon drone fonctionne parfaitement.
(J'ai utilisé google translate donc je n'ai aucune idée si cela est écrit correctement)
J'espère que cela aide !!
-Eli
Thanks! Overall, these are great instructions!
Removing the front end of the top cover was challenging, as it required some strength and confidence. It helped to reach in and disconnect the large white connector (step 7) before completely removing the top cover (step 6), as suggested here: DJI Mavic Pro Top Case Removal.
Step 15 turns out to be unnecessary — the two screws covered in plastic adhesive fasten the gimbal’s circuit board to the gimbal’s mounting plate, all of which come out together.
Those aren’t ZIF connectors. They are FPC connectors.
Hey - burred a screw in step 8 (which didnt’ really need to remove) is there anywhere in the UK i can buy a couple of these (from Step 8 - Gimba'l / Camera)
:Remove the one 5mm JIS #0 screw from the small micro controller board at the front of the DJI Mavic Pro by turning counterclockwise
What wasn't pointed out is that removing ALL the silicon glue AND THEN REMOVING THE CONNECTORS before removing the gimbal.(Step 15)
Now I have a broken front sensor and have no idea if the drone will ignore BEING BLIND in one eye (front sensor) and fly anyway.
If not, I'm either out $350 for the new camera/gimbal AND the use of my drone, or will have to pay $150 for camera install AND another $150 to repair the sensor wire/connector THAT WASN'T pointed out in step 15
More sad than mad.
Hi I dont need to remove the ginbal, but the bands have popped off. Motor and respond works well, jsut the gimble bands popped off and it’s dangling. How do I fix this?
Don't follow step 5 as it is written. The back two screws, as shown in the picture, are Philips head, not hex. If you undo these and the arms come loose, it's a major headache to re-tension the springs in the arm pivots.
'lamao
Max Poerner - Yanıt