
Dell Vostro 1710 RAM Replacement
10 - 15 dakika
Orta
Öne Çıkan Öğrenci Kılavuzu
Giriş
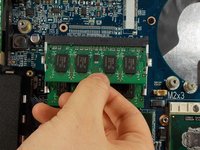
1. adıma gitRAM is needed for a computer to function. If your computer is crashing you may have old or damaged RAM. It can be damaged by static electricity and if it is not removed or inserted correctly. Adding more RAM to your computer can improve its performance drastically.
Neye ihtiyacın var
Aletler


Neredeyse bitti!
To reassemble your device, follow these instructions in reverse order.
Sonuç
To reassemble your device, follow these instructions in reverse order.
Ekip

UMass Dartmouth, Team S3-G7, Peak Spring 2018 UMass Dartmouth, Team S3-G7, Peak Spring 2018 üyesi
UMASSD-PEAK-S18S3G7
3 Üyeler
8 adet Kılavuz yazıldı