Giriş
Use this guide to fully disassemble a Sony Cyber-Shot WX80, a compact digital camera first released in 2013 and since discontinued. Please note: This guide is intended to provide instructions on disassembling the Sony Cyber-Shot WX80 and does not provide guidance for repairing or replacing individual parts of the camera.
If you are experiencing issues with your Sony Cyber-Shoot WX80, a troubleshooting guide can be found here. A motherboard replacement guide can be found here, and you can find more guides on our website.
Before beginning, ensure the device is not attached to any external power sources and power it down completely.
Neye ihtiyacın var
-
-
Remove all six #00 screws holding the outer chassis together with a Phillips #00 screwdriver.
 FixBot'a Sor
-
-
-
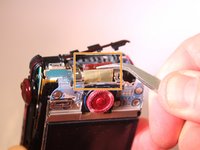
Take note of the small free moving flap near the battery port seen in the first of the three photos.
-
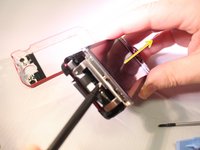
Remove the front of the shell case with the spudger. Insert the spudger into the seam on the right side of the camera and pry away from the back case.
-
Using the spudger, repeat the process to remove the back of the case. Pry away from the front of the camera.
-
-
Bu adımda kullanılan alet:Tweezers$4.99
-
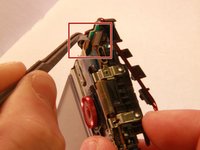
Use tweezers to remove the first of two ribbon cables holding the LCD screen in place. Pull directly out of the port.
-
Use tweezers to remove the second of the two ribbon cables using the same method.
-
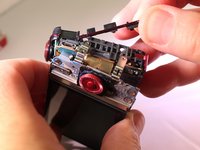
The LCD screen is now detached. Gently pull it apart from the rest of the camera with your hands.
-
-
-
-
Remove the inner frame lining with tweezers.
-
Carefully lift the inner frame lining away from the rest of the camera with your fingers.
-
-
-
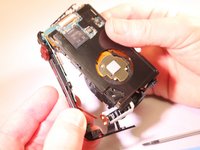
Use your fingers to gently lift the plate up and away from the rest of the camera.
-
-
-
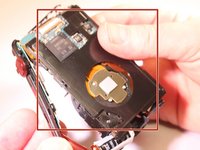
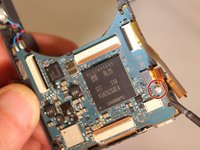
You should now be able to see the exposed motherboard and lens.
-
Remove the first ribbon cable (pictured first) with tweezers. Pull gently away from the camera.
-
Remove the second ribbon cable (pictured second) with tweezers. Pull gently away from the camera.
-
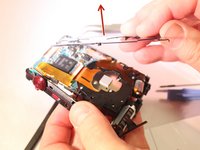
Use your fingers to gently lift the lens away from the motherboard and frame.
-
-
-
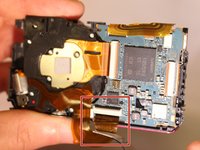
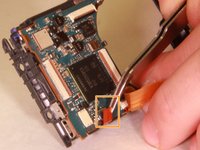
Remove the screw (pictured first) with the #00 Phillips screwdriver.
-
Use tweezers to remove the last ribbon cable (pictured second). Pull gently away from the camera frame.
-
You should now be able to remove the motherboard from the base skeleton frame.
-


To reassemble your device, follow these instructions in reverse order.
İptal et: Bu kılavuzu tamamlamadım.
3 farklı kişi bu kılavuzu tamamladı.

Ekip

Eastern Washington University, Team 2-5, Matresse Spring 2015 Eastern Washington University, Team 2-5, Matresse Spring 2015 üyesi
EWU-MATRESSE-S15S2G5
4 Üyeler
7 adet Kılavuz yazıldı
5Kılavuz Yorumları
So what about the other parts not in your photos that fall ?
The bracket around the speaker and this little white part that fell out as soon as I lifted the back cover a little? can you please give more info
I'm also finding where was the white parts located. It seems that without this part, wx80 works well. If you found its location, please give me hint. Thanks.
Maybe this helps for the location of the white part: https://www.quora.com/What-does-the-insi...
This is not complete disassembly pics. Not at all. This is half the steps.