
Gateway 600YG2 Top Case Replacement
Giriş
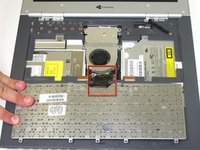
1. adıma gitUse this guide to replace the top case of your Gateway 600YG2 laptop. The top case surrounds the keyboard and the mousepad. Removing it allows you to access components on the system board underneath the keyboard. It also allows you to replace the system board altogether.
This guide does not require any specialized skills.
Before beginning, make sure to shut down your laptop and disconnect it from any external power source.
Neye ihtiyacın var


-
-
Flip the laptop over.
-
Slide the battery release tab to the right with your index finger to open the battery cover.
-
-
-
Insert the spudger between the "sysrq" and "ins" keys.
-
Gently pry free the power button panel above the keyboard, beginning from the right and moving to the left.
-
-
-
Remove the five screws with a Phillips #0 screwdriver.
-
Lift the hinge covers along the outer edges with the spudger until they are released.
-
-
-
Slide the release and push the button to eject the drive.
-
Remove the drive.
-
-
-
Use a Phillips #0 screwdriver to remove the thirteen screws from the bottom of the computer.
-


To reassemble your device, follow these instructions in reverse order.
To reassemble your device, follow these instructions in reverse order.
İptal et: Bu kılavuzu tamamlamadım.
Bir başkası bu kılavuzu tamamladı.
Ekip

Cal Poly, Team 20-10, Maness Fall 2010 Cal Poly, Team 20-10, Maness Fall 2010 üyesi
CPSU-MANESS-F10S20G10
3 Üyeler
22 adet Kılavuz yazıldı