Ana içeriğe geç

Hannspree Hannspad SN1AT71 Wi-Fi Card Replacement

Neye ihtiyacın var

  1. Hannspree Hannspad SN1AT71 Wi-Fi Card Replacement, Back Panel: adım 1, 1 resimden 1.
    • Place the tablet screen side up.

    • Make sure the device is turned off to avoid damage.

  2. Hannspree Hannspad SN1AT71 Wi-Fi Card Replacement: adım 2, 2 resimden 1. Hannspree Hannspad SN1AT71 Wi-Fi Card Replacement: adım 2, 2 resimden 2.
    • Use the metal spudger to press an opening between the screen and back cover.

    • The plastic tabs are located on each corner of the back cover.

    • Be careful, as the plastic tabs are delicate.

  3. Hannspree Hannspad SN1AT71 Wi-Fi Card Replacement: adım 3, 1 resimden 1.
    • Wedge the plastic opening tool between the screen and the back panel to prevent re-engagement

  4. Hannspree Hannspad SN1AT71 Wi-Fi Card Replacement: adım 4, 2 resimden 1. Hannspree Hannspad SN1AT71 Wi-Fi Card Replacement: adım 4, 2 resimden 2.
    • Slide the metal spudger around the casing to separate it from the inside of the tablet.

  5. Hannspree Hannspad SN1AT71 Wi-Fi Card Replacement: adım 5, 2 resimden 1. Hannspree Hannspad SN1AT71 Wi-Fi Card Replacement: adım 5, 2 resimden 2.
    • Flip the tablet over so the screen side is down after all the tabs are separated.

    • Remove the back panel by delicately lifting it straight up.

  6. Hannspree Hannspad SN1AT71 Wi-Fi Card Replacement, Battery: adım 6, 2 resimden 1. Hannspree Hannspad SN1AT71 Wi-Fi Card Replacement, Battery: adım 6, 2 resimden 2.
    • Remove the adhesive tape from the power connection cables.

  7. Hannspree Hannspad SN1AT71 Wi-Fi Card Replacement: adım 7, 3 resimden 1. Hannspree Hannspad SN1AT71 Wi-Fi Card Replacement: adım 7, 3 resimden 2. Hannspree Hannspad SN1AT71 Wi-Fi Card Replacement: adım 7, 3 resimden 3.
    • Instructions for desoldering can be found on the iFixit website.

    • The soldering iron is hot. It can burn you and it can cause damage to the wires and motherboard.

    • Grab hold of the red wire using the tweezers.

    • Desolder the red wire connection from the motherboard using the tip of the soldering iron.

    • Move the wire connection away from the motherboard.

    • Do not let the red wire connection touch other wires or the motherboard.

  8. Hannspree Hannspad SN1AT71 Wi-Fi Card Replacement: adım 8, 3 resimden 1. Hannspree Hannspad SN1AT71 Wi-Fi Card Replacement: adım 8, 3 resimden 2. Hannspree Hannspad SN1AT71 Wi-Fi Card Replacement: adım 8, 3 resimden 3.
    • Desolder the black and yellow wire connection from the motherboard by following the previous step.

    • When moving the wire connections, do not let the red wire connection touch other wires or the motherboard.

  9. Hannspree Hannspad SN1AT71 Wi-Fi Card Replacement: adım 9, 3 resimden 1. Hannspree Hannspad SN1AT71 Wi-Fi Card Replacement: adım 9, 3 resimden 2. Hannspree Hannspad SN1AT71 Wi-Fi Card Replacement: adım 9, 3 resimden 3.
    • Insert the flat end of the nylon spudger between the battery and the case.

    • The battery is connected to the tablet with an adhesive tape and will come free slowly.

    • Do not puncture or bend the battery while removing. If your battery is swollen, take appropriate precautions.

  10. Hannspree Hannspad SN1AT71 Wi-Fi Card Replacement, Wi-Fi Card Replacement: adım 10, 1 resimden 1.
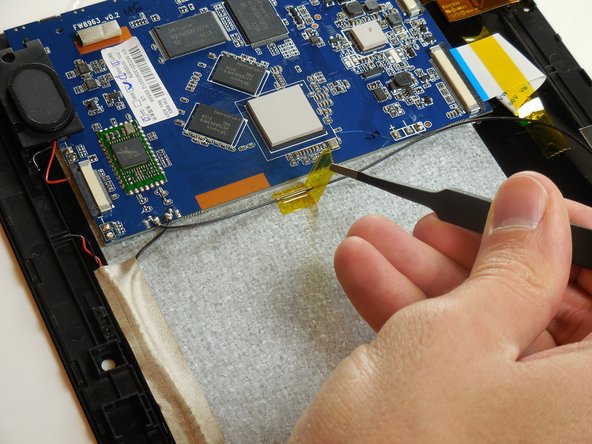
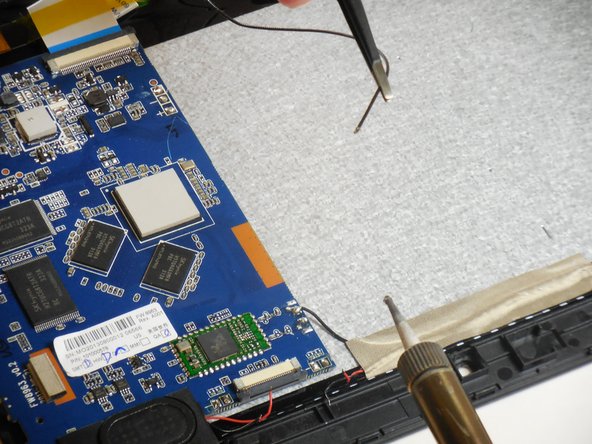
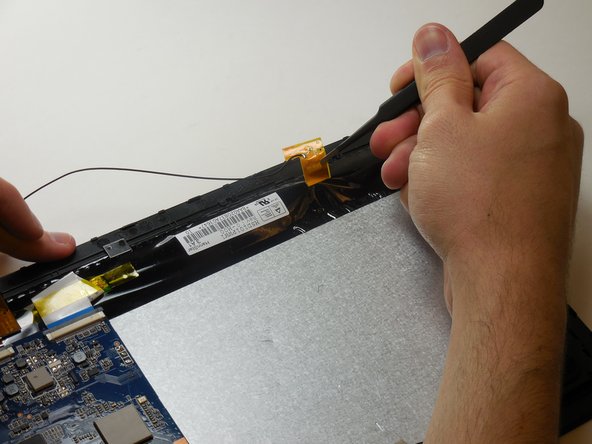
    • Identify the card and its connection to the motherboard.

    • The card itself.

    • The area where the card connects to the motherboard.

  11. Hannspree Hannspad SN1AT71 Wi-Fi Card Replacement: adım 11, 3 resimden 1. Hannspree Hannspad SN1AT71 Wi-Fi Card Replacement: adım 11, 3 resimden 2. Hannspree Hannspad SN1AT71 Wi-Fi Card Replacement: adım 11, 3 resimden 3.
    • Peel off the adhesive tape holding the wires down.

  12. Hannspree Hannspad SN1AT71 Wi-Fi Card Replacement: adım 12, 2 resimden 1. Hannspree Hannspad SN1AT71 Wi-Fi Card Replacement: adım 12, 2 resimden 2.
    • Desolder the wire.

  13. Hannspree Hannspad SN1AT71 Wi-Fi Card Replacement: adım 13, 2 resimden 1. Hannspree Hannspad SN1AT71 Wi-Fi Card Replacement: adım 13, 2 resimden 2.
    • Use the tweezers to peel the Wi-Fi card off.

Sonuç

To reassemble your device, follow these instructions in reverse order.

Bir başkası bu kılavuzu tamamladı.

matthew vandeventer

Üyelik tarihi: 03/11/15

950 İtibar

5 adet Kılavuz yazıldı

Ekip

Colorado Springs, Team 9-4, Panko Spring 2015 Colorado Springs, Team 9-4, Panko Spring 2015 üyesi

UCCS-PANKO-S15S9G4

3 Üyeler

10 adet Kılavuz yazıldı

0 Yorum

Yorum Ekle

İstatistikleri Görüntüle:

Son 24 Saat: 2

Son 7 gün: 3

Son 30 gün: 7

Her zaman: 704