Giriş
Shucking an external hard drive involves disassembling the external enclosure and harvesting the bare hard drive inside. From there, you can use the drive in your home server, NAS, or PC. This procedure shows you how to remove the hard drive while keeping the enclosure intact.
Shucking external hard drives is a great way to get a lot of storage at a better price. Many external hard drives use server-grade hard drives that cost nearly twice as much if you were to purchase them standalone without the external enclosure.
This guide demonstrates shucking a WD Elements 12TB external hard drive from Western Digital, model WDBWLG0120HBK-NESN, but the procedure can apply to any WD Elements 3.5” external drive.
Note: Before shucking, be sure to boot up the external drive and run a deepscan for bad sectors using a program like HD Tune Pro or Stablebit Scanner. If any errors are detected, return the drive to the retailer or manufacturer.
Neye ihtiyacın var
-
-
The external enclosure cover is attached to the vented frame with four plastic clips from the inside. Note their locations before moving on to the next step.
-
-
-
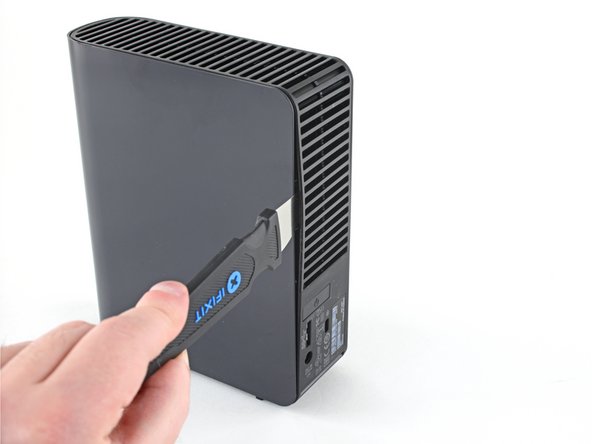
Insert a Jimmy into the seam between the frame and the cover on one side of the drive, roughly halfway between the top and bottom.
-
-
-
With the Jimmy inserted in between the frame and cover, pry the frame outward to release the bottom clip.
-
-
-
Slide the Jimmy up along the seam and pry the frame outward to release the top plastic clip.
-
-
-
Repeat steps 2-4 on the other side of the enclosure.
-
-
-
-
Slide the cover straight off the frame to remove it.
-
-
-
Slide the LED light guide out of the LED slot on the drive's controller board.
-
-
-
Use your hands to push on the four rubber blocks in the corners to unseat the hard drive from the frame.
-
-
-
Use a Phillips screwdriver to remove the 8.5 mm-long screw securing the small controller board metal bracket to the hard drive.
-
Remove the metal bracket.
-
-
-
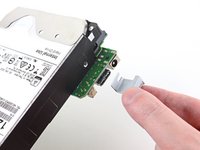
Use a Phillips screwdriver to remove the 8.5 mm-long screw securing the controller board to the hard drive.
-
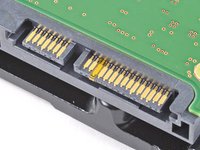
Slide the controller board straight off the end of the hard drive to remove it.
-


Be sure to keep the enclosure—as well as all the parts and screws that accompany it—until the warranty has expired. After that, take them to an R2 or e-Stewards certified recycler. You can also offer them to folks on r/DataHoarder to be reused.
To reassemble the drive and enclosure, follow these instructions in reverse order.
İptal et: Bu kılavuzu tamamlamadım.
68 farklı kişi bu kılavuzu tamamladı.

16Kılavuz Yorumları
I have a question. Is it possible to take a similar drive but smaller capacity like this about and turn it into a portable drive from it having to have a power supply?
It is not possible. The problem is that a 3.5” disk drive (as used in the Elements drive) needs 12 V as well as 5 V, and they need more power than a USB socket can typically deliver. 2.5” disk drives operate from just a 5 V supply, and, having smaller disks inside, they use less power to start up, so they can be run completely through USB.
Hi Craig! My PC sees it as Local Disc (E:) and wants to format it. Can’t do that! Is there a workaround? This was due to a power surge and I think it was just the adaptor power supply that got damaged. Running W10Home21H1 on Lenovo DESKTOP-699CIMO. Intel(R) Core(TM) i7-4790 CPU @ 3.60GHz 3.60 GHz 16,0GB 64bits Any ideas would be greatly appreciated! Cheers, Marco