Ana içeriğe geç

Bu çeviri, kaynak kılavuzdaki en son güncellemeleri yansıtmayabilir. Çeviriyi güncellemeye yardımcı olun veya kaynak kılavuzunu görüntüleyin.

iPhone 5s Pil Değişimi

Neye ihtiyacın var

Videoya Genel Bakış

  1. iPhone 5s Pil Değişimi, Ön Panel Düzeneği: adım 1, 1 resimden 1.
    • İşleme başlamadan önce, iPhone'unuzun pil gücünü %25'in altına düşürün. Şarj edilmiş lityum-iyon piller, yanlışlıkla delinmesi halinde alev alabilir ya da patlayabilir.

    • Sökme işlemine başlamadan önce iPhone'unuzu kapatın.

    • Tercümeyi buraya girin

  2. iPhone 5s Pil Değişimi: adım 2, 3 resimden 1. iPhone 5s Pil Değişimi: adım 2, 3 resimden 2. iPhone 5s Pil Değişimi: adım 2, 3 resimden 3.
    • Eğer ekran camınız çatlamış ise, cama hafifçe vurarak, daha fazla kırılmayı kontrollü bir şekilde yapın ve tamir esnasında gövdenin de zarar görmesini engelleyin.

    • Temiz koli bandı şeritlerini üstüste gelecek şekilde yapıştırarak, iPhone'un ekranını tamamen kaplayın.

    • Bu işlem, cam kırıklarını zapteder, ekranı oynatırken ve kaldırırken de yapısal bütünlüğü sağlar.

    • Tamir esnasında ortaya saçılan cam kırıklarından gözlerinize zarar gelmemesi için koruyucu gözlük kullanın.

  3. Bu adım çevrilmemiş. Çevrilmesine yardım edin

    iPhone 5s Pil Değişimi: adım 3, 3 resimden 1. iPhone 5s Pil Değişimi: adım 3, 3 resimden 2. iPhone 5s Pil Değişimi: adım 3, 3 resimden 3.
    • In the following steps you will be pulling the display up out of the phone body. The display is composed of a glass screen and a plastic bezel with metal clips.

    • Regardless of the tool you use, you need to be sure you pull up the entire display.

    • If the glass begins to separate from the plastic, as shown in the first image, slide a plastic opening tool between the plastic frame and the metal phone body to pry the metal clips out of the case.

    • If you are reassembling a phone with a separated display bezel, you may want to place a thin strip of adhesive between the plastic bezel and the glass to keep the phone closed.

  4. Bu adım çevrilmemiş. Çevrilmesine yardım edin

    iPhone 5s Pil Değişimi: adım 4, 3 resimden 1. iPhone 5s Pil Değişimi: adım 4, 3 resimden 2. iPhone 5s Pil Değişimi: adım 4, 3 resimden 3.
    Bu adımda kullanılan alet:
    Anti-Clamp
    $24.95
    Satın Al
    • The next two steps demonstrate the Anti-Clamp, a tool we designed to make the opening procedure easier. If you aren't using the Anti-Clamp, skip down two steps for an alternate method.

    • For complete instructions on how to use the Anti-Clamp, check out this guide.

    • Pull the blue handle backwards to unlock the Anti-Clamp's arms.

    • Slide the arms over either the left or right edge of your iPhone.

    • Position the suction cups near the bottom edge of the iPhone just above the home button—one on the front, and one on the back.

    • Squeeze the cups together to apply suction to the desired area.

    • If the surface of your iPhone is too slippery for the Anti-Clamp to hold onto, you can use the included tape pad to create a grippier surface.

  5. Bu adım çevrilmemiş. Çevrilmesine yardım edin

    iPhone 5s Pil Değişimi: adım 5, 3 resimden 1. iPhone 5s Pil Değişimi: adım 5, 3 resimden 2. iPhone 5s Pil Değişimi: adım 5, 3 resimden 3.
    • Pull the blue handle forwards to lock the arms.

    • Turn the handle clockwise 360 degrees or until the cups start to stretch.

    • Make sure the suction cups remain aligned with each other. If they begin to slip out of alignment, loosen the suction cups slightly and realign the arms.

    • Insert an opening pick under the screen when the Anti-Clamp creates a large enough gap.

    • If the Anti-Clamp doesn't create a sufficient gap, rotate the handle a quarter turn.

    • Don't crank more than a quarter turn at a time and wait a few seconds between turns. Let the Anti-Clamp and time do the work for you.

    • Skip the next two steps.

  6. Bu adım çevrilmemiş. Çevrilmesine yardım edin

    iPhone 5s Pil Değişimi: adım 6, 1 resimden 1.
    • If you don't have an Anti-Clamp, use a single suction cup to lift the front panel:

    • Press a suction cup onto the screen, just above the home button.

    • Be sure the cup is completely on the screen to get a tight seal.

  7. Bu adım çevrilmemiş. Çevrilmesine yardım edin

    iPhone 5s Pil Değişimi: adım 7, 1 resimden 1.
    • The front panel is attached with clips, and there are several ribbon cables connecting it to the rest of the phone. Your goal here is to release the clips and open the phone only enough to disconnect the cables. Go slowly and carefully to avoid damage.

    • Make sure the suction cup is firmly attached to the front panel assembly near the home button.

    • While holding the iPhone down with one hand, pull up on the suction cup to slightly separate the home button end of the front panel from the rear case.

    • With a plastic opening tool, gently pry the edges of the rear case down, away from the front panel assembly, while you pull up with the suction cup.

    • Take your time and apply firm, constant force. The front panel assembly is a much tighter fit than on most other devices.

  8. Bu adım çevrilmemiş. Çevrilmesine yardım edin

    iPhone 5s Pil Değişimi: adım 8, 2 resimden 1. iPhone 5s Pil Değişimi: adım 8, 2 resimden 2.
    • Do not try to completely remove the front panel assembly from the rear case, as there are several delicate ribbon cables connecting them.

    • Pull the plastic nub to release the vacuum seal on the suction cup.

    • Remove the suction cup from the screen.

  9. Bu adım çevrilmemiş. Çevrilmesine yardım edin

    iPhone 5s Pil Değişimi: adım 9, 3 resimden 1. iPhone 5s Pil Değişimi: adım 9, 3 resimden 2. iPhone 5s Pil Değişimi: adım 9, 3 resimden 3.
    • Open the phone just enough to reveal the metal bracket covering the home button cable.

    • Do not open the phone too far or you risk damaging the home button cable, or the socket it plugs into. Keep the cable loose—if it is stretched taut, that's too far.

    • Only the phone's original home button assembly will be capable of using the Touch ID functionality. If you rip the cable, installing a new home button will only restore ordinary home button functions, not the Touch ID features.

    • Use the tip of a spudger to push the bracket free and remove it with tweezers.

    • The next two steps apply to reassembly. Skip them and continue to Step 12 until reassembly.

  10. Bu adım çevrilmemiş. Çevrilmesine yardım edin

    iPhone 5s Pil Değişimi: adım 10, 2 resimden 1. iPhone 5s Pil Değişimi: adım 10, 2 resimden 2.
    • During reassembly, you will need to reinstall the Touch ID cable bracket. The top of the bracket needs to slide between the battery and Touch ID cable connector, in front of the metal tab. The bottom must latch down over the connector.

    • Slide the top of the bracket over the Touch ID cable connector from left to right.

  11. Bu adım çevrilmemiş. Çevrilmesine yardım edin

    iPhone 5s Pil Değişimi: adım 11, 2 resimden 1. iPhone 5s Pil Değişimi: adım 11, 2 resimden 2.
    • During reassembly, use the flat end of a spudger to snap the front portion of the Touch ID cable bracket down over the cable connector.

    • If the bracket does not snap down flush, you may need to remove the bracket and slide it over the cable connector again for a better fit.

  12. Bu adım çevrilmemiş. Çevrilmesine yardım edin

    iPhone 5s Pil Değişimi: adım 12, 2 resimden 1. iPhone 5s Pil Değişimi: adım 12, 2 resimden 2.
    • Use the tip of a spudger to pry the home button cable connector up out of its socket.

    • Be sure you're separating the cable connector from its socket, and not prying the entire socket up. The socket is on its own glued-down cable that can be pried up if you aren't careful.

  13. Bu adım çevrilmemiş. Çevrilmesine yardım edin

    iPhone 5s Pil Değişimi: adım 13, 3 resimden 1. iPhone 5s Pil Değişimi: adım 13, 3 resimden 2. iPhone 5s Pil Değişimi: adım 13, 3 resimden 3.
    • Once the connector has been released, pull the home button end of the assembly away from the rear case, using the top of the phone as a hinge.

    • Open the display to about a 90º angle, and lean it against something to keep it propped up while you're working on the phone.

    • Add a rubber band to keep the display securely in place while you work. This prevents undue strain on the display cables.

    • In a pinch, you can use an unopened canned beverage to hold the display.

  14. Bu adım çevrilmemiş. Çevrilmesine yardım edin

    iPhone 5s Pil Değişimi: adım 14, 1 resimden 1.
    • Remove the two 1.6 mm Phillips #000 screws securing the metal battery connector bracket to the logic board.

  15. Bu adım çevrilmemiş. Çevrilmesine yardım edin

    iPhone 5s Pil Değişimi: adım 15, 1 resimden 1.
    • Remove the metal battery connector bracket from the iPhone.

  16. Bu adım çevrilmemiş. Çevrilmesine yardım edin

    iPhone 5s Pil Değişimi: adım 16, 2 resimden 1. iPhone 5s Pil Değişimi: adım 16, 2 resimden 2.
    • Use the flat end of a spudger to gently pry the battery connector up from its socket on the logic board.

    • Be very careful to only pry up on the battery connector itself and not the socket on the logic board. If you pry up on the logic board socket or the board itself, you may destroy the socket or damage nearby components on the board.

  17. Bu adım çevrilmemiş. Çevrilmesine yardım edin

    iPhone 5s Pil Değişimi: adım 17, 1 resimden 1.
    • Remove the following screws securing the front panel assembly cable bracket to the logic board:

    • One 1.7 mm Phillips #000 screw

    • One 1.2 mm Phillips #000 screw

    • One 1.3 mm Phillips #000 screw

    • One more 1.7 mm Phillips #000 screw

    • This 1.7 mm screw tends to not be attracted to a magnetized screwdriver. Take care not to lose it when removing.

    • It is especially important to keep track of your screws in this step for reassembly. Accidentally using the 1.3 mm screw or one of the 1.7 mm screws in the bottom right hole will result in significant damage to the logic board causing the phone to no longer boot properly.

    • Be careful not to over-tighten the screws, and don't force them. If they don't fit easily when you are securing them, they may be the wrong size.

  18. Bu adım çevrilmemiş. Çevrilmesine yardım edin

    iPhone 5s Pil Değişimi: adım 18, 1 resimden 1.
    • Remove the front panel assembly cable bracket from the logic board.

  19. Bu adım çevrilmemiş. Çevrilmesine yardım edin

    iPhone 5s Pil Değişimi: adım 19, 2 resimden 1. iPhone 5s Pil Değişimi: adım 19, 2 resimden 2.
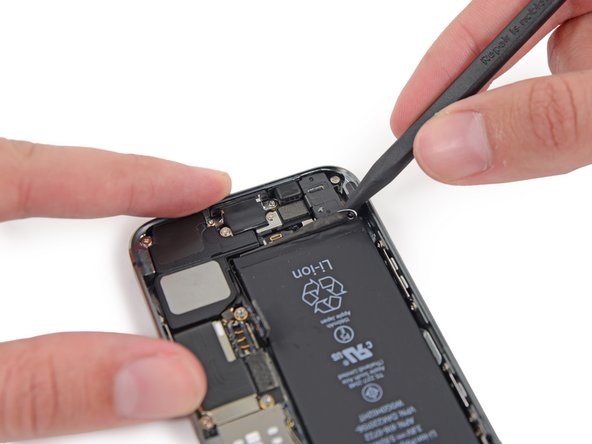
    • Use a spudger or a fingernail to disconnect the front-facing camera and sensor cable.

  20. Bu adım çevrilmemiş. Çevrilmesine yardım edin

    iPhone 5s Pil Değişimi: adım 20, 2 resimden 1. iPhone 5s Pil Değişimi: adım 20, 2 resimden 2.
    • Make sure the battery is disconnected before you disconnect or reconnect the cable in this step.

    • Disconnect the LCD cable connector.

    • When reassembling your phone, the LCD cable may pop off the connector. This can result in white lines or a blank screen when powering your phone back on. If that happens, simply reconnect the cable and power cycle your phone. The best way to power cycle your phone is to disconnect and reconnect the battery.

  21. Bu adım çevrilmemiş. Çevrilmesine yardım edin

    iPhone 5s Pil Değişimi: adım 21, 2 resimden 1. iPhone 5s Pil Değişimi: adım 21, 2 resimden 2.
    • Finally, disconnect the digitizer cable connector.

  22. Bu adım çevrilmemiş. Çevrilmesine yardım edin

    iPhone 5s Pil Değişimi: adım 22, 1 resimden 1.
    • Remove the front panel assembly from the rear case.

  23. iPhone 5s Pil Değişimi, Pil: adım 23, 3 resimden 1. iPhone 5s Pil Değişimi, Pil: adım 23, 3 resimden 2. iPhone 5s Pil Değişimi, Pil: adım 23, 3 resimden 3.
    • Spudger'ın ucunu, pil yapışkan şeridinin ortaya çıkması için pil ve kulaklık girişi arasında gezdirin.

  24. iPhone 5s Pil Değişimi: adım 24, 3 resimden 1. iPhone 5s Pil Değişimi: adım 24, 3 resimden 2. iPhone 5s Pil Değişimi: adım 24, 3 resimden 3.
    • Pil yapışkan şeridini telefondan uzağa doğru çekin.

    • Siyah renkteki pil yapışkan şeridini, beyaz şeritlerin arasından keserek beyaz şeritleri ayırın.

  25. iPhone 5s Pil Değişimi: adım 25, 3 resimden 1. iPhone 5s Pil Değişimi: adım 25, 3 resimden 2. iPhone 5s Pil Değişimi: adım 25, 3 resimden 3.
    • İşlem sırasında şeritlerin düz durmasına ve kıvrılıp bükülmemesine özen gösterin; kıvrılmış şeritler birbirine yapışırlar ve düzgün bir şekilde ayrılmak yerine koparlar.

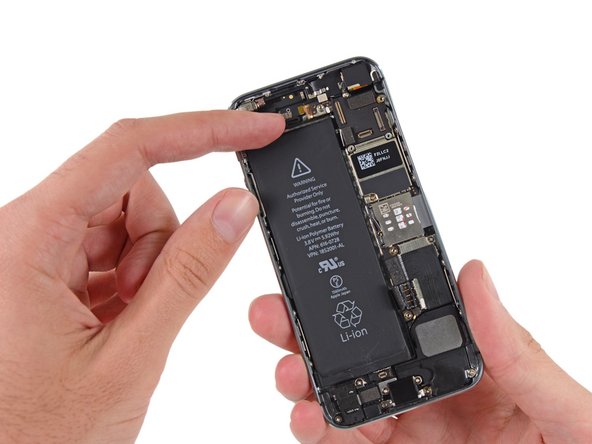
    • Pil yapışkan şeritlerinden bir tanesini yavaşça, iPhone'un aşağısına ve pilden uzağa doğru çekin.

    • Şerit pil ve arka kasanın arasından sıyrılana kadar, aralıksız bir şekilde sabit bir kuvvet uygulayarak şeridi çekmeyi sürdürün. En iyi sonucu elde etmek için, şeridi 60º ya da daha küçük bir açıyla çekin.

    • Şeridi, pilin etrafından ve yukarı doğru dikkatlice yönlendirin. İşlem esnasında şeridin, iPhone'un herhangi bir başka iç parçasına takılmamasına dikkat edin.

    • Şerit bu esnada kendi boyunun birkaç katına kadar uzayacaktır. Şeridin tamamı telefondan ayrılana kadar şeridi çekmeye devam edin ve gerekirse şeridi pile yakın yerinden tekrar tutun.

  26. iPhone 5s Pil Değişimi: adım 26, 2 resimden 1. iPhone 5s Pil Değişimi: adım 26, 2 resimden 2.
    • İşlemi ikinci şerit için tekrarlayın.

    • Eğer iki şeridi de başarıyla ayırdıysanız, takip eden iki adımı da atlayın.

    • Şeritlerden herhangi birinin pilin altında sıkışması ve tekrar tutulamaması halinde, mümkün olduğu kadar kalan şeridi telefondan ayırıp, bir sonraki adımdan devam edin.

  27. iPhone 5s Pil Değişimi: adım 27, 1 resimden 1.
    • iPhone'u ters çevirip, kasa tarafından olmak üzere pilin ve arka kasanın arasına plastik bir kart yerleştirin.

    • Plastik kartı, anakarta doğru zorlamayın, aksi takdirde telefona zarar verebilirsiniz.

    • Sol en üst, ses kontrollerine yakın yerden zorlamamaya dikkat edin; aksi takdirde ses düğmesi ribon kablosuna zarar verebilirsiniz.

    • Pilin bükülme tehlikesini ortadan kaldırmak için kartı sürekli düz tutmaya özen gösterin. Pil bükülür ise zarar görebilir ve etrafa tehlikeli kimyasallar saçılabilir. Pili oynatmak için keskin aletler kullanmayın.

    • Kartı iyice ileri doğru iterek, pilin arkasındaki yapışkanı kopartın.

    • Alternatif olarak, pili arka kasadan ayırma işlemi için diş ipi kullanılabilir. Diş ipine oranla daha sağlam bir alternatif olarak da gitar teli kullanılabilir. Özellikle 12'lik bir setin mi teli çok uygundur.

    • Pilin üst köşelerinden diş ipini ya da teli geçirip, uçları yanyana getirin, sonrasında bunları katlanmış bir kumaş parçasının etrafına sararak eşit bir şekilde çekin.

  28. iPhone 5s Pil Değişimi: adım 28, 3 resimden 1. iPhone 5s Pil Değişimi: adım 28, 3 resimden 2. iPhone 5s Pil Değişimi: adım 28, 3 resimden 3.
    • Pili arka kasadan çekip çıkarın.

    • Pili yüklerken, pilinizin yapışkan şeritlerini değiştirmek için bu kılavuza başvurun.

    • Cihazınızı tekrar birleştirdikten sonra, cihazınızı manüel olarak yeniden başlatın. Bu işlem, meydana gelebilecek bir takım sorunları engelleyebilir ve sorun tespitini kolaylaştırır.

Sonuç

Cihazınızı tekrar birleştirmek için, bu talimatları sondan başa doğru uygulayın. En iyi performansı yakalamak için, yeni yüklenen pilinizi kalibre edin: pil gücünü %10'un altına kadar düşürdükten sonra, kesintisiz bir şekilde %100'e kadar şarj edin.

2077 farklı kişi bu kılavuzu tamamladı.

Bu çevirmenlere özel teşekkürler:

en tr

90%

Gözde dünyayı onarmamıza yardım ediyor! Katkıda bulunmak ister misiniz?
Çeviriye Başlayın ›

Sam Goldheart

Üyelik tarihi: 10/18/12

465.822 İtibar

538 adet Kılavuz yazıldı

Ekip

iFixit iFixit üyesi

Staff

135 Üyeler

17.141 adet Kılavuz yazıldı

224 Yorum

If the adhesive breaks without releasing, and you need to use a spudger or similiar to remove the battery, be VERY careful not to damage the Upper Component Cable.

https://d3nevzfk7ii3be.cloudfront.net/ig...

Dave - Yanıt

This should've been included in the repair guide, as the adhesive tabs seemed designed to break. My phone is now in worse shape than it was and I'm facing what seems to be an extremely difficult repair, which I will probably not undertake.

winternick -

A couple of additional pointers might be helpful...

1: I did not get all of the adhesive out from under the battery. As a result, I bent the heck out of the battery & ordered a new one, not trusting a bent one. A mention of whether it would be safe would be nice.

2: I found it impossible to get the clip from step 7 back on. I left it off. If there's a trick to this, it would be nice to have that extra instruction with the reassembly instructions, rather than "reverse order."

3: While this is always a good idea, in the process of trying to get something done, it's easy to forget that you need to remember which screws go back where, especially the 3 different-sized screws from step 10. What an evil thing Apple did there! I laid the bracket upside-down on a piece of tape, and oriented the screws around it so I'd know where they go back upon reassembly a week later. A suggestion of doing something like this might be helpful.

4: I love my iFixit toolkits! But including a pair of tweezers in it would be helpful.

datamaestro - Yanıt

2. I found this piece "snapped" into place reasonably easily, but I was careful to get the orientation correct & make sure the edge against the battery pull was "in under" (for lack of a better term) and not trying to squash the battery pull down.

Hope this helps.

Dave -

1. With regards to the bent battery, you were right to replace it. LiOn Batteries are very dangerous when the cells inside are compromised. Even though the good ones have circuit breakers built in to prevent fire, they can fail. A LiOn battery - even a small one in an iPhone - can go "high order" and cause a fire that is next to impossible to extinguish. A brief search on YouTube for Lithium Ion Battery fires will quickly convince even the skeptical.

2. The way I keep track of screws... Get a complete set of all colors of Sharpie pens. When disassembling, I touch the screw head with the same color pen as the circle in the iFixit Guide. Then when reassembling I know where the green, orange, red, & blue screws go!

Pete H -

Yorum Ekle

İstatistikleri Görüntüle:

Son 24 Saat: 58

Son 7 gün: 463

Son 30 gün: 2,332

Her zaman: 1,417,269