Giriş
The IBM ThinkPad T30 is a reliable laptop, but like many older systems, its processor (CPU) can become outdated or fail over time. The processor is responsible for executing instructions and running applications, so issues such as overheating, slow performance, or system instability can often be traced back to this component.
If troubleshooting steps such as cleaning the cooling system or reapplying thermal paste have not resolved these issues, replacing the processor may be necessary. This repair can help improve performance and restore the system to stable working condition.
In this guide, you will learn how to safely remove and replace the processor in the ThinkPad T30. This is a more advanced repair that requires working with internal components and should be attempted by users with some repair experience.
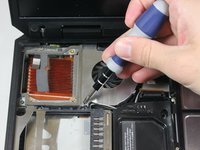
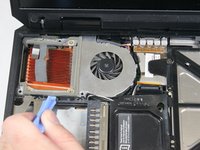
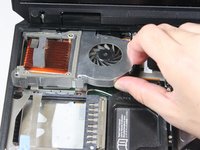
Before beginning, ensure the laptop is completely powered off, unplugged, and the battery is removed. It is also recommended to work in a static-free environment to avoid damaging sensitive components. During disassembly, you will need to carefully remove the cooling assembly, so be cautious of thermal paste and ensure it is properly cleaned and reapplied during reinstallation.
Avoid touching the processor contacts directly, and handle all components with care to prevent damage. Take your time during each step and keep track of screws and parts to ensure proper reassembly.
By following this guide carefully and taking the necessary precautions, you can successfully replace the processor and improve the performance of your ThinkPad T30.
Neye ihtiyacın var
-
-
Flip the ThinkPad upside down with the bottom facing you.
-
Slide the latch to the right into the unlock position.
-
While holding the latch in the unlock position, lift the battery out with your other hand.
-
-
-
Begin by removing the two black 16 mm Phillips #0 screws. The screws can be identified by the two notches next to each screw. One (marked in red) is near the battery lock and the other (not pictured) is next to the Wi-Fi cover.
-
Push up the bottom of the keyboard by poking your finger through the hole to the right of the yellow bios battery. You will feel slight resistance.
-
-
-
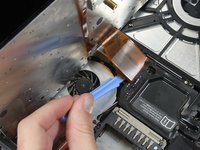
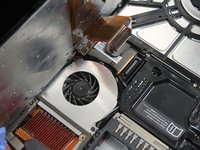
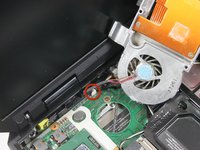
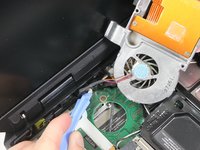
To remove the processor, set the dial on the processor socket to unlock using a small screwdriver.
-
Unscrew until the processor looks like it "lifts" a little.
-


To reassemble your device, follow these instructions in reverse order.
İptal et: Bu kılavuzu tamamlamadım.
4 farklı kişi bu kılavuzu tamamladı.
Ekip

Cal Poly, Team 3-20, Amido Fall 2012 Cal Poly, Team 3-20, Amido Fall 2012 üyesi
CPSU-AMIDO-F12S3G20
3 Üyeler
16 adet Kılavuz yazıldı