Ana içeriğe geç

Kindle Paperwhite 2nd Generation Charging Port Replacement

Neye ihtiyacın var

  1. Kindle Paperwhite 2nd Generation Charging Port Replacement, Battery: adım 1, 2 resimden 1. Kindle Paperwhite 2nd Generation Charging Port Replacement, Battery: adım 1, 2 resimden 2.
    • Insert plastic opening tool into the corners of the Paperwhite and slide around the edge perimeter to remove bezel.

    • Be sure to begin prying along the outer edges , these are the optimal points for removing the bezel.

    • Be careful and do not slide prying tool deeper than 3-4 mm under the side bezel or you could peel off screen protector film.

  2. Kindle Paperwhite 2nd Generation Charging Port Replacement: adım 2, 2 resimden 1. Kindle Paperwhite 2nd Generation Charging Port Replacement: adım 2, 2 resimden 2.
    • Using a Screw Driver, Remove the eleven 3.2 mm Phillips 000 screws from corners of the mid-frame and from behind the black strip as shown.

    • Do not forget the screw in the middle of the black adhesive strip.

  3. Kindle Paperwhite 2nd Generation Charging Port Replacement: adım 3, 1 resimden 1.
    • Carefully remove the mid-frame from the back cover.

  4. Kindle Paperwhite 2nd Generation Charging Port Replacement: adım 4, 2 resimden 1. Kindle Paperwhite 2nd Generation Charging Port Replacement: adım 4, 2 resimden 2.
    • Use a screwdriver to remove the three 3.0 mm Phillips 000 screws that are holding the battery in place as shown.

  5. Kindle Paperwhite 2nd Generation Charging Port Replacement: adım 5, 1 resimden 1.
    • Carefully lift the battery and remove it from the device.

  6. Kindle Paperwhite 2nd Generation Charging Port Replacement, Motherboard: adım 6, 2 resimden 1. Kindle Paperwhite 2nd Generation Charging Port Replacement, Motherboard: adım 6, 2 resimden 2.
    • Use a screwdriver to remove the seven 3.0 mm Phillips 000 screws that are holding the motherboard in place as shown.

    • Don't lose the washer that is highlighted with an orange marker as shown. It is a necessary component to protect the screw.

  7. Kindle Paperwhite 2nd Generation Charging Port Replacement: adım 7, 2 resimden 1. Kindle Paperwhite 2nd Generation Charging Port Replacement: adım 7, 2 resimden 2.
    • Gently disconnect the zif connectors.

    • Some of these connectors are very thin and fragile, handle with care!

  8. Kindle Paperwhite 2nd Generation Charging Port Replacement: adım 8, 3 resimden 1. Kindle Paperwhite 2nd Generation Charging Port Replacement: adım 8, 3 resimden 2. Kindle Paperwhite 2nd Generation Charging Port Replacement: adım 8, 3 resimden 3.
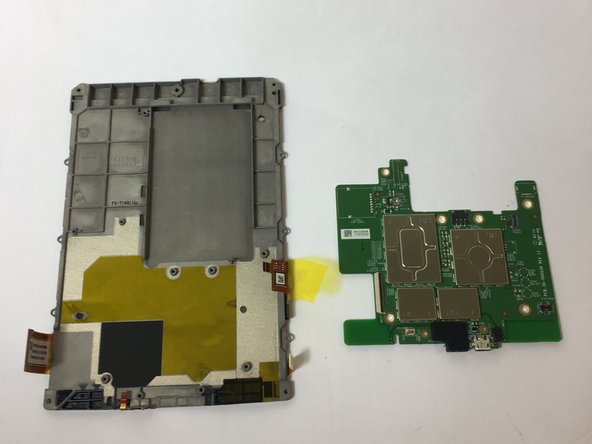
    • Gently remove the motherboard.

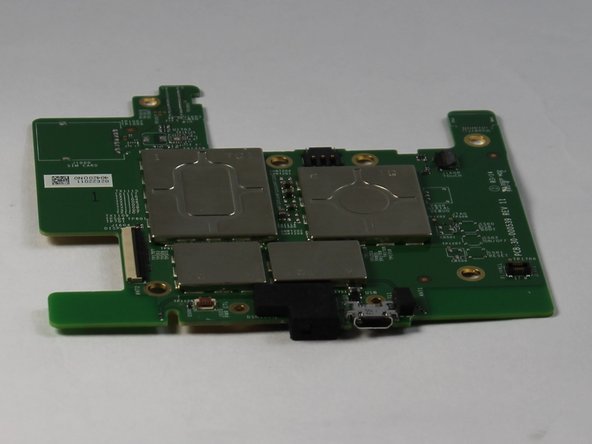
  9. Kindle Paperwhite 2nd Generation Charging Port Replacement, Charging Port: adım 9, 1 resimden 1.
    • The charging port is integrated in to the device motherboard.

    • From here, to fix a faulty port, either replace the entire motherboard, or carefully desolder the old port and solder a new one on in its place.

    • Check out the soldering guide for help.

Sonuç

To reassemble your device, follow these instructions in reverse order.

9 farklı kişi bu kılavuzu tamamladı.

Tyler Davis

Üyelik tarihi: 09/15/16

1.574 İtibar

5 adet Kılavuz yazıldı

Ekip

USF Tampa, Team 11-2, Blackwell Fall 2016 USF Tampa, Team 11-2, Blackwell Fall 2016 üyesi

USFT-BLACKWELL-F16S11G2

4 Üyeler

6 adet Kılavuz yazıldı

9 Yorum

How to replace the USB port; replace the motherboard. Kind of a lame fix if you ask me. Whatever happened to soldering a new port on?

Sam Hardeman - Yanıt

I have not done the fix yet but plan to replace the USB which appears to be a USB - micro B USB 2.0 Receptacle Connector 5 Position Surface Mount available at DigiKey. Is there any reason not to attempt this? I have microscope and soldering station. If not, where do you get the motherboard and how much is it?

Bill Smith - Yanıt

Any updates? Did you run into any issues?

theend12212012 -

Démontage facile effectivement, mais les cinq microsoudures sur la carte mère sont impossibles à faire avec un simple fer à souder ! Il faut utiliser du matériel pour CMS (composant à montage en surface)…

Ceci dit mon problème vient effectivement de ces microsoudures. En appuyant simplement sur ces contacts mon Kindle s’est remis en marche ! Vive le travail mal fait à la construction…

telerando - Yanıt

Getting the Kindle open and getting to the charging port was quite ‘easy’. In step 1 the top is stuck on with something like sticky back tape and the top can be gently pulled away from the tape.

Having got to the port I can not figure out how to replace it. This part does not seem to be easy, unless Step 9 is explained in much more detail. The contacts for the port seem to be incredibly small and I can’t figure out how they’re connected, or what part I need to order to replace the port.

Richard Garside - Yanıt

Yorum Ekle

İstatistikleri Görüntüle:

Son 24 Saat: 9

Son 7 gün: 61

Son 30 gün: 246

Her zaman: 24,088