Ana içeriğe geç
Onarım Topluluğuna Katılın - Hesap Oluşturun

Le Pan S Speaker Replacement

Neye ihtiyacın var

    1. Le Pan S Speaker Replacement, Battery: adım 1, 1 resimden 1.
      • Remove the two 3.5 mm Phillips #00 screws that are covered by the micro SD port.

      • This cover is adjacent to the volume button on the side of the Le Pan S.

      FixBot'a Sor

      Yorum Ekle

    2. Le Pan S Speaker Replacement: adım 2, 2 resimden 1. Le Pan S Speaker Replacement: adım 2, 2 resimden 2.
      • Insert the spudger between the front and back panel in order to pry them apart.

      • Do this beside the volume button and the micro SD cover.

      • Pry open the rest of the Le Pan S by dragging the spudger across the side.

      FixBot'a Sor

      Yorum Ekle

    3. Le Pan S Speaker Replacement: adım 3, 1 resimden 1.
      • Once the front and back faces are completely separated, remove the back cover to reveal the inside components.

      FixBot'a Sor

      Yorum Ekle

    4. Le Pan S Speaker Replacement: adım 4, 2 resimden 1. Le Pan S Speaker Replacement: adım 4, 2 resimden 2.
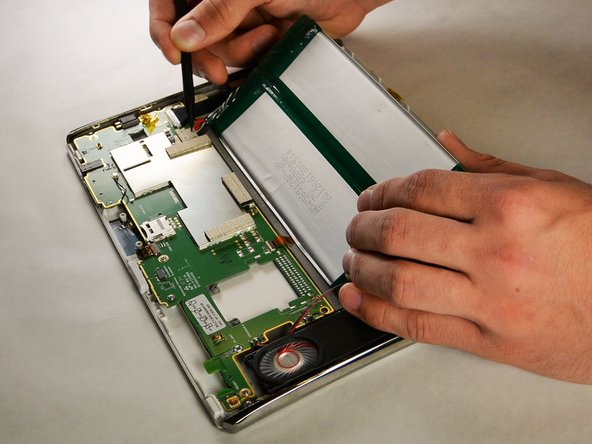
      • Disconnect the battery from the circuitry and lay it out of the way.

      • The best method to complete this is to pull the bundled cable connector out with your hands. Pull towards the wires and away from the electrical board. Use the spudger to further coax the cable out.

      • If you are replacing your battery, make sure to dispose of it properly.

      FixBot'a Sor

      Yorum Ekle

    1. Le Pan S Speaker Replacement, Speaker: adım 5, 1 resimden 1.
      • Remove the four 3.5 mm Phillips #00 screws holding the speakers in place.

      • Move the speakers out of the way.

      FixBot'a Sor

      Yorum Ekle

    2. Le Pan S Speaker Replacement: adım 6, 1 resimden 1.
      • Place the wick on the solder connecting the speakers to the electrical board.

      • Place a heated soldering iron on the solder wick to melt the existing solder.

      • Pull the speakers off of the solder connection.

      • A solder vacuum can also be used in place of solder wick to remove old solder.

      • If you need more help with the soldering process, take a look at iFixit's guide for soldering and desoldering connections.

      FixBot'a Sor

      Yorum Ekle

Sonuç

To reassemble your device, follow these instructions in reverse order.

İptal et: Bu kılavuzu tamamlamadım.

Maria Dole

Üyelik tarihi: 09/17/15

395 İtibar

3 adet Kılavuz yazıldı

Ekip

IUPUI, Team 2-1, Harley Fall 2015 IUPUI, Team 2-1, Harley Fall 2015 üyesi

IUPUI-HARLEY-F15S2G1

5 Üyeler

10 adet Kılavuz yazıldı

0Kılavuz Yorumları

Yorum Ekle

İstatistikleri Görüntüle:

Son 24 Saat: 1

Son 7 gün: 5

Son 30 gün: 25

Her zaman: 513