Ana içeriğe geç
Lenovo Legion Y520-15IKBN RAM Replacement

Lenovo Legion Y520-15IKBN RAM Replacement

Noah J Michalek

Noah J Michalek ve 5 diğer katkıda bulunanlar

En son July 10, 2024 tarihinde güncellendi

25 dakika
Orta
Öne Çıkan Öğrenci Kılavuzu

This guide will show you how to replace the RAM in the Lenovo Legion 520-IKBN. You would replace the RAM if computer is acting slower than it is or if your startup screen is a black screen.

Neye ihtiyacın var

Parçalar

Aletler

  • Phillips #00 Screwdriver
    Phillips #00 Screwdriver
  • Spudger
    Spudger

Daha fazlasını göster…

  1. Lenovo Legion Y520-15IKBN RAM Replacement, Base Panel: adım 1, 2 resimden 1. Lenovo Legion Y520-15IKBN RAM Replacement, Base Panel: adım 1, 2 resimden 2.
    • Shut down and unplug your device before proceeding.

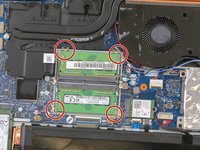
    • Remove the thirteen 6.5 mm screws from the base plate using a Phillips #00 screwdriver.

  2. Lenovo Legion Y520-15IKBN RAM Replacement: adım 2, 1 resimden 1.
    • Flip the laptop on its side and wedge a spudger between the base panel and chassis, then pry around the perimeter until the base panel releases.

    • To get a better grip you may want to open the laptop slightly.

    • Lift the bottom panel off of the chassis.

    • During reassembly, make sure that the bottom panel clicks back into place on all four sides of the laptop.

  3. Lenovo Legion Y520-15IKBN RAM Replacement, RAM: adım 3, 2 resimden 1. Lenovo Legion Y520-15IKBN RAM Replacement, RAM: adım 3, 2 resimden 2.
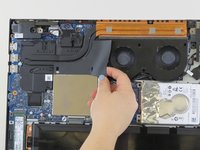
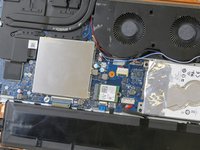
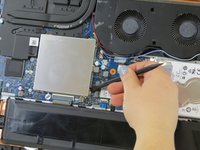
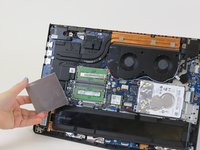
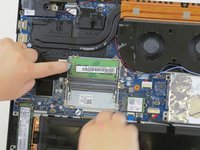
    • There is a piece of plastic covering part of the RAM and the fan. You will need to remove this to get to the RAM.

    • You do not need to remove the battery for the replacement of RAM card.

    I would write down the “you dont need to remove the battery for the RAM raplacement” 2 steps before, I removed it for no reason.

    Jose Carvajal - Yanıt

  4. Lenovo Legion Y520-15IKBN RAM Replacement: adım 4, 3 resimden 1. Lenovo Legion Y520-15IKBN RAM Replacement: adım 4, 3 resimden 2. Lenovo Legion Y520-15IKBN RAM Replacement: adım 4, 3 resimden 3.
    • There will be a silver square box next to the fan. Use a plastic spudger to pry the small tabs on the side that are holding the silver square on.

  5. Lenovo Legion Y520-15IKBN RAM Replacement: adım 5, 2 resimden 1. Lenovo Legion Y520-15IKBN RAM Replacement: adım 5, 2 resimden 2.
    • The RAM will now be exposed. There are two tabs holding each one of two RAM cards in place. They are on the sides of the RAM cards. Pull the tabs to release the cards.

    • When putting the RAM back together, there are lines on the end of the RAM cards that need to line up.

Sonuç

To reassemble your device, follow these instructions in reverse order.

11 farklı kişi bu kılavuzu tamamladı.

4 Yorum

Hi, can i add any 8gb 2400mhz ddr4 kit bought online? or does it have to be a specific kind?

Thank you for the guide

Azim Hanif - Yanıt

Excellent guide, I’d just remind myself while the body is open its a good opportunity to use some compressed air [dust, crumbs etc.] and to always wear an anti static band when handling the inside of any electronic.

FritzDW - Yanıt

Hi, after instaling another 8GB 2400mhz ddr4 do i have to do anything special after so the pc will recognize the ram or something? i don't know much about pc thank you for the guide.

Martin tjof - Yanıt

Yorum Ekle

İstatistikleri Görüntüle:

Son 24 Saat: 0

Son 7 gün: 22

Son 30 gün: 104

Her zaman: 15,125