Giriş
This guide shows how to replace the SSD in a Lenovo Legion Y520 Laptop. First by transferring the files over from your old SSD to the new SSD using an M.2-to-USB-adapter and the free Macrium Reflect software and then physically opening up the laptop and replacing the old SSD with the new, upgraded one.
Neye ihtiyacın var
-
-
I suggest watching this video I made that walks you through the whole process of replacing the laptop's SSD at least once so you understand all the steps required for the replacement.
-
-
-
So the first step to upgrade and replace the laptop's SSD is to first copy the files over from the old SSD to the new SSD. To do this we will be using a free software called Macrium Reflect 7, which can be found at https://www.macrium.com/reflectfree , you will just need to click "Home Use" and then enter your email and they will email you the link
-
-
-
So with the M.2-to-USB-SSD adapter you will open the adapter up by unscrewing the screws in the corners and then you should mount the new SSD into the device, screw it back together and then attach it to the computer. Now you have both SSDs connected to the same machine and can use Macrium to copy over the contents of the old SSD to the new SSD.
-
-
-
-
Open up Macrium Reflect, click "Clone this Disk", then "Select a Different Source Disk", and choose the drive that you want to clone, and then select the destination source as the drive you want to clone to (which should be your new SSD)
-
-
-
So this part can be a little bit tricky but what you are aiming for is to bring over the C drive from the old SSD to the new one and open up the partition to the maximum allowable size that still leaves room on the drive for the old boot files, other back up files, and all the other drives you want copied over
-
-
-
Here we are finishing up the cloning of the old drive over to the new drive with Macrium Reflect. Once the drive is successfully cloned all that is left is to open up the machine and physically uninstall the old drive and reinstall the new drive in it's place. Since you cloned the boot drive, the new SSD should boot up with no issues once installed
-
-
-
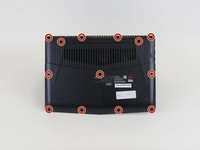
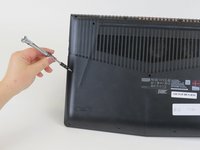
You will need to remove thirteen 6.5mm screws (with a Phillips #00 screwdriver) from back of the laptop to make it possible to pry off the back cover.
-
-
-
Turn the laptop on its side and use an opening tool, spudger, or similar plastic device to pry the back cover off. Prying off the back cover can be a little bit challenging but just stick with it until you hear the tabs pop open and then you should be able to pry the rest of it off.
-
-
-
Now that you have the back of the device opened up you want to carefully unscrew the screw holding the old SSD in place and carefully wiggle it out. Then carefully wiggle in the new SSD and rescrew it back down. Congratulations you physically installed the new SSD!
-


To reassemble your device, follow steps 7 and 8 in reverse order.
To reassemble your device, follow steps 7 and 8 in reverse order.
İptal et: Bu kılavuzu tamamlamadım.
2 farklı kişi bu kılavuzu tamamladı.

3 Yorum
Hey can i put 2tb in the nvme slot??
No.
Maximum 512GB