Giriş
In this guide, you will learn how to replace the motherboard in a Lenovo ThinkPad X1 Carbon 6th Gen. Be sure to power off your device and disconnect it from any power source before beginning.
Neye ihtiyacın var
-
-
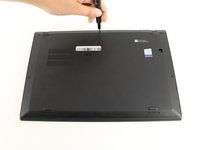
Use a Phillips #0 screwdriver to unscrew the five screws that secure the back cover to the laptop.
-
-
-
Use a Jimmy to lift the cover directly up off of the locating pins.
-
Remove the back cover.
I thank you for these instructions. They were quite helpful and I successfully replaced the fan. There is one thing however. Your instructions stated the following: "Be sure to pull on all of the cables at the same time."
I disagree. One should never pull the wires. I was able to nudge the one part of the connector loose from the other part that it fit into." I then put the new fan in and gently and carefully pushed the connecting parts together.
Otherwise, your instructions were clear and to the point. Thank you very much
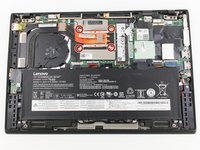
The image shows prying the cover open at the bottom right. In fact, there are tabs securing the bottom edge to the frame. The cover needs to be pried open at the top edge. Once the top edge is released, the cover can be shifted slightly toward the top of the image to disengage the tabs at the bottom.
This error, along with the similar error about removing the battery in step 4, suggests that the instructions were written with the laptop in the opposite orientation than what is shown in the images.
I also don't believe that the iFixit Jimmy is necessary - in fact, it might scratch up the exterior paint of the X1 Carbon Gen 6. Instead, I find the triangular iFixit picks are more appropriate for the task: iFixit Opening Picks (Set of 6)
Also, at least for my unit, the lid comes off easily and I only use the plastic picks if there's any resistance and I don't want to risk breaking any of the clips.
-
-
-
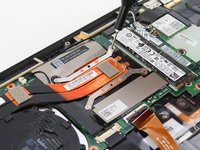
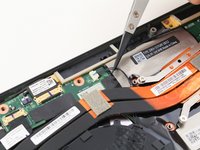
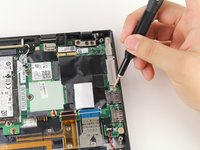
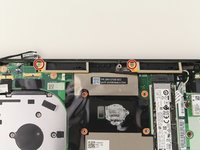
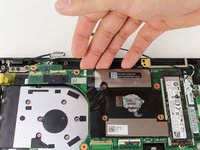
Use a Phillips #0 screwdriver to loosen the four screws that secure the fan to the motherboard.
-
-
Bu adımda kullanılan alet:Nylon Tipped Tweezers$4.99
-
Use nylon tipped tweezers, or your fingers, to gently pull the fan's power cable towards the SSD, disconnecting it from the pins.
-
-
-
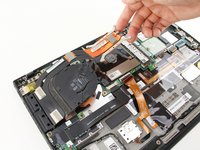
Turn the fan over to expose the interior.
-
If necessary, clean out the fan or wipe away and replace the thermal paste.
All good. But most of us occasional Fixit-ers don't happen to have thermal paste lying around. Would have been helpful to include it in your list of necessary parts and tools. Otherwise, instructions were clear as crystal and worked as advertised. Tx!
Great call out! I updated this guide to include the Thermal Paste as a required component. Thank you!!
I'm about to do this repair, and I'm planning to use Honeywell PTM7950 SP rather than thermal paste. It occurred to me that maybe I should ask the experts if this is a good idea. PTM7950 has rave reviews on heat conductivity, and it appears that it will fit fine under the fan. But am I missing a problem that will come back to haunt me someday?
It's probably fine to use Honeywell PTM7950, just make sure to perform a CPU-intensive tasks (such as synthetic benchmarking) so that any pockets of air can escape after initial post-market application. If it doesn't perform as intended, then you can always remove it and use a more conventional thermal paste on the CPU.
Tai Lam -
There is one detail that many videos/guides almost never explicitly mention: you don't put any thermal paste on the smaller "die" for the X1 Carbon Gen 6 - and you only catch this if you see others cleaning the original thermal paste for the first time.
* This is mentioned in the description of a video from Duraputer in February 2024: https://youtu.be/VLb8vIzdi6s
* This is also mentioned in a pinned comment of a video from Salem Techsperts in October 2022: https://www.youtube.com/watch?v=TAIypDVt...
-
-
-
-
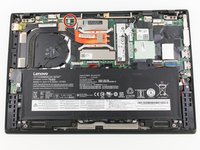
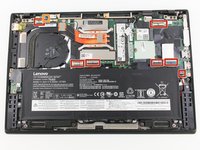
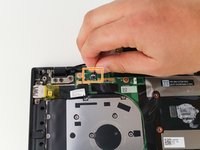
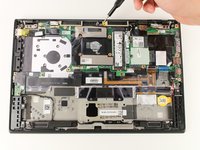
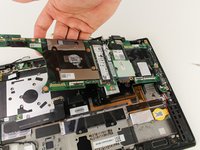
Remove each of the 7 main ribbon cables that connect the motherboard to the rest of the laptop.
-
Detach the last ribbon cable in the same way as before.
-
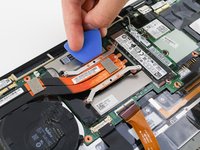
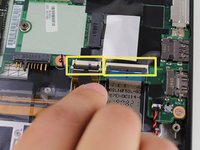
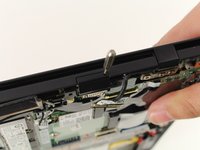
For the red and orange cables, use a spudger to lift the black plastic bar.
Somewhere between these steps the battery was removed. Can you add a step here describing that?
Battery removal starts on Step 3 above.
-


To reassemble your device, follow these instructions in reverse order.
To reassemble your device, follow these instructions in reverse order.
İptal et: Bu kılavuzu tamamlamadım.
5 farklı kişi bu kılavuzu tamamladı.

Ekip

Cal Poly, Team S19-G4, White Winter 2020 Cal Poly, Team S19-G4, White Winter 2020 üyesi
CPSU-WHITE-W20S19G4
3 Üyeler
23 adet Kılavuz yazıldı
2 Yorum
Step 3 should be removing the battery. There are 4 screws to do this.
is it true these boards have a problem and stop functioning? I bought it at Costco 2-3 years ago. My computer won't power on and my local tec shop thinks this is the problem. I like it bc is light and small and since I paid $1100 for it I think I should get a little more life out of it, right? I just bought a new battery too. thanks.
(X1 Carbon 6th Gen - (Type 20KH, 20KG) Laptop (ThinkPad) - Type 20KG; 8th Generation Intel® Core™ i7-8550U Processor(Core i7-8550U) Machine Type Model: 20KG0022US.)