
Logitech M185 Wireless Mouse Disassembly

Neye ihtiyacın var
Aletler

-
-
Unscrew the Phillips #1 screw in the battery compartment after removing the battery.
-
-
-
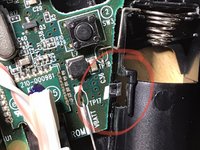
Wiggle the grey part of the top to remove it by pulling it towards you(away from the scroll wheel).
-
Reasoning by Jacob Hickey "because in the internal top part of the mouse where the buttons/scroll wheel is, there’s hinges-like “tooth” that’ll snap if you do pull on it. It’s like opening a jewelry box that has a hinge on one end of the box… if that makes sense…"
Just note, the reasoning on the author of this guide indicating “Do not pull the grey cover towards the top and do not pull the part near the keys” is because in the internal top part of the mouse where the buttons/scroll wheel is, there’s hinges-like “tooth” that’ll snap if you do pull on it. It’s like opening a jewelry box that has a hinge on one end of the box… if that makes sense…
-
-
-
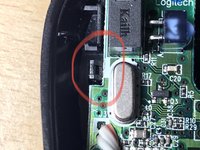
Push back small black clips to release the circuit board.
-
Slide up the metal battery connectors to free them from the casing. (Note that these are soldered to the circuit board.)
-
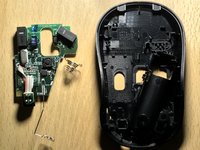
Fully remove the circuit board with the battery connectors and image sensor still attached.
-
-
-
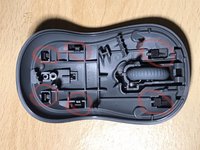
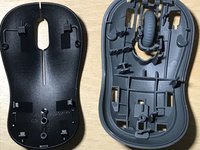
Working from back to front (left to right in the first image) unclip the first two pairs of black plastic clips.
-
Slide the black upper casing forwards over the mouse wheel whilst applying pressure the two front clips to release them.
-
Separate the two casing layers fully.
hola, pues muchas gracias, sólo desarmar y armar y vuelve a funcionar !!!
-


To reassemble your device, follow these instructions in reverse order.
To reassemble your device, follow these instructions in reverse order.
İptal et: Bu kılavuzu tamamlamadım.
34 farklı kişi bu kılavuzu tamamladı.

11Kılavuz Yorumları
Thank you Karmanyaah Malhotra for takin’ the time to do this for everybody like me :-)
were can i buy these iems telll mee please
TElll me now or else
I will be sad
Wow! As an engineer in molded plastics, this mouse is the most gorgeous impressive molded thing I've seen in a long time. Worth taking my mouse apart just for fun. Impressed with Logitech again. Thank you for the excellent instructions.
Bought my keyboard/mouse at Microcenter.
The screw in the battery holder was covered by a sticker on my mouse. So I used a small screwdriver to just poke through the sticker and I was able to get it apart. Excellent post. Saved me a lot of time & hassle. My left click button had lost its spring because over the years the cover was wearing away the button. Just put a small piece of electrical tape over the part of the cover that pushes the click button and now it works great again. Thanks!
Also, I second James Salter's opinion on this molded plastic. Still springy after all these years. Kudos to Logitech!
I seem to have a cheaper version. I'd guess it's an illegal clone but do people really bother with low end mice?! I don't have that red jumper cable - the laser is on the main board. I don't have any circuit board clips, not as many clips on the top & the bottom of the top is flat - none of the structural reinforcing cross beams present. The wheel is a completely different device.
My problem is the wheel - it appears to have been directly attached to the sensor with a <1mm rod which has broken. I can not even take the part of the wheel in the sensor out; AS shown in my ASCII art below (S: sensor. W: wheel) it is practically part of the sensor:
SSS WW
WS WW
WWWWWWWWWW
WS WW
SSS WW
Hopeless? I was thinking of melting a hole with a needle & jamming in a slightly larger metal rod but I can't even tell how much of the sensor face is wheel, and how much is a plastic plate covering the wheel. If I try this - any tips on materials/hole boring technique/glue?
Very easy to follow guide.
This also can pair with a modification, which make the mouse quitter alot.