Ana içeriğe geç

Logitech Webcam Pro 9000 USB Connection Replacement

Neye ihtiyacın var

  1. Logitech Webcam Pro 9000 USB Connection Replacement, Front and Back Cover: adım 1, 2 resimden 1. Logitech Webcam Pro 9000 USB Connection Replacement, Front and Back Cover: adım 1, 2 resimden 2.
    • Remove the two 8 mm Phillips #0 screws on the back cover.

    • The motherboard connects the two covers together. DO NOT separate the two yet.

    • There is a button that loosens as the Phillips screws are removed. Don't be alarmed if it falls out.

  2. Logitech Webcam Pro 9000 USB Connection Replacement: adım 2, 2 resimden 1. Logitech Webcam Pro 9000 USB Connection Replacement: adım 2, 2 resimden 2.
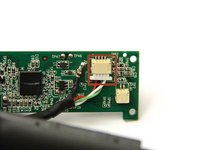
    • Remove the four 6mm Phillips #0 screws connecting the motherboard and front cover.

    • DO NOT detach the wire connecting the motherboard to the front cover.

  3. Logitech Webcam Pro 9000 USB Connection Replacement, USB Connection: adım 3, 2 resimden 1. Logitech Webcam Pro 9000 USB Connection Replacement, USB Connection: adım 3, 2 resimden 2.
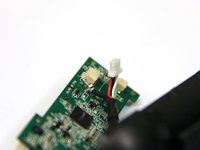
    • Use tweezers to grasp the white wire connector on the back of the motherboard.

    • Wiggle the connector back and forth to remove it from the socket.

  4. Logitech Webcam Pro 9000 USB Connection Replacement: adım 4, 2 resimden 1. Logitech Webcam Pro 9000 USB Connection Replacement: adım 4, 2 resimden 2.
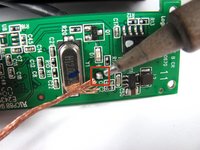
    • Desolder the joint on the front of the motherboard to completely detach the USB cable.

    • Follow this link to learn how to properly solder and desolder your parts.

Sonuç

To reassemble your device, follow these instructions in reverse order.

Cory Davis

Üyelik tarihi: 04/14/13

236 İtibar

4 adet Kılavuz yazıldı

Ekip

Cal Poly, Team 12-34, Amido Spring 2013 Cal Poly, Team 12-34, Amido Spring 2013 üyesi

CPSU-AMIDO-S13S12G34

4 Üyeler

16 adet Kılavuz yazıldı

Bir Yorum

what is the connector called

Anirudh Krishnan - Yanıt

Yorum Ekle

İstatistikleri Görüntüle:

Son 24 Saat: 0

Son 7 gün: 0

Son 30 gün: 3

Her zaman: 2,003