Ana içeriğe geç

Mac Pro Late 2013 Graphics Card Replacement

Neye ihtiyacın var

  1. Mac Pro Late 2013 Graphics Card Replacement, Outer Case: adım 1, 2 resimden 1. Mac Pro Late 2013 Graphics Card Replacement, Outer Case: adım 1, 2 resimden 2.
    • Slide the lock switch to the right, to the unlocked position.

  2. Mac Pro Late 2013 Graphics Card Replacement: adım 2, 3 resimden 1. Mac Pro Late 2013 Graphics Card Replacement: adım 2, 3 resimden 2. Mac Pro Late 2013 Graphics Card Replacement: adım 2, 3 resimden 3.
    • Lift the outer case straight up off the Mac Pro.

    • It may help to push down on the center of the fan while lifting the case up.

  3. Mac Pro Late 2013 Graphics Card Replacement, Fan Assembly: adım 3, 3 resimden 1. Mac Pro Late 2013 Graphics Card Replacement, Fan Assembly: adım 3, 3 resimden 2. Mac Pro Late 2013 Graphics Card Replacement, Fan Assembly: adım 3, 3 resimden 3.
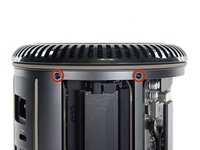
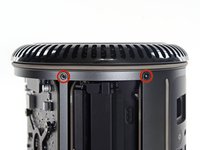
    • Remove five 5.1 mm T10 Torx screws from around the outer perimeter of the fan assembly.

  4. Mac Pro Late 2013 Graphics Card Replacement: adım 4, 2 resimden 1. Mac Pro Late 2013 Graphics Card Replacement: adım 4, 2 resimden 2.
    • The fan assembly is attached to the rest of the computer by two cables on the IO board side.

    • Tilt the assembly up away from the IO board.

    • Do not try to remove the fan assembly yet, as it is still attached by two cables.

  5. Mac Pro Late 2013 Graphics Card Replacement: adım 5, 1 resimden 1.
    • While supporting the fan assembly with one hand, loosen the two T8 captive screws in the fan cable bracket.

    • These screws are captive in the Mac Pro. Do not try to remove these screws from your Mac Pro.

  6. Mac Pro Late 2013 Graphics Card Replacement: adım 6, 1 resimden 1.
    • Use a pair of tweezers to pull the fan cable bracket away from the fan assembly.

  7. Mac Pro Late 2013 Graphics Card Replacement: adım 7, 2 resimden 1. Mac Pro Late 2013 Graphics Card Replacement: adım 7, 2 resimden 2.
    • Use the flat end of a spudger to disconnect the fan assembly ribbon cable from the IO board.

  8. Mac Pro Late 2013 Graphics Card Replacement: adım 8, 1 resimden 1.
    • Disconnect the fan assembly antenna cable from the IO board.

    • Remove the fan assembly from the Mac Pro.

  9. Mac Pro Late 2013 Graphics Card Replacement, Lower Case: adım 9, 3 resimden 1. Mac Pro Late 2013 Graphics Card Replacement, Lower Case: adım 9, 3 resimden 2. Mac Pro Late 2013 Graphics Card Replacement, Lower Case: adım 9, 3 resimden 3.
    • Flip the Mac Pro upside down, 180 degrees.

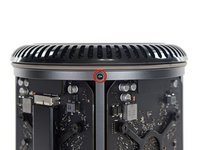
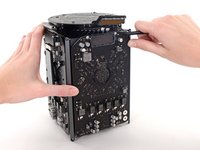
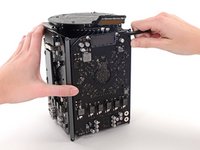
    • Remove five 5.1 mm T10 Torx screws from the outer perimeter of the lower case.

  10. Mac Pro Late 2013 Graphics Card Replacement: adım 10, 2 resimden 1. Mac Pro Late 2013 Graphics Card Replacement: adım 10, 2 resimden 2.
    • Carefully lift the lower case up and remove it from the Mac Pro.

  11. Mac Pro Late 2013 Graphics Card Replacement, Graphics Card: adım 11, 2 resimden 1. Mac Pro Late 2013 Graphics Card Replacement, Graphics Card: adım 11, 2 resimden 2.
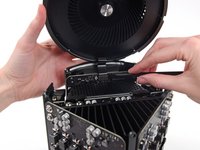
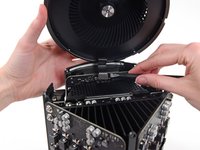
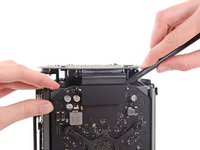
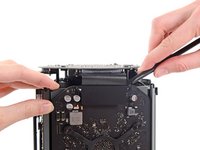
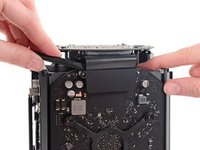
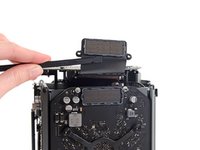
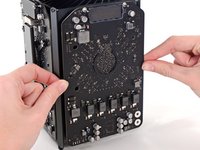
    • Use the flat end of a spudger and a twisting motion to gently separate one side of the graphics card data connection.

  12. Mac Pro Late 2013 Graphics Card Replacement: adım 12, 3 resimden 1. Mac Pro Late 2013 Graphics Card Replacement: adım 12, 3 resimden 2. Mac Pro Late 2013 Graphics Card Replacement: adım 12, 3 resimden 3.
    • Gently separate the other side as well.

    • Flip the connector up and out of the way of the graphics card.

  13. Mac Pro Late 2013 Graphics Card Replacement: adım 13, 1 resimden 1.
    • Remove the two 6.6 mm T8 Torx Security screws securing the GPU to the Mac Pro.

    • These screws fit into power cables behind the GPU. Be careful not to over-tighten and twist the cables.

  14. Mac Pro Late 2013 Graphics Card Replacement: adım 14, 1 resimden 1.
    • Remove the four 8.4 mm T10 screws from the GPU heat sink bracket.

  15. Mac Pro Late 2013 Graphics Card Replacement: adım 15, 1 resimden 1.
    • Remove the GPU heat sink bracket.

  16. Mac Pro Late 2013 Graphics Card Replacement: adım 16, 3 resimden 1. Mac Pro Late 2013 Graphics Card Replacement: adım 16, 3 resimden 2. Mac Pro Late 2013 Graphics Card Replacement: adım 16, 3 resimden 3.
    • The graphics card is now held onto the central heat sink by thermal compound.

    • You may need to pry very gently with a spudger to separate the card from the heat sink.

    • Remove the graphics card from the heat sink.

  17. Mac Pro Late 2013 Graphics Card Replacement: adım 17, 1 resimden 1.
    • During reassembly, be sure to clean off and replace the thermal compound. Use our Applying Thermal Paste guide if you require assistance.

    • Repeat this procedure if you wish to remove the secondary graphics card.

Sonuç

To reassemble your device, follow these instructions in reverse order.

44 farklı kişi bu kılavuzu tamamladı.

Andrew Optimus Goldheart

Üyelik tarihi: 10/17/09

502.275 İtibar

407 adet Kılavuz yazıldı

Ekip

iFixit iFixit üyesi

Staff

136 Üyeler

16.559 adet Kılavuz yazıldı

19 Yorum

hey! is it possible to upgrade the GPU or is this just for replacing exactly the same part?

Ben - Yanıt

I am guessing you can upgrade them with OEM parts, but where would we find them?

Fernando Bernardino -

Yes. I recently swapped out D300 pairs for D700 pairs without a blip. I did an NVRAM reset afterwards just to be safe.

Technology Research -

I have the D300s, and would like to upgrade to the D500s or D700s. Where might I find the replacement graphics cards? Also, any recommendations on service providers who would do this procedure?

Chris M Balz - Yanıt

I'd love to know this as well. The only reason I picked up the ,ad pro was the potential for upgrades. As it turns out D300s are crap. I can't even run boot camp properly.

jerimiahy -

Yorum Ekle

İstatistikleri Görüntüle:

Son 24 Saat: 29

Son 7 gün: 179

Son 30 gün: 843

Her zaman: 99,134