Giriş
Use this guide to replace a damaged heat sink or to reapply thermal paste.
Neye ihtiyacın var
-
Bu adımda kullanılan alet:P5 Pentalobe Screwdriver Retina MacBook Pro and Air$5.99
-
Remove the following ten screws:
-
Two 8 mm 5-point Pentalobe screws
-
Eight 2.5 mm 5-point Pentalobe screws
-
-
-
Use the flat end of a spudger to pry both short sides of the battery connector upward to disconnect it from its socket on the logic board.
-
Bend the battery cable slightly away from the logic board so the connector will not accidentally contact its socket.
-
-
-
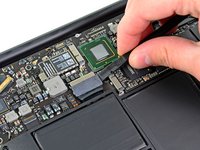
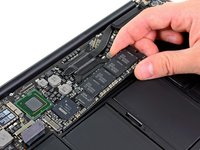
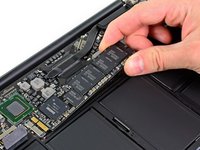
Remove the single 2.9 mm T5 Torx screw securing the SSD to the logic board.
-
-
-
-
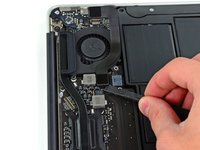
Use the flat end of a spudger to pry the I/O board cable up from its socket on the I/O board.
-
-
-
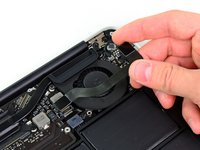
Use the tip of a spudger to carefully flip up the retaining flap on the fan cable ZIF socket.
-
-
-
Remove the four 2.5 mm T5 Torx screws securing the heat sink to the logic board.
-


To reassemble your device, follow these instructions in reverse order.
To reassemble your device, follow these instructions in reverse order.
İptal et: Bu kılavuzu tamamlamadım.
19 farklı kişi bu kılavuzu tamamladı.

2Kılavuz Yorumları
Great guide. I repasted my Early 2011 15" MBP with the 2.2 QC i7 and my peak load temp is now 87C (it was well over 100, and I was having it shutdown on me sometimes before). Having done this now, I must say I consider this system much more difficult to work inside than HP, Dell, or Lenovo/IBM laptops (having worked on all the others before). If you're patient, take it slow, and are careful though, everything works out. Here's some pictures of parts of the process:
Macbook Air 2011...a few things are different on my computer than this guide, but everything is straightforward enough. Here are the differences I found.
1. battery plug is slightly different, but same thing you just pull it out with the plastic tab.
2. Need to unplug the wire underneath the fan to reveal the 3rd screw...it isn't where it's shown on the picture here, that's a screw for the logic board not the fan.
3. There is a 5th screw holding the heatsink in place on the right end under another wire that connects to the hinge & screen. Had to move the wire to the side and remove that extra screw to get the heatsink off.
My Macbook Air 2011 shut off and starting making 3 beeps on attempting startup. Read this 3 beeps on start up and thought it may be the heat sink. Haven't applied new paste yet, but the paste is definitely hardened after following this guide. Plan to reapply and hopefully it works again!