Giriş
Screaming at your MacBook Air might not hurt its feelings, but it could go deaf. Use this guide to replace a blown-out microphone. This is a relatively easy process. Take your time and don't force anything.
Neye ihtiyacın var
-
Bu adımda kullanılan alet:P5 Pentalobe Screwdriver Retina MacBook Pro and Air$5.99
-
Remove the following ten screws:
-
Two 8 mm 5-point Pentalobe screws
-
Eight 2.5 mm 5-point Pentalobe screws
-
-
-
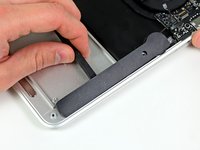
Use the flat end of a spudger to pry both short sides of the battery connector upward to disconnect it from its socket on the logic board.
-
Bend the battery cable slightly away from the logic board so the connector will not accidentally contact its socket.
-
-
-
-
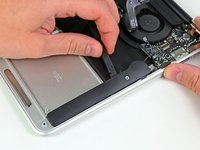
Lift the battery from its edge nearest the logic board and remove it from the upper case.
-
Charge it to 100%, and then keep charging it for at least 2 more hours. Next, unplug and use it normally to drain the battery. When you see the low battery warning, save your work, and keep your laptop on until it goes to sleep due to low battery. Wait at least 5 hours, then charge your laptop uninterrupted to 100%.
-
If you notice any unusual behavior or problems after installing your new battery, you may need to reset your MacBook's SMC.
-
-
-
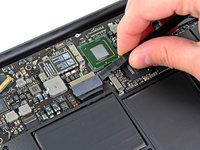
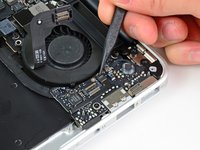
Use the flat end of a spudger to pry the I/O board cable connector up off its socket on the I/O board.
-
Bend the cable away from the I/O board.
-
-
-
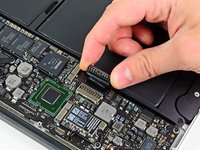
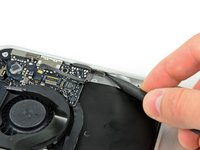
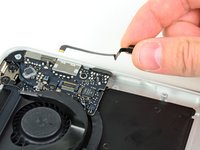
Use the tip of a spudger to flip up the retaining flap on the microphone ribbon cable ZIF socket.
-
Use the tip of a spudger to pull the microphone ribbon cable out of its socket.
-


To reassemble your device, follow these instructions in reverse order. Take note of microphone position before removal so you can position the replacement accurately in place.
To reassemble your device, follow these instructions in reverse order. Take note of microphone position before removal so you can position the replacement accurately in place.
İptal et: Bu kılavuzu tamamlamadım.
2 farklı kişi bu kılavuzu tamamladı.

2Kılavuz Yorumları
Very straightforward replacement.
Take special care when removing the microphone and speaker connectors from their respective sockets. Just be gentle and methodical.
Ensure you press down firmly, but not hard, after microphone replacement when reconnecting the battery connector to the motherboard.
When re-attaching the speaker connector, also pay special attention to pushing down firmly on this to ensure a connection is made. Again, not too hard, but it is easy to push down enough to think it is connected but it can easily not be.