
MacBook Pro 15" Unibody Late 2011 Optical Drive Replacement

Giriş
1. adıma gitMacBook Pro not reading CDs? Use this guide to replace a burned-out optical drive.
Neye ihtiyacın var


-
-
Remove the following ten screws securing the lower case to the upper case:
-
Three 13.5 mm (14.1 mm) Phillips screws.
-
Seven 3 mm Phillips screws.
-
-
-
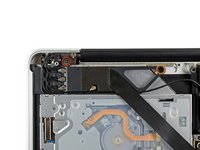
Use the edge of a spudger to pry the battery connector upwards from its socket on the logic board.
-
-
-
Disconnect the camera cable connector from its socket on the logic board.
-
-
-
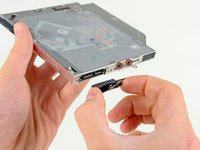
Pull the optical drive cable out of the optical drive.
-
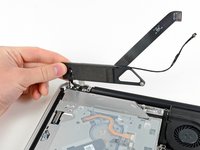
Remove the two black Phillips #0 screws securing the small metal mounting bracket. Transfer this bracket to your new optical drive or hard drive enclosure.
-


To reassemble your device, follow these instructions in reverse order.
To reassemble your device, follow these instructions in reverse order.
İptal et: Bu kılavuzu tamamlamadım.
29 farklı kişi bu kılavuzu tamamladı.

5 Yorum
In Step 8, be careful when putting back the airport black plate that there is a little lip under the thumb (in the photo) and needs to be inserted underneath the outside black frame before rescrewing the 2 screws.
Secondly, I used this guide to add the data doubler caddy from OWC. Be sure to unscrew the philips screws and the little metal plate on the outside of the optical drive and attach it to the caddy. It will allow you to attach the 3rd torx6 screw of the caddy to the frame closest to the center.
Kudos to everyone who warned about the screws in step #8. They’re not nice screws and they do need to replaced with a reasonable amount of torque in order to secure the BlueTooth/WiFi assembly. You have to remove those screws in order to remove one of the 3 Torx screws securing the drive mechanism.
I personally had little trouble with the screws in step #8 but only because I was forewarned and took extra care to ensure that I was using the exact cross head driver for the screws. It helps to have the right tools.
Now… if anyone has any tips on how to get those fiddly Torx screws back into their positions I’d be even more grateful. I’ve managed it but find that screws like that are a real pain to get back into place. The heads are not at all deep, they’ve picked up a bit of magnetism and prefer to jump off the driver and stick to any other metal in the machine. The longest part of the job is getting those three screws properly seated (not cross threaded) and screwed down to the point when the drive is secure.
Adding a tip that helps for properly seat those pesky little screws that helps for me is you must first be certain you have them perpendicular and with a very delicate touch (with just the weight of the driver) rotate counter-clockwise until feel the tiniest little click, feeling that click will indicate you lined up the threads….then with no pressure applied began clockwise rotation. Repeat as necessary.