Bu sürüm, hatalı düzenlemeler içerebilir. En son doğrulanmış bellek kopyası dönün.
Neye ihtiyacın var
-
Bu adım çevrilmemiş. Çevrilmesine yardım edin
-
Remove the following ten screws securing the lower case to the upper case:
-
Seven 3 mm Phillips screws.
-
Three 13.5 mm Phillips screws.
-
-
Bu adım çevrilmemiş. Çevrilmesine yardım edin
-
Using both hands, lift the lower case near the vent to pop it off two clips securing it to the upper case.
-
Remove the lower case and set it aside.
-
-
Bu adım çevrilmemiş. Çevrilmesine yardım edin
-
Remove the two 5-Point Pentalobe screws along the top edge of the battery.
-
-
Bu adım çevrilmemiş. Çevrilmesine yardım edin
-
Use the tip of a spudger to bend back the finger of the "Warning: Do not remove the battery" sticker while you remove third five-point Pentalobe screw hidden underneath.
-
-
Bu adım çevrilmemiş. Çevrilmesine yardım edin
-
Lift the battery by its plastic pull tab and slide it away from the long edge of the upper case.
-
-
Bu adım çevrilmemiş. Çevrilmesine yardım edin
-
Tilt the battery back enough to access the battery cable connector.
-
Pull the battery cable connector away from its socket on the logic board and remove the battery from the upper case.
-
-
Bu adım çevrilmemiş. Çevrilmesine yardım edin
-
Use the tip of a spudger to rotate the plastic retainer away from the camera cable connector.
-
-
Bu adım çevrilmemiş. Çevrilmesine yardım edin
-
Pull the camera cable away from its socket on the logic board.
-
-
Bu adım çevrilmemiş. Çevrilmesine yardım edin
-
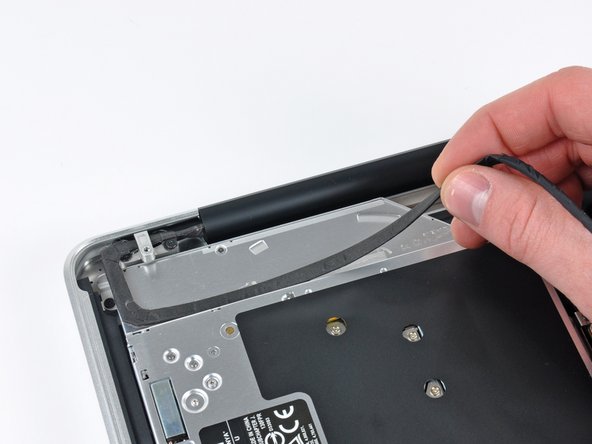
Peel the camera cable off the adhesive securing it to the body of the optical drive.
-
-
Bu adım çevrilmemiş. Çevrilmesine yardım edin
-
Disconnect the Bluetooth cable by pulling the male end straight away from its socket.
-
Use the flat end of a spudger to pry the Bluetooth antenna cable up from its socket on the board.
-
-
-
Bu adım çevrilmemiş. Çevrilmesine yardım edin
-
Remove the two 8 mm Phillips screws securing the Bluetooth/camera cable retainer to the upper case.
-
Lift the Bluetooth board/cable retainer assembly out of the upper case.
-
-
Bu adım çevrilmemiş. Çevrilmesine yardım edin
-
Remove the two 8 mm Phillips screws securing the camera cable retainer to the upper case.
-
Lift the camera cable retainer out of the upper case.
-
-
Bu adım çevrilmemiş. Çevrilmesine yardım edin
-
Grab the plastic pull tab secured to the display data cable lock and rotate it toward the DC-In side of the computer.
-
-
Bu adım çevrilmemiş. Çevrilmesine yardım edin
-
Remove the single 7 mm Phillips screw securing the display data cable retainer to the upper case.
-
Remove the display data cable retainer from the upper case.
-
-
Bu adım çevrilmemiş. Çevrilmesine yardım edin
-
Pull the display data cable connector straight away from its socket.
-
-
Bu adım çevrilmemiş. Çevrilmesine yardım edin
-
Remove the outer two T6 Torx screws securing both display hinges to the upper case (four screws total).
-
-
Bu adım çevrilmemiş. Çevrilmesine yardım edin
-
Open your MacBook Pro so the display is perpendicular to the upper case.
-
Place your opened MacBook Pro on a table as pictured.
-
While holding the display and upper case together with your left hand, remove the remaining T6 Torx screw from the lower display bracket.
-
-
Bu adım çevrilmemiş. Çevrilmesine yardım edin
-
Remove the last remaining T6 Torx screw securing the display to the upper case.
-
-
Bu adım çevrilmemiş. Çevrilmesine yardım edin
-
Grab the upper case with your right hand and rotate it slightly toward the top of the display so the upper display bracket clears the edge of the upper case.
-
Rotate the display slightly away from the upper case.
-
Lift the display up and away from the upper case, minding any brackets or cables that may get caught.
-
-
Bu adım çevrilmemiş. Çevrilmesine yardım edin
-
Before starting, be sure to clean the display glass with lint-free cloth moistened with a mild solution; it will make the suction cup adhere better, and will make checking for dust on reassembly easier
-
With the heat gun set to low, start by heating the outer black border near the upper right corner of the glass panel.
-
-
Bu adım çevrilmemiş. Çevrilmesine yardım edin
-
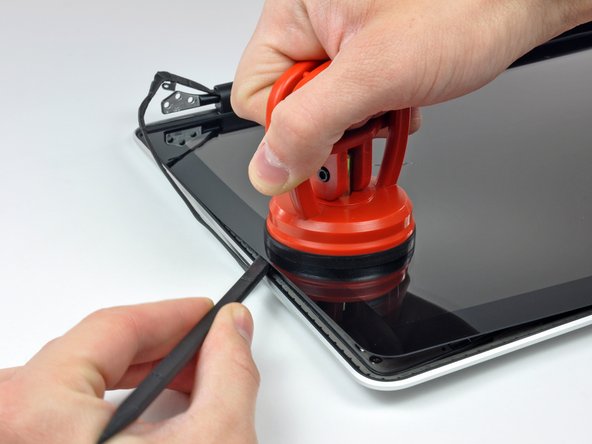
With the panel sufficiently heated, fasten a heavy-duty suction cup near the upper right corner of the display glass.
-
Slowly and gently pull the corner of the display glass up off the display assembly.
-
-
Bu adım çevrilmemiş. Çevrilmesine yardım edin
-
Gently lift the corner of the display glass enough to insert a spudger between it and the display assembly.
-
Use the flat end of a spudger to gently pry up the adhesive securing the front glass to the display.
-
Pry up the glass panel a few inches away from the upper right corner along the top and right edges of the display.
-
-
Bu adım çevrilmemiş. Çevrilmesine yardım edin
-
Use a heat gun to soften the adhesive under the black strip along the right side of the front glass panel.
-
Attach a suction cup along the right side of the front glass panel.
-
Pull up on the glass panel while you use the flat end of a spudger to separate it from the rest of the display assembly.
-
Continue working along the right edge of the front display glass until it is separated from the display.
-
-
Bu adım çevrilmemiş. Çevrilmesine yardım edin
-
Use your heat gun to soften the adhesive under the black strip along the top edge of the glass display panel.
-
Attach a suction cup near the top edge of the glass display panel and use it to pull the glass panel up off the display.
-
Work along the top edge of the glass panel, carefully using the flat end of a spudger to separate the adhesive if necessary.
-
-
Bu adım çevrilmemiş. Çevrilmesine yardım edin
-
Use a heat gun to soften the adhesive under the black strip near the upper left corner of the glass display panel.
-
Attach a suction cup near the upper left corner of the glass display panel.
-
Pull up on the suction cup and use the flat end of a spudger to carefully pry the glass display panel out of the display assembly.
-
-
Bu adım çevrilmemiş. Çevrilmesine yardım edin
-
Use a heat gun to soften the adhesive under the black strip along the left side of the front glass panel.
-
Attach a suction cup along the left side of the front glass panel.
-
Pull up on the glass panel while you use the flat end of a spudger to separate it from the rest of the display assembly.
-
Continue working along the left edge of the front display glass until it is separated from the display.
-
-
Bu adım çevrilmemiş. Çevrilmesine yardım edin
-
Now that the top, left, and right edges of the glass are free from the display, slowly lift the top edge of the glass panel and gently rotate it out of the display.
-
-
Bu adım çevrilmemiş. Çevrilmesine yardım edin
-
Insert the edge of a plastic opening tool between the display glass and the camera bracket, and run it around the camera bracket to separate it from the display glass.
-
-
Bu adım çevrilmemiş. Çevrilmesine yardım edin
-
To reconnect the cable, first use the tip of a spudger to remove the piece of foam tape over the camera cable ZIF socket.
-
Use the tip of a spudger to flip up the ZIF cable retainer on the camera cable socket.
-
Insert the camera cable into its socket on the camera board and use the tip of a spudger to snap down the ZIF cable retainer, locking the cable in place.
-


İptal et: Bu kılavuzu tamamlamadım.
11 farklı kişi bu kılavuzu tamamladı.

3 Yorum
I just finished doing mine. Removing the whole display panel is massive overkill, it is very easy to replace this glass with the panel mounted on the computer. I think that the whole disassembly process exposes you to far more risk of damaging your computer than the mild inconvenience of having the display panel still attached. The most important thing is to make sure the surfaces are as clean as possible, i have a tiny little fiber that got caught between and I'm cursing myself!
I have followed all the instructions by the book, but now when the computer turns on the screen stays off. I have tried an external display assuming the LCD panel went bad, but it won't work either. Any ideas?
Thanks!